Ubuntu Linux Mining
17/10/2023
You can use Ubuntu Linux for mining, similar to other operating systems, but there might be more convenient options. If you build up a comprehensive mining rig, we advise using specialized mining operating systems like RaveOS or HiveOS.
RaveOS and HiveOS are essentially Linux systems, but they come pre-configured for mining purposes, including optimizations and convenient overclocking settings for graphic cards.
For a consistent and reliable mining experience on Linux, consider mining on Kryptex PPS+ Pool. The PPS+ payout system ensures steady payouts, regardless of the number of blocks found. This method maximizes the efficiency and reliability of your mining effort.
Mining on Linux: A Beginner's Guide
If you chose Ubuntu Linux as your main mining platform, here is a step-by-step guide to get started:
- Select Your Cryptocurrency: First, choose the cryptocurrency you want to mine and familiarize yourself with its specific algorithm. Options like NEXA, ETC, RVN, ERGO, etc. are available. Remember that the miner won't switch the coins itself; you must manually choose the coin and miner to work with.
- If you're interested in CPU mining, check out the article How to mine XMR Monero on Linux for guidance.
- Choose the Miner: There isn't a one-fits-all miner for all algorithms, coins, and GPUs (Nvidia, AMD, Intel ARC). You'll need to pick a miner that matches your specific algorithm and graphics card. You can find suitable miners on the miner.download website.
- Configure Your Miner: After downloading the miner, create a configuration file specifying mining parameters such as pool address, worker name, and wallet address. The miner.download website often provides pre-configured files; you only need to input your wallet address.
- Initiate Mining: Once the miner is ready, launch it by executing the appropriate command in the terminal. You can use a prepared .sh file or launch it directly from the terminal. This article will explore various launching methods.
- Monitor Your Mining Activity: If you're mining to your cryptocurrency wallet, all your mining stats will be stored on the Kryptex Pool. Alternatively, if you are mining to your Kryptex email for Bitcoin payments, access your personal Kryptex account to keep track of your earnings and progress.
Choosing the Cryptocurrency for Linux Mining
Before you dive into the mining world, the first important decision is selecting the cryptocurrency you wish to mine. To assist in this choice, consult the The List of the Best GPUs for Mining.
If you already have a graphics card, the table provides insights into the most profitable coins to mine with your GPU. For those who want to purchase new video cards, the table is a helpful resource for making an informed decision.
We strongly recommend choosing modern graphics cards with 8 GB or more memory!
Additionally, consider your payment preferences:
- You will need a personal crypto wallet if you prefer receiving the specific coin you mine.
Register a crypto wallet for your chosen coin. - If you would rather receive Bitcoin earnings, you can register an account with Kryptex.
Learn how to mine directly into your personal Kryptex account in Bitcoin.
Choosing a Miner for Linux
To start mining on Linux, you must download a suitable miner from the miner.download website.
If you are not sure about which miner to select, we recommend the following options based on your graphics card type:
For AMD Cards:
For Nvidia Cards:
For Intel ARC Cards:
Configuring a Miner for Linux
While lolminer is a universal choice suitable for various graphics card manufacturers, we'll guide you through the setup using its example. However, choose your preferred miner; the setup process will be similar.
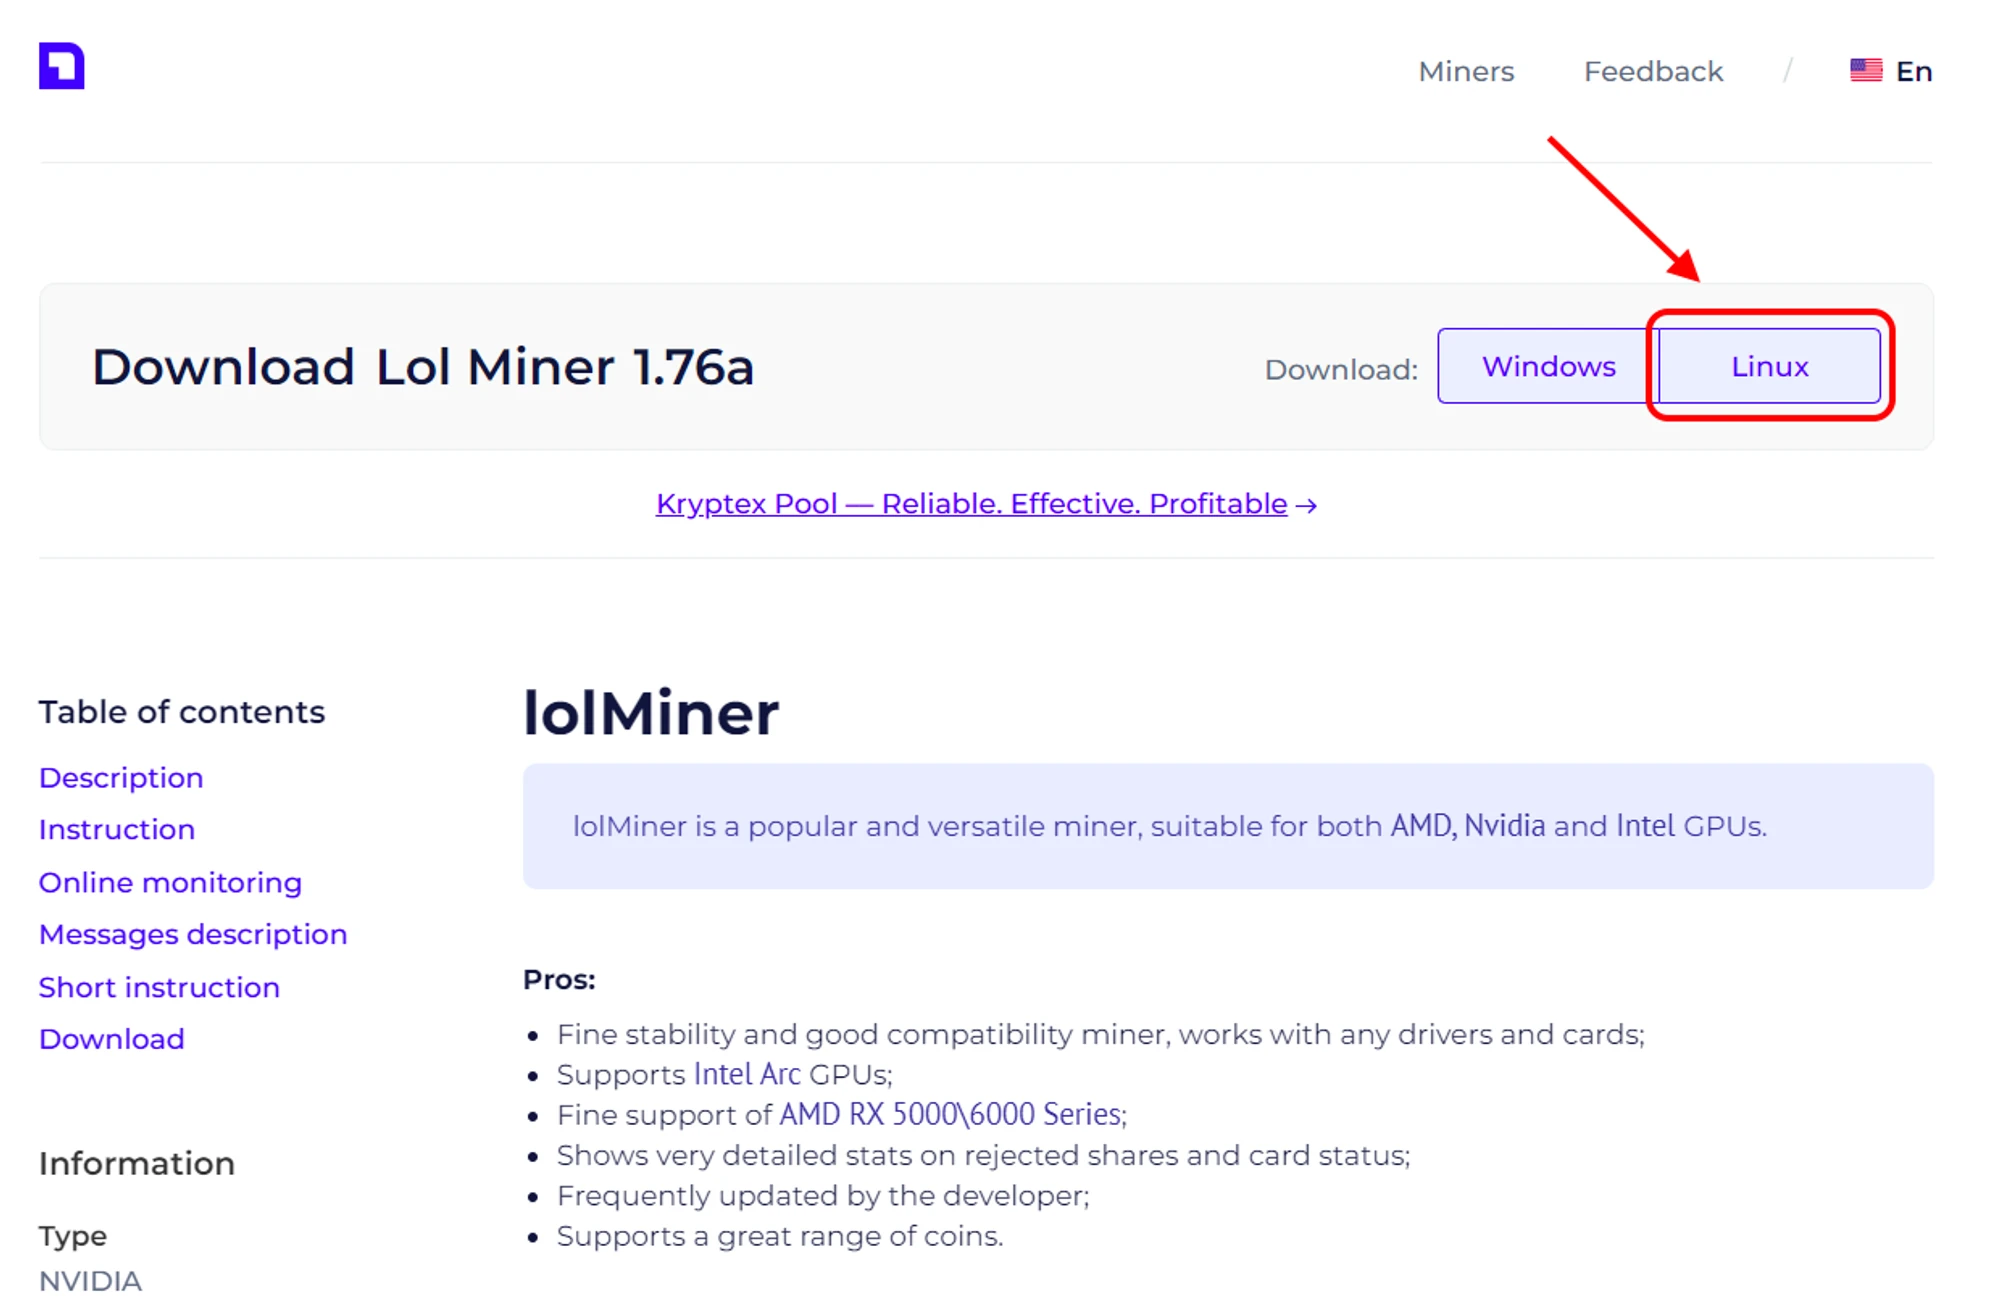
Go to the miner.download website and choose your miner, in our case, lolminer. Download the Linux version.
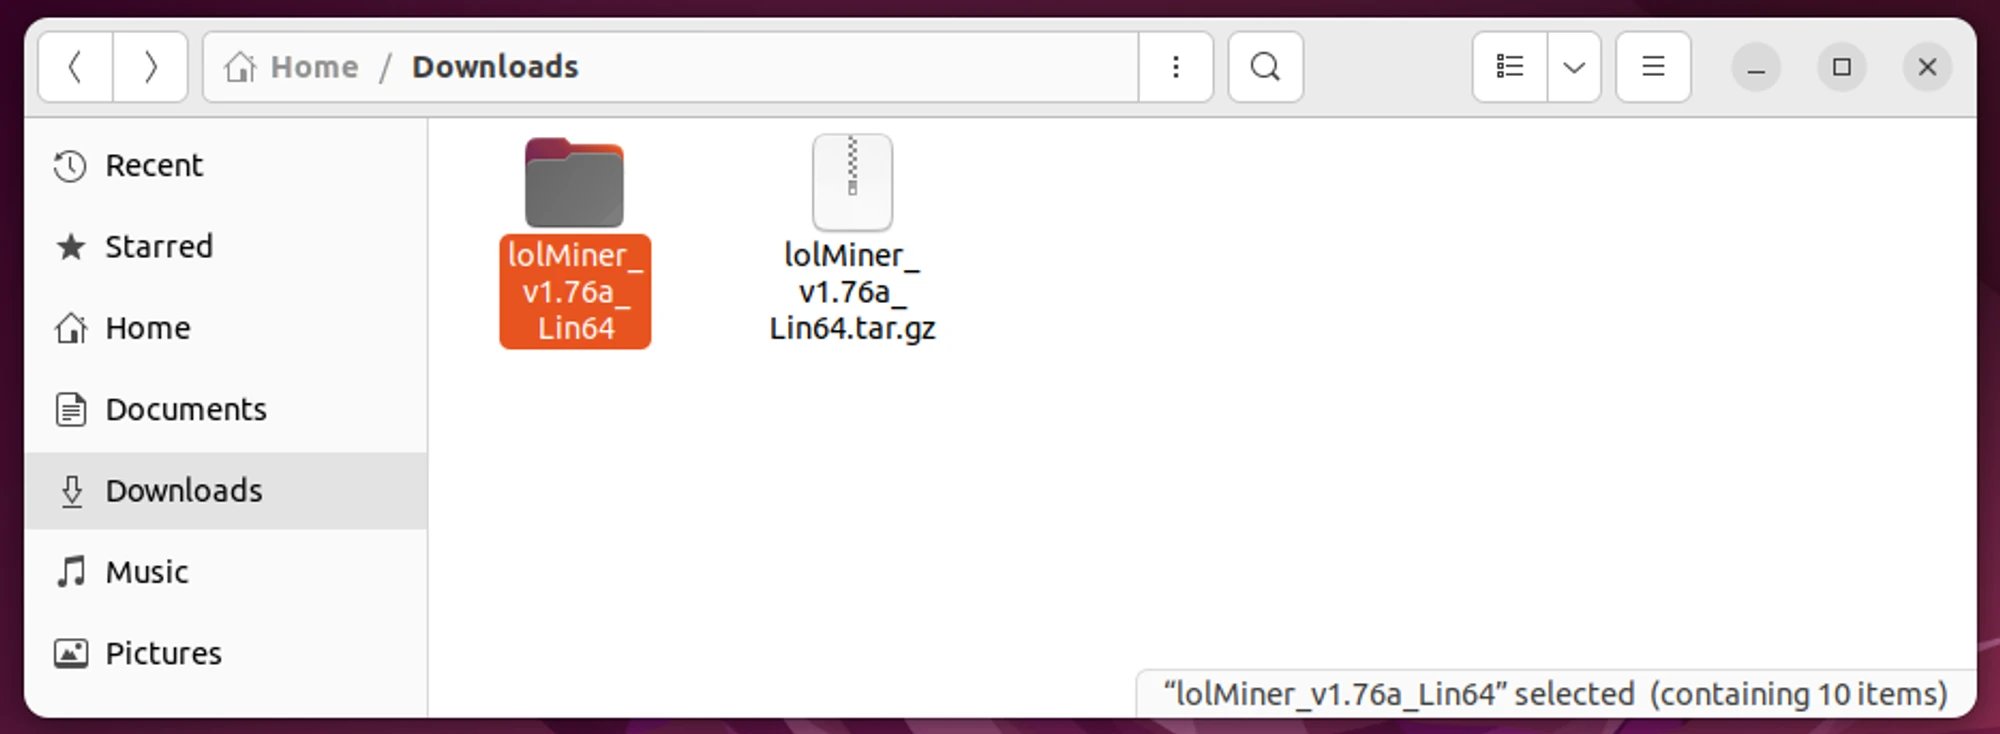
Extract the miner's archive to a convenient location for you.
Access the miner's folder, where you'll find the miner executable, a
.cfgfile (for configuring the miner), areadmefile detailing miner commands, and.shlaunch scripts for quickly initiating specific algorithms. These presets are already configured to work with the Kryptex PPS+ Pool - all you need to do is input your wallet address!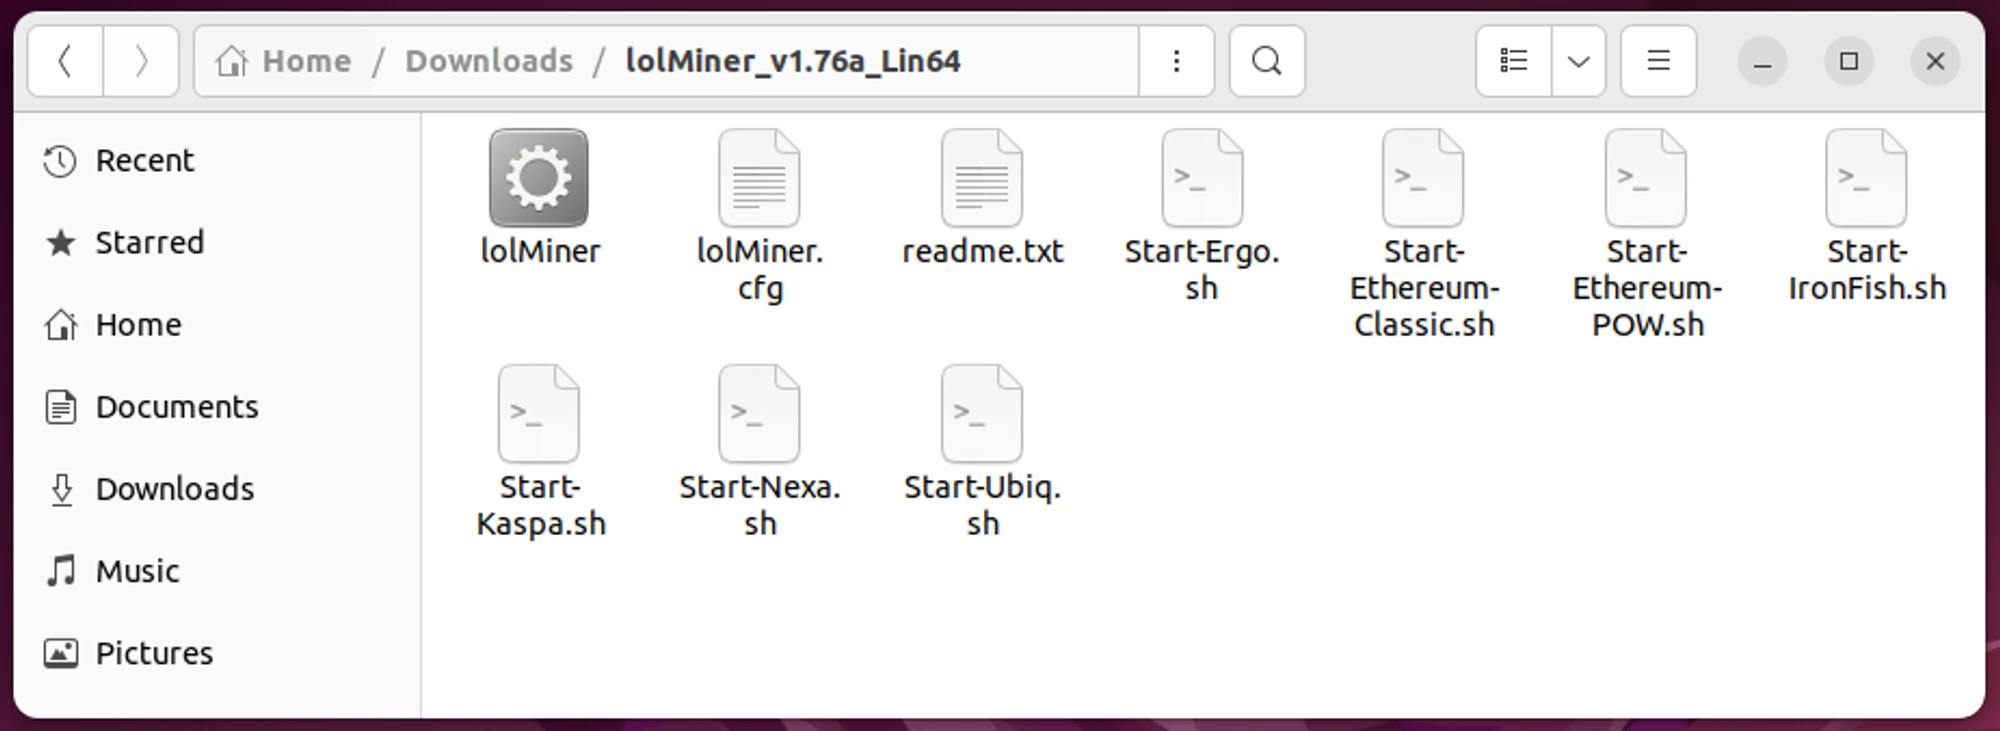
Select the cryptocurrency you want to mine; for instance, let's say you're interested in mining NEXA. Open the Start-Nexa.sh file.
Replace the wallet address after
--userwith your wallet address or your Kryptex Email. Add the desired worker name separated by a slash / after the wallet address. If you have additional miner parameters to specify, you can include them. Ensure that the worker name uses only Latin letters and numbers without spaces. Save your changes and close the file. Avoid adding extra spaces, indentation, or symbols, as the miner may interpret them as errors.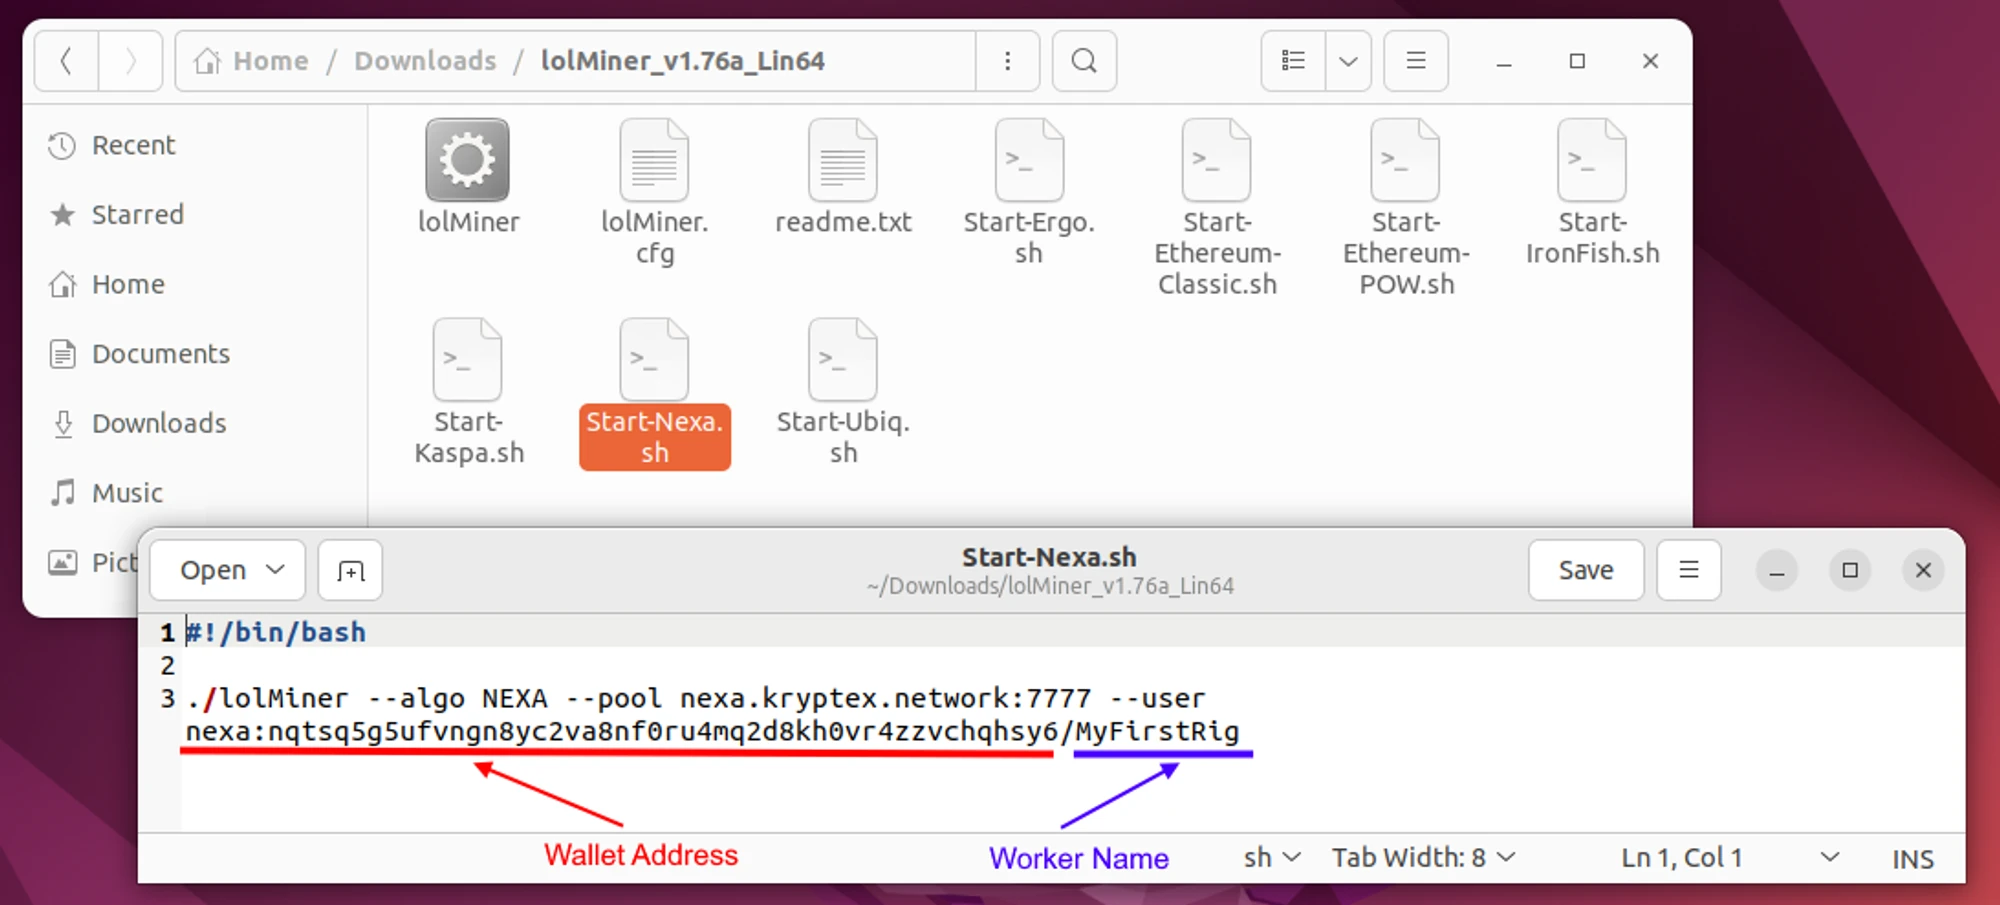
Running a Miner on Linux
Open a terminal window within your miner's directory.
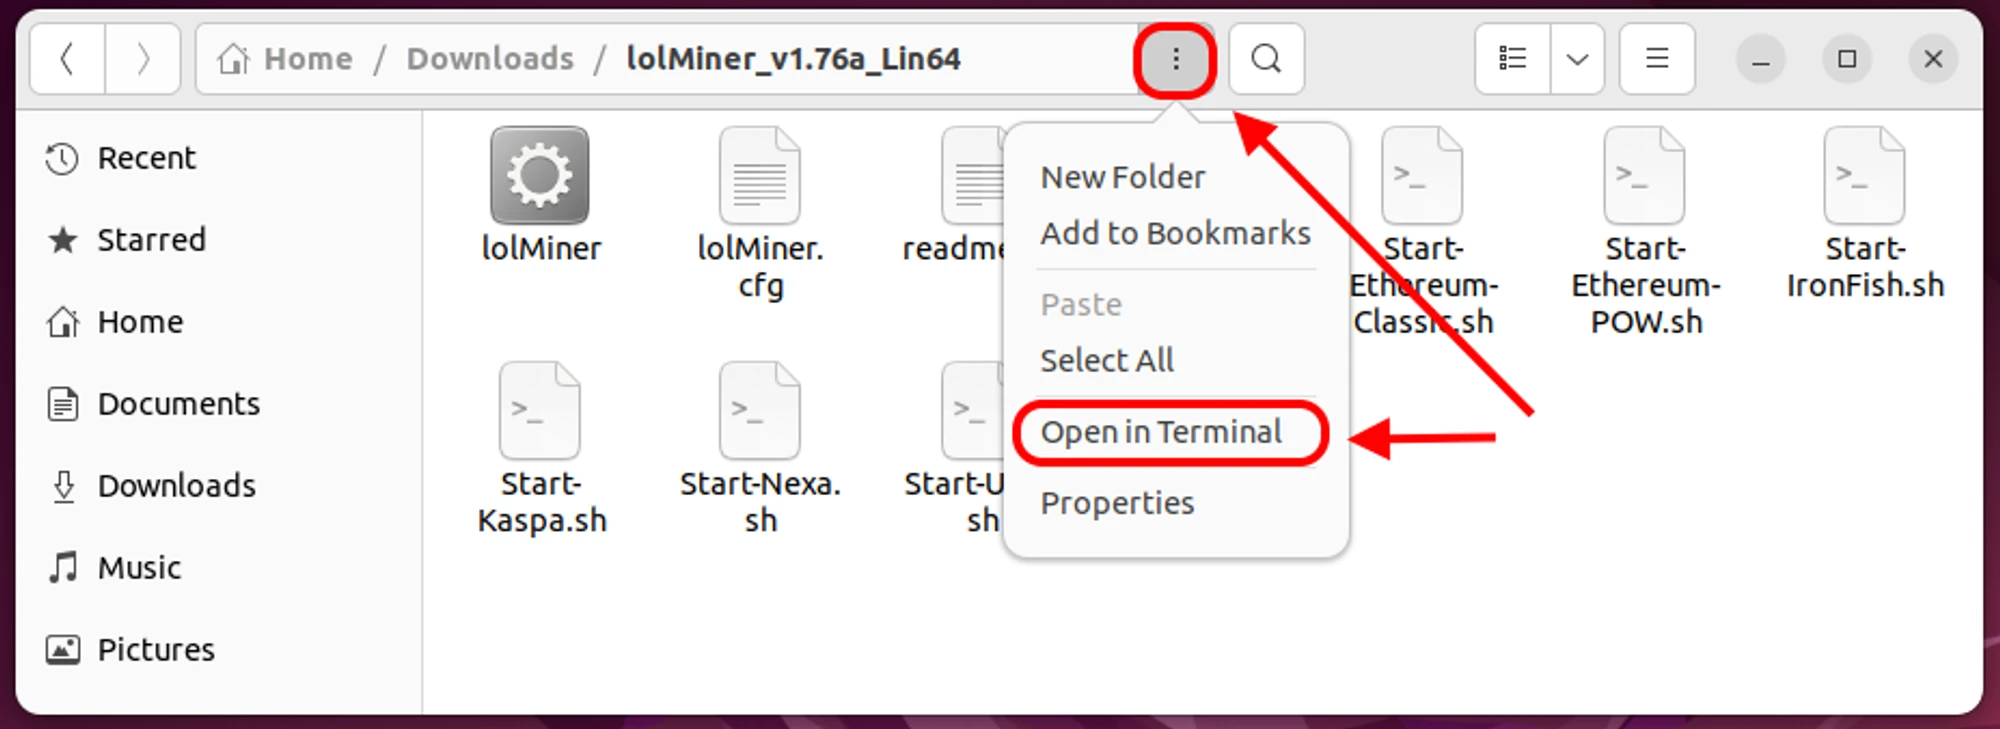
Use the
suorsudo sucommand to acquire administrative privileges and enter your account password.Allow execution of your chosen
.shscript by entering the commandchmod +x Start-Nexa.sh.Initiate the miner using the selected script with the command
./Start-Nexa.sh.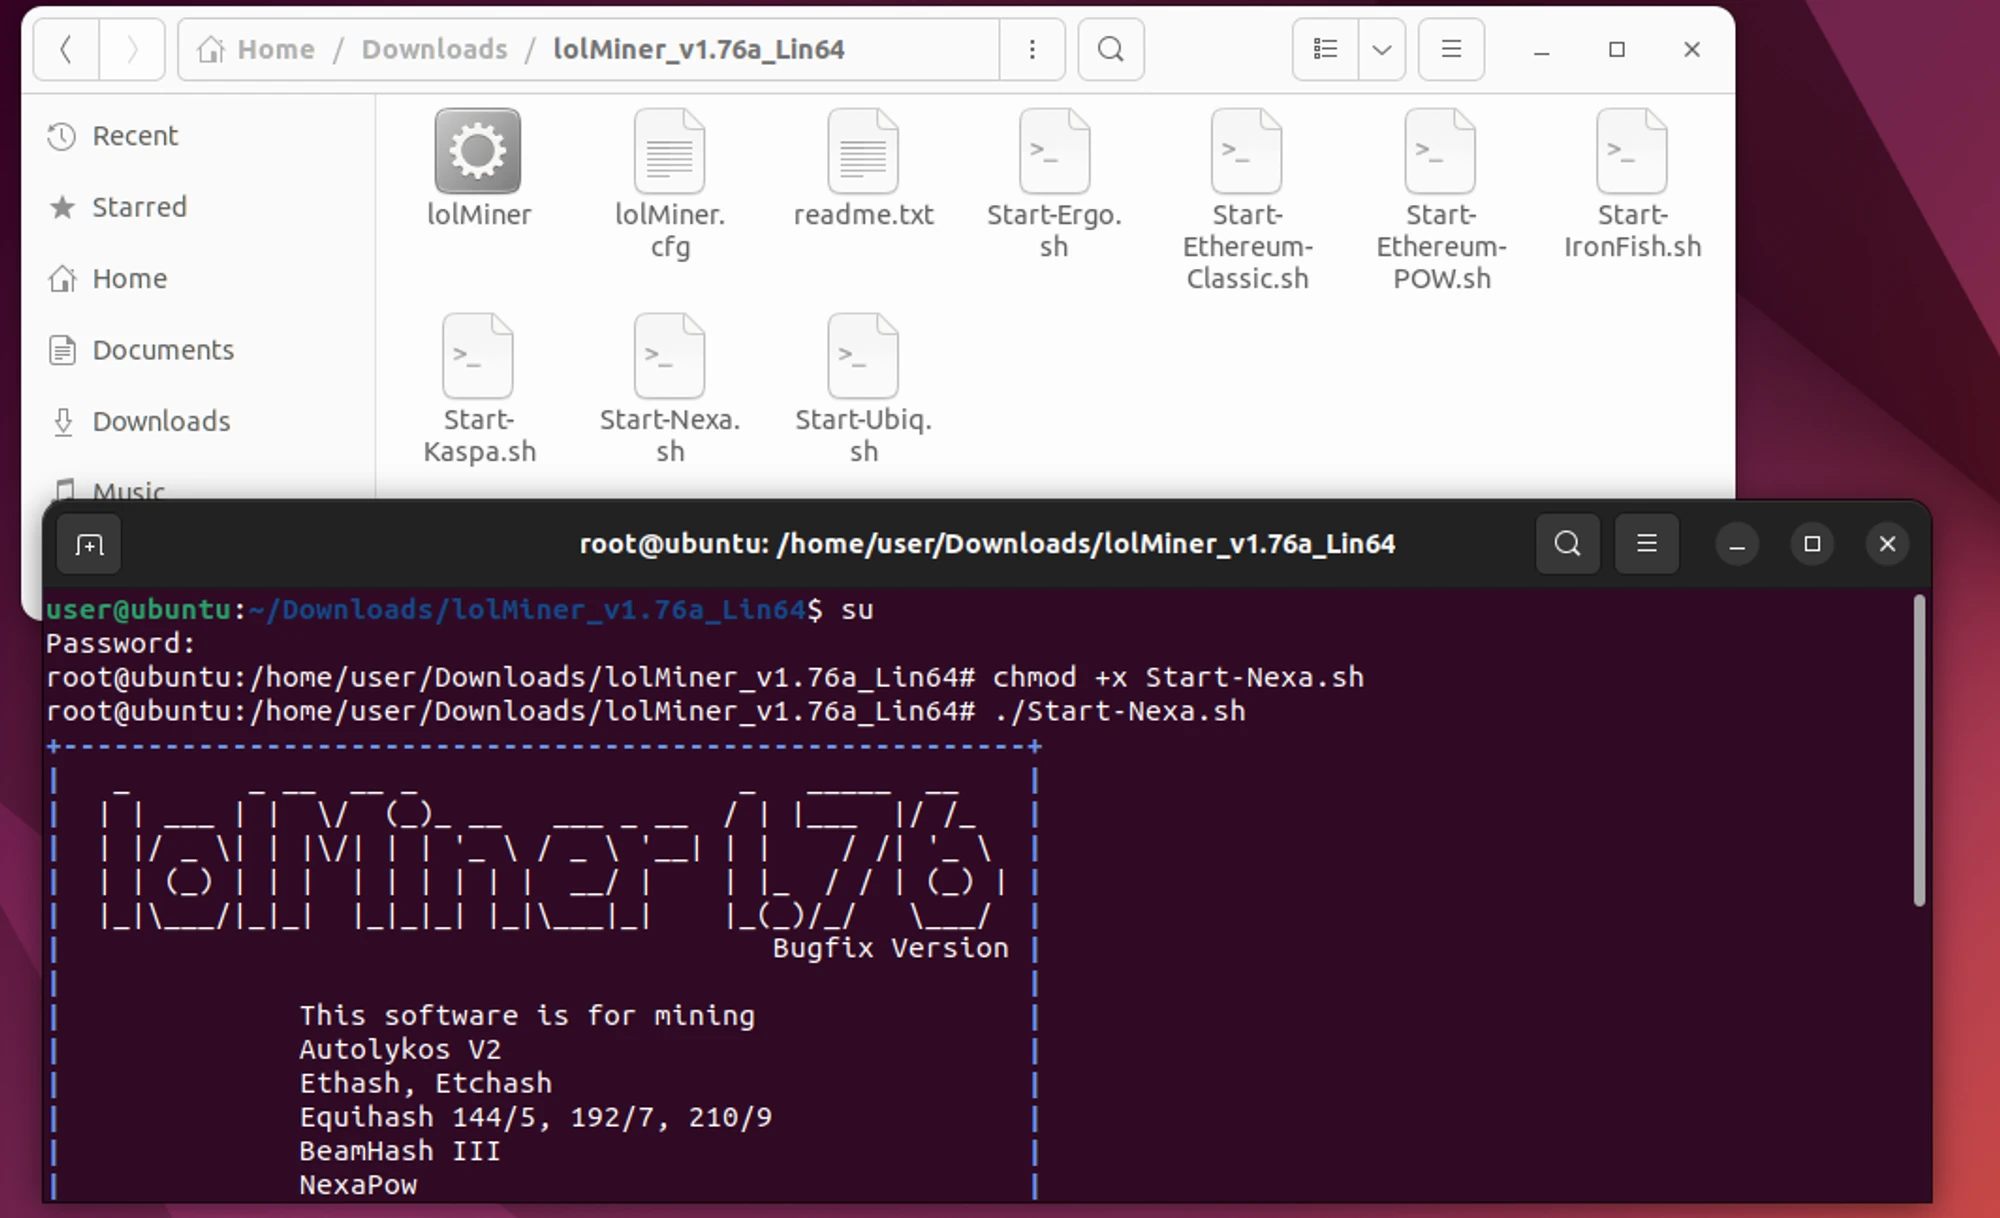
The miner will begin mining according to the configurations specified in your
Start-Nexa.shscript. To quit mining, close the terminal window.
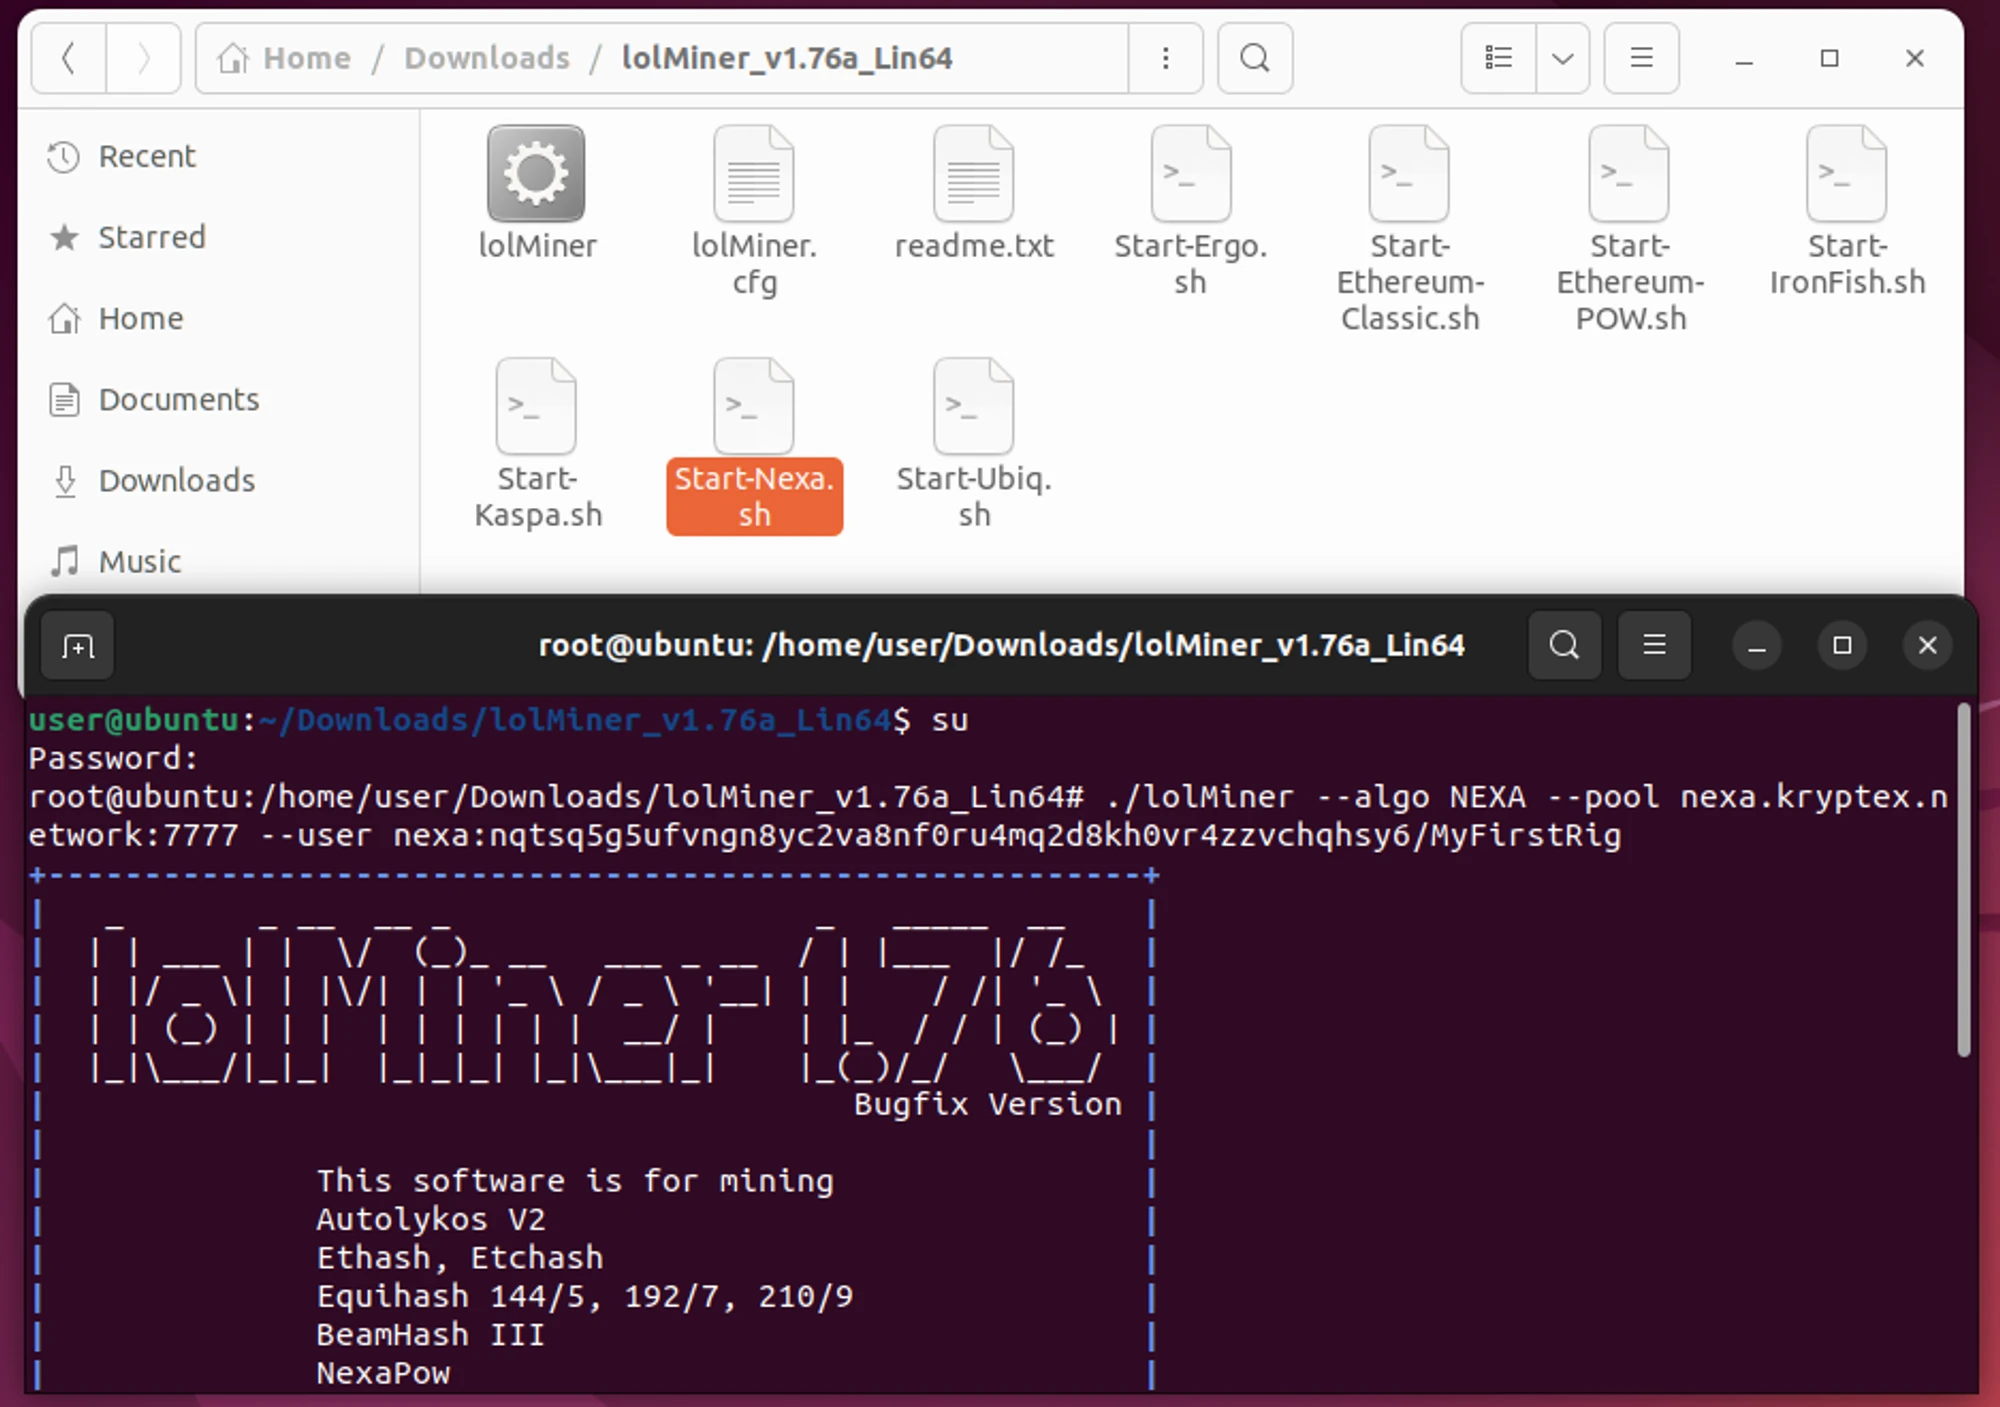
Running the Miner from the Linux Terminal
Mining can be initiated directly from the terminal without the need for a preconfigured script:
Open the terminal from the folder containing the miner.
Use the
suorsudo sucommand to gain administrative privileges, and enter your account password.Enter the following command to start the miner:
./lolMiner --algo NEXA --pool nexa.kryptex.network:7026 --user WALLET_ADDRESS/RIG_NAME
Where:NEXArepresents the algorithm you are mining.nexa.kryptex.network:7026indicates the pool address and port for mining.WALLET_ADDRESSshould be replaced with your NEXA wallet address or your Email in Kryptex.RIG_NAMEshould be replaced with the worker name you want to display on the pool.
For example:./lolMiner --algo NEXA --pool nexa.kryptex.network:7026 --user nexa:nqtsq5g5ufvngn8yc2va8nf0ru4mq2d8kh0vr4zzvchqhsy6/MyFirstRigThe miner will start mining based on the settings specified in the terminal command. To quit mining, simply close the terminal window.
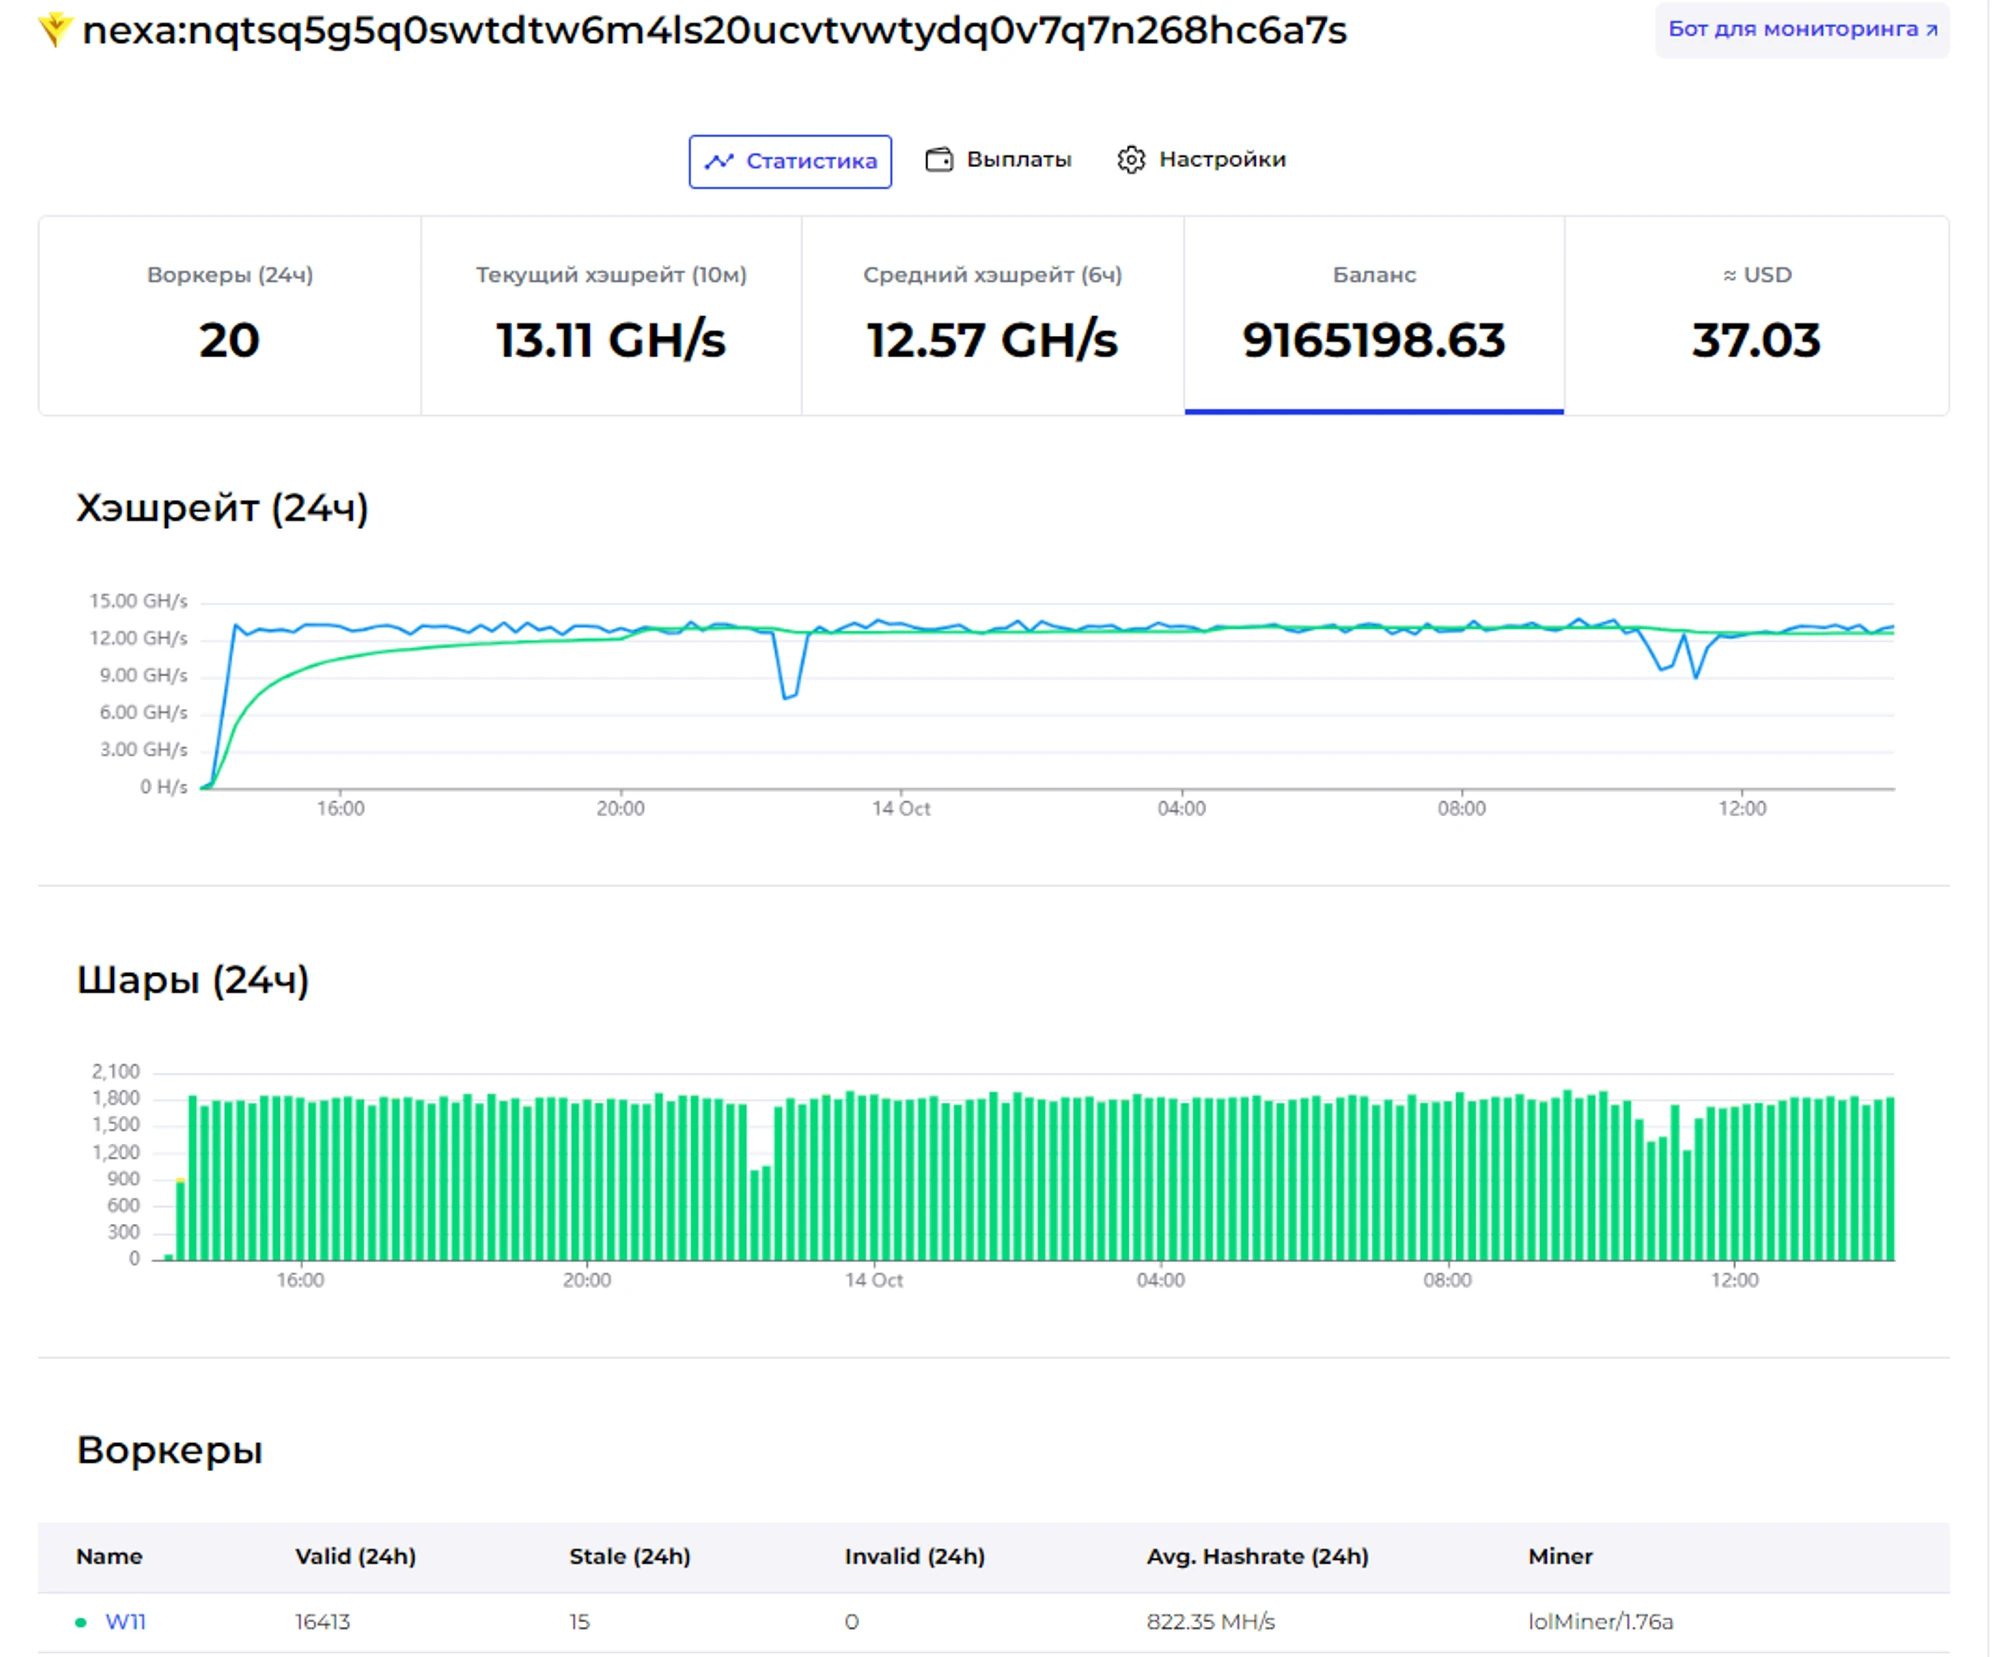
Track Your Mining Progress
Once mining runs successfully, keep tracking your GPU status in the terminal window. You will find details such as the hashrate, the number of shares sent, the graphics card's temperature, and other valuable information there.
If you're mining to your crypto wallet address, visit the Kryptex Pool page at https://pool.kryptex.com/. On the page, use the search field at the top. Enter the crypto wallet address you specified in the miner and press Enter. A statistics page related to your wallet will open.
Additionally, you have the option to utilize our exclusive Telegram monitoring bot.
If you mining using your Kryptex Email, open your Kryptex personal account.
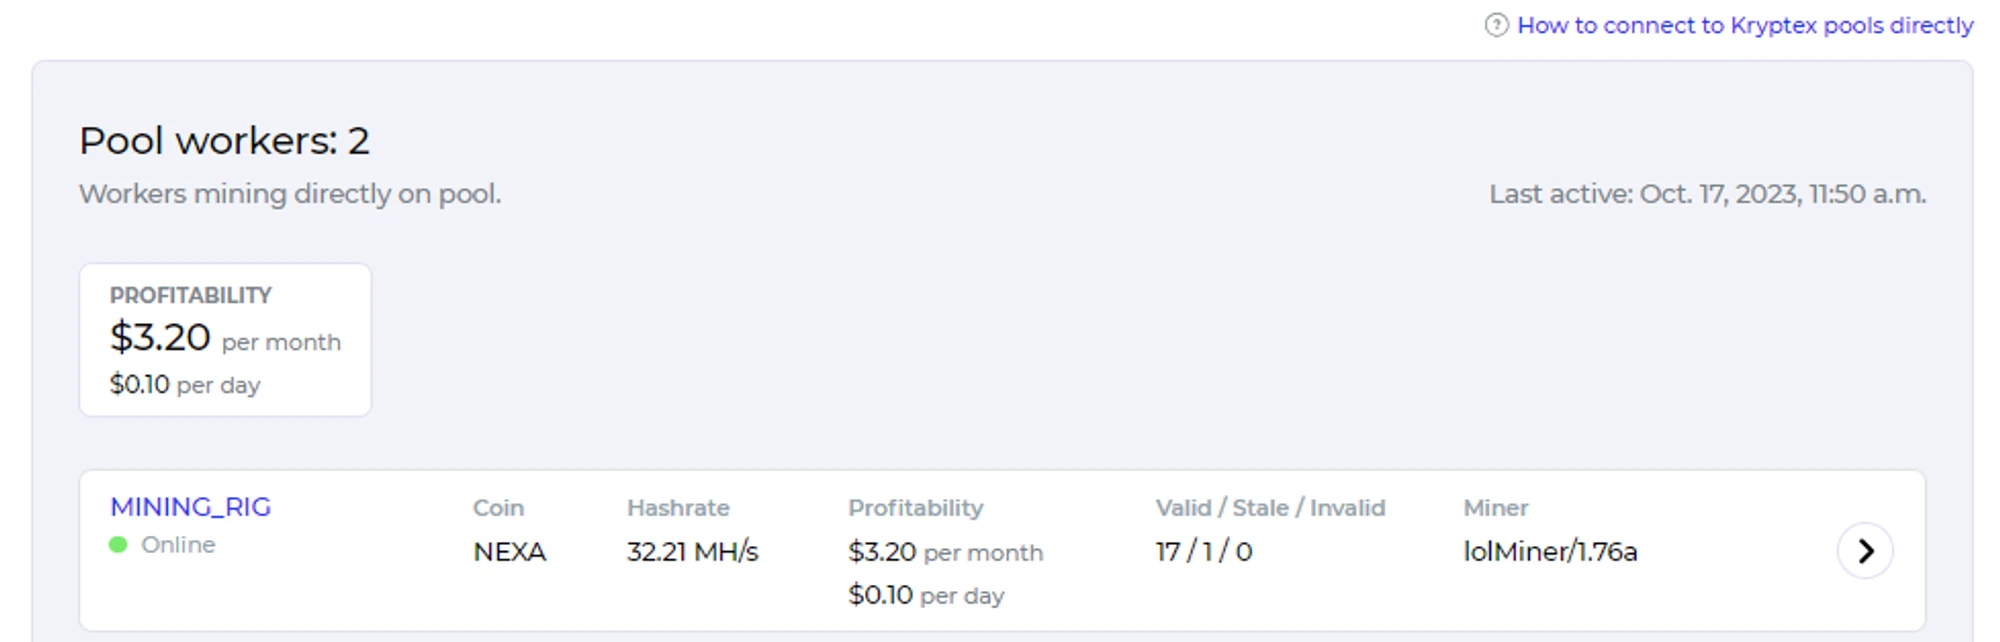
If you've followed all the steps correctly, the statistics will show up on the pool or in your account (depending on your chosen method) about 10-15 minutes after mining begins.
🚑Need help?
Something does not work?
Our friendly community and experienced support will be happy to help you!
Contact us throw the website support, in Telegram, or ask for help on our Discord.