How to create IRON FISH wallet
30/03/2026
The IRON FISH coin has recently appeared, but has already established itself as an excellent option for dual and triple mining. Thanks to the energy-efficient Blake3 algorithm, it allows for mining without consuming a lot of electricity.
IRON FISH can be exchanged on one of these exchanges: KuCoin, Gate.io, CoinEx, MEXC.
We will discuss three methods to create a IRON FISH coin wallet:
- Crypto wallet at your PC —
node wallet. - Mobile app FoxWallet.
- Exchange.
We do not recommend mining on exchange. If you choose mining on an exchange, you do so at your own risk. Not your keys — not your crypto!
How to Сreate a IRON FISH wallet on Your Computer
This method is convenient for professionals who prefer to control their keys and wallets, and store the wallet on their PC.
Some cons: The security of your wallet relies on the security of your computer and the safety of your keys. It is important to ensure that your PC is secure.
Managing a wallet on a PC requires care and precision, and accidental mistakes can have serious consequences. It is not recommended for inexperienced users or novice miners.
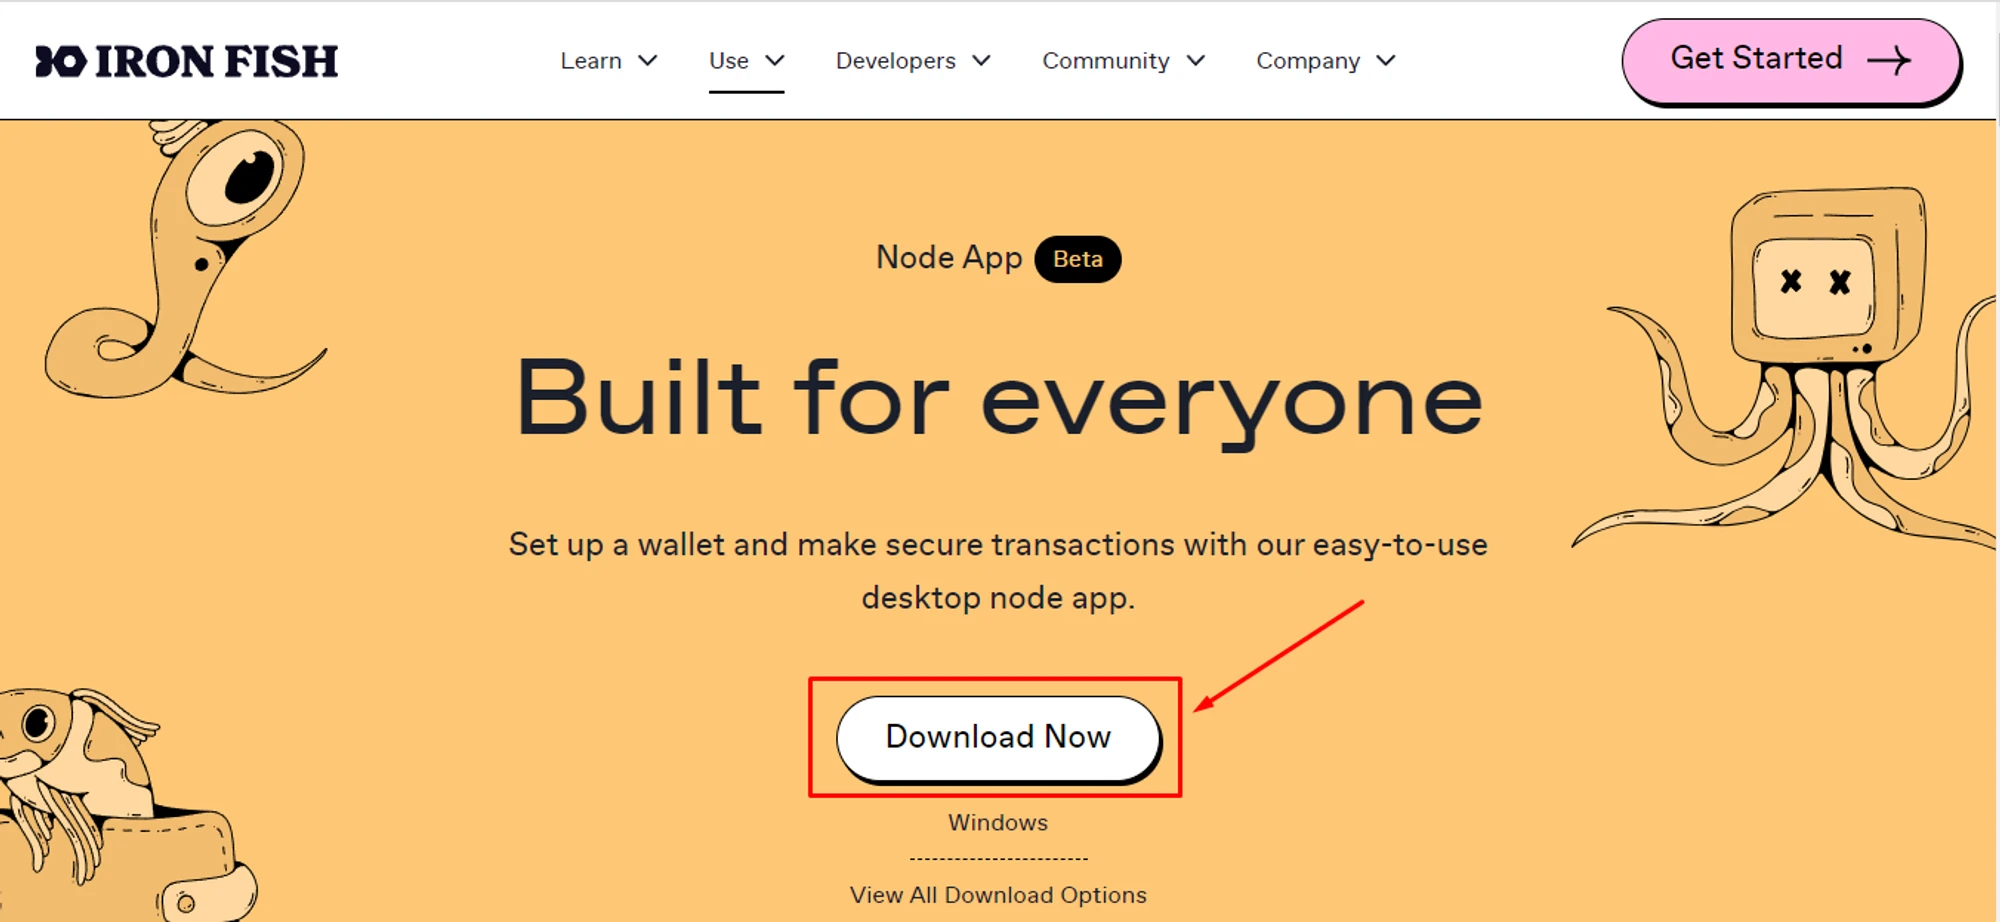
Download the wallet client for your operating system from the official Iron Fish developers website — https://ironfish.network/use/node-app
Install the client (in our case, for Windows OS);
Open the wallet app after installation is complete;
Click "Create Account" to create an account;
If you have previously used a node wallet, you can import your wallet into the
Node Appusing the Mnemonic Phrase, Encoded Key, or File → Select the "Import Account"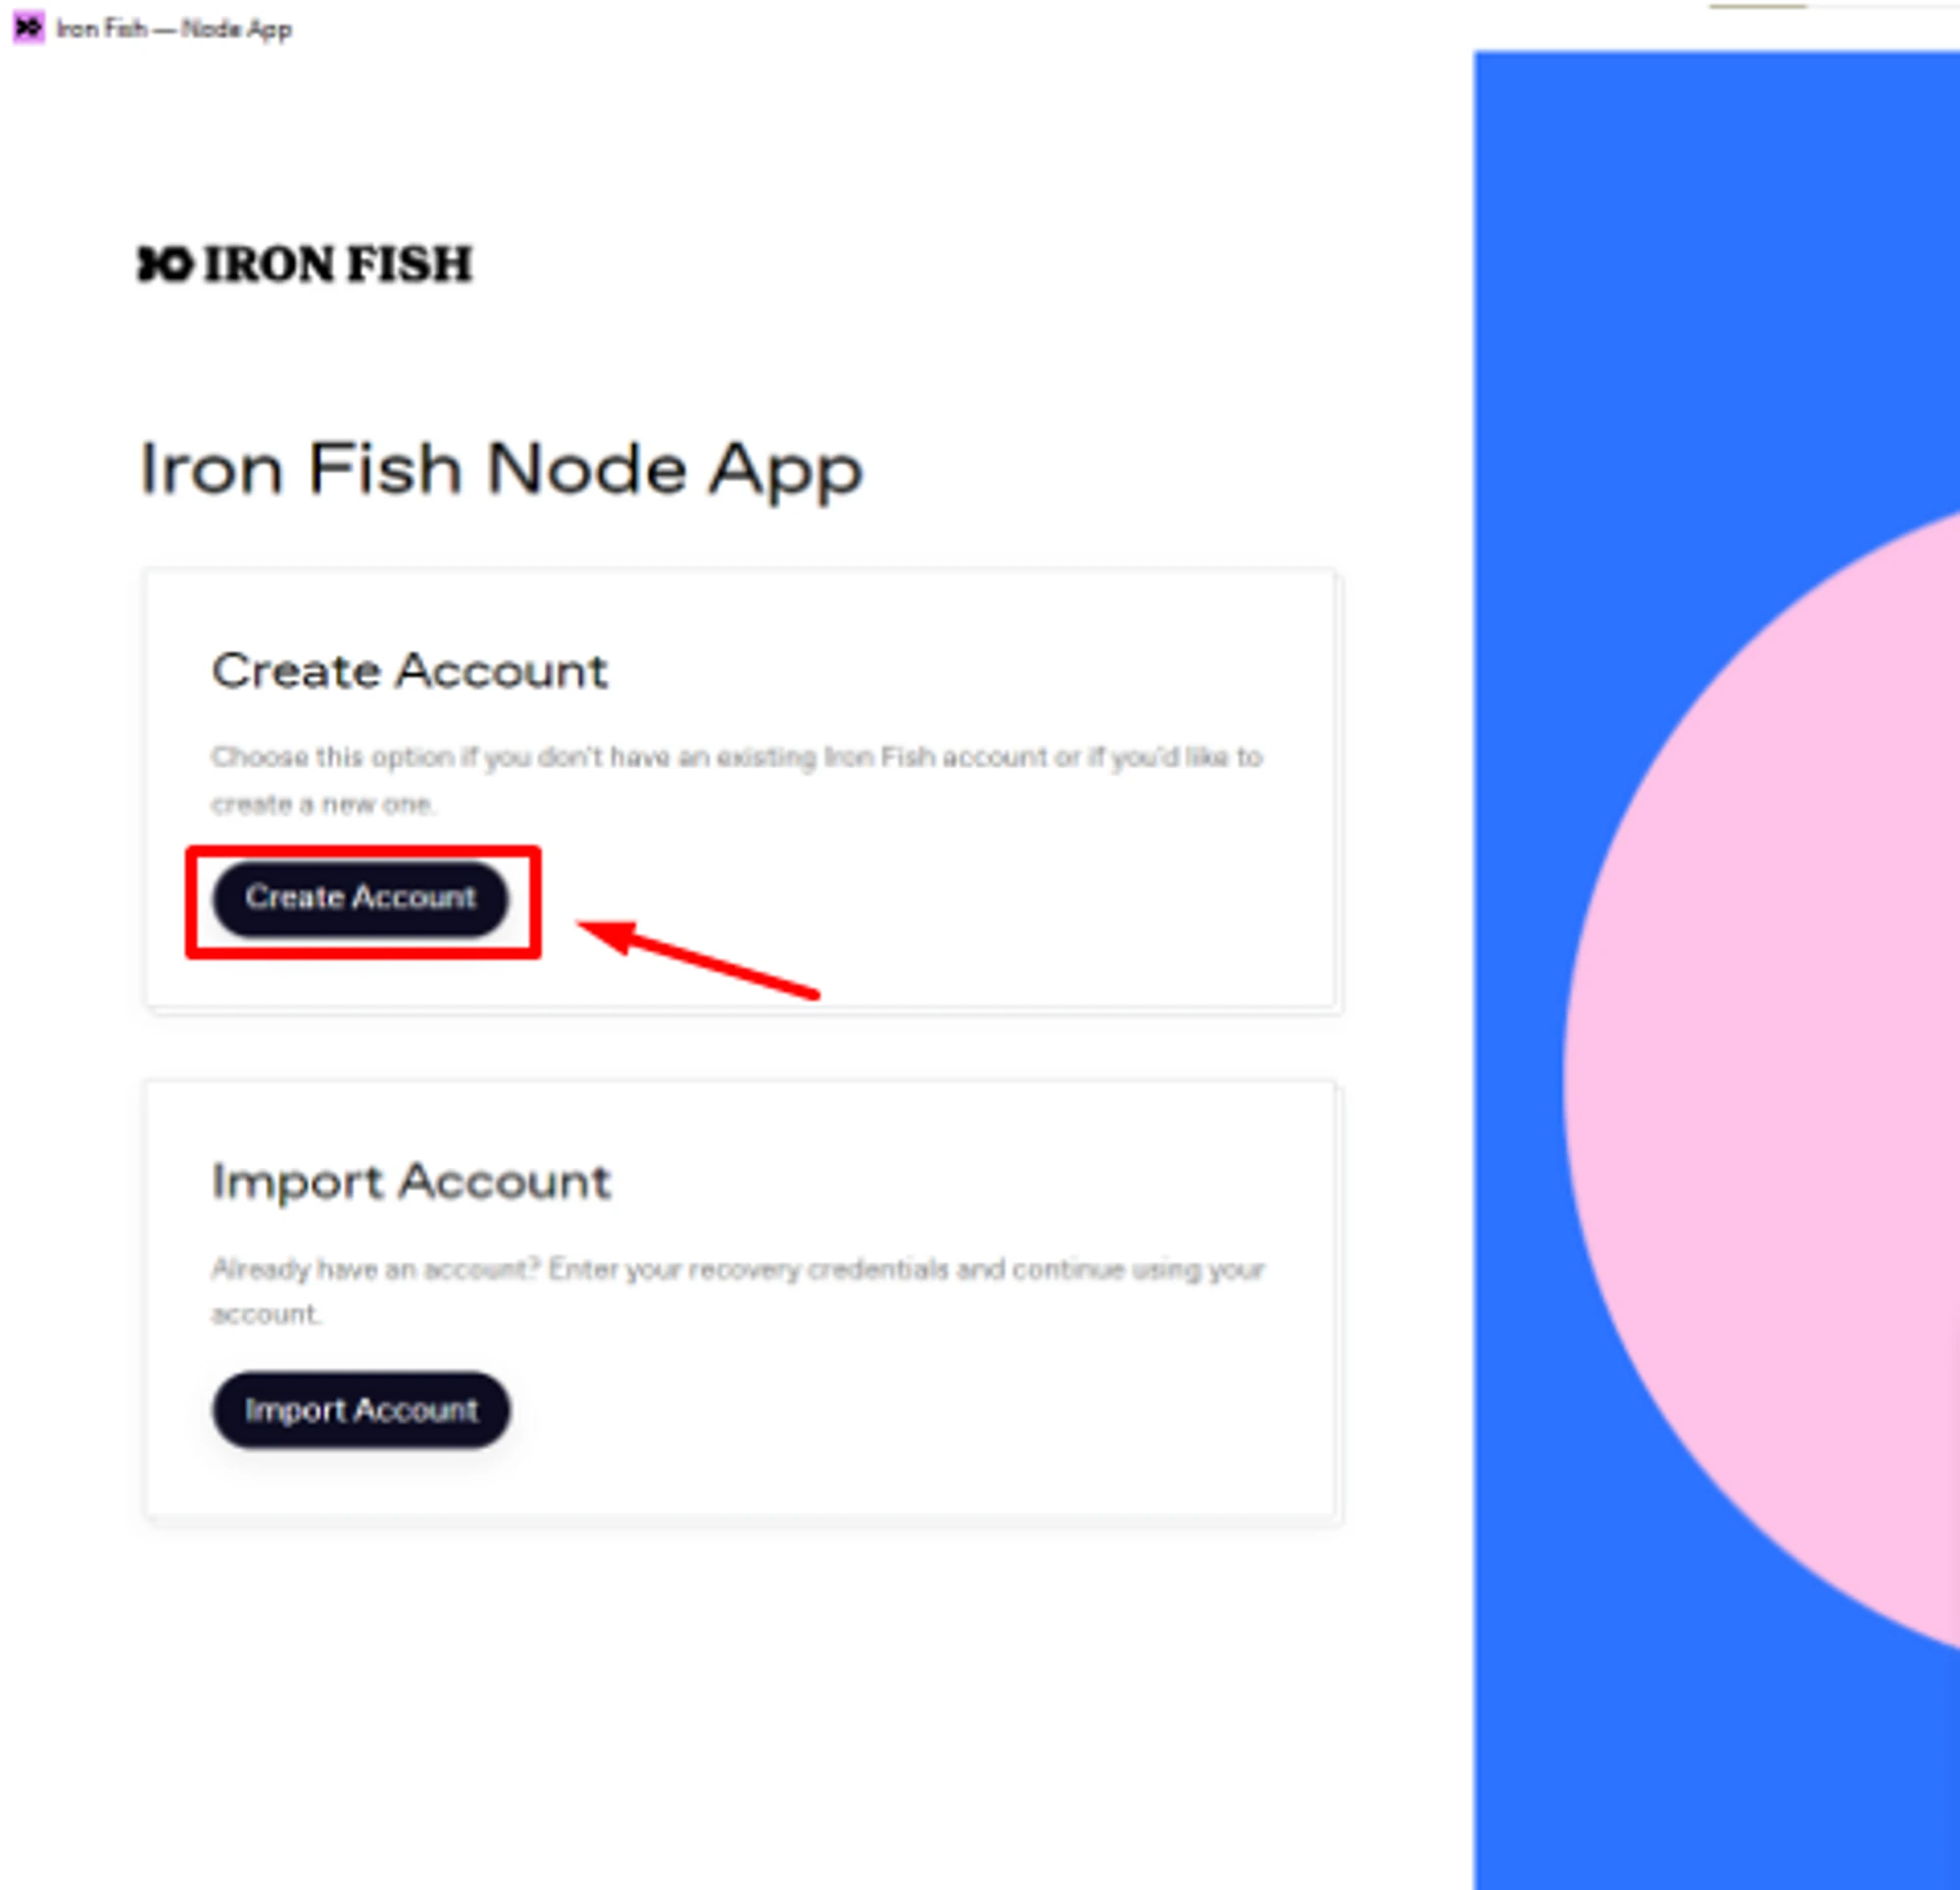
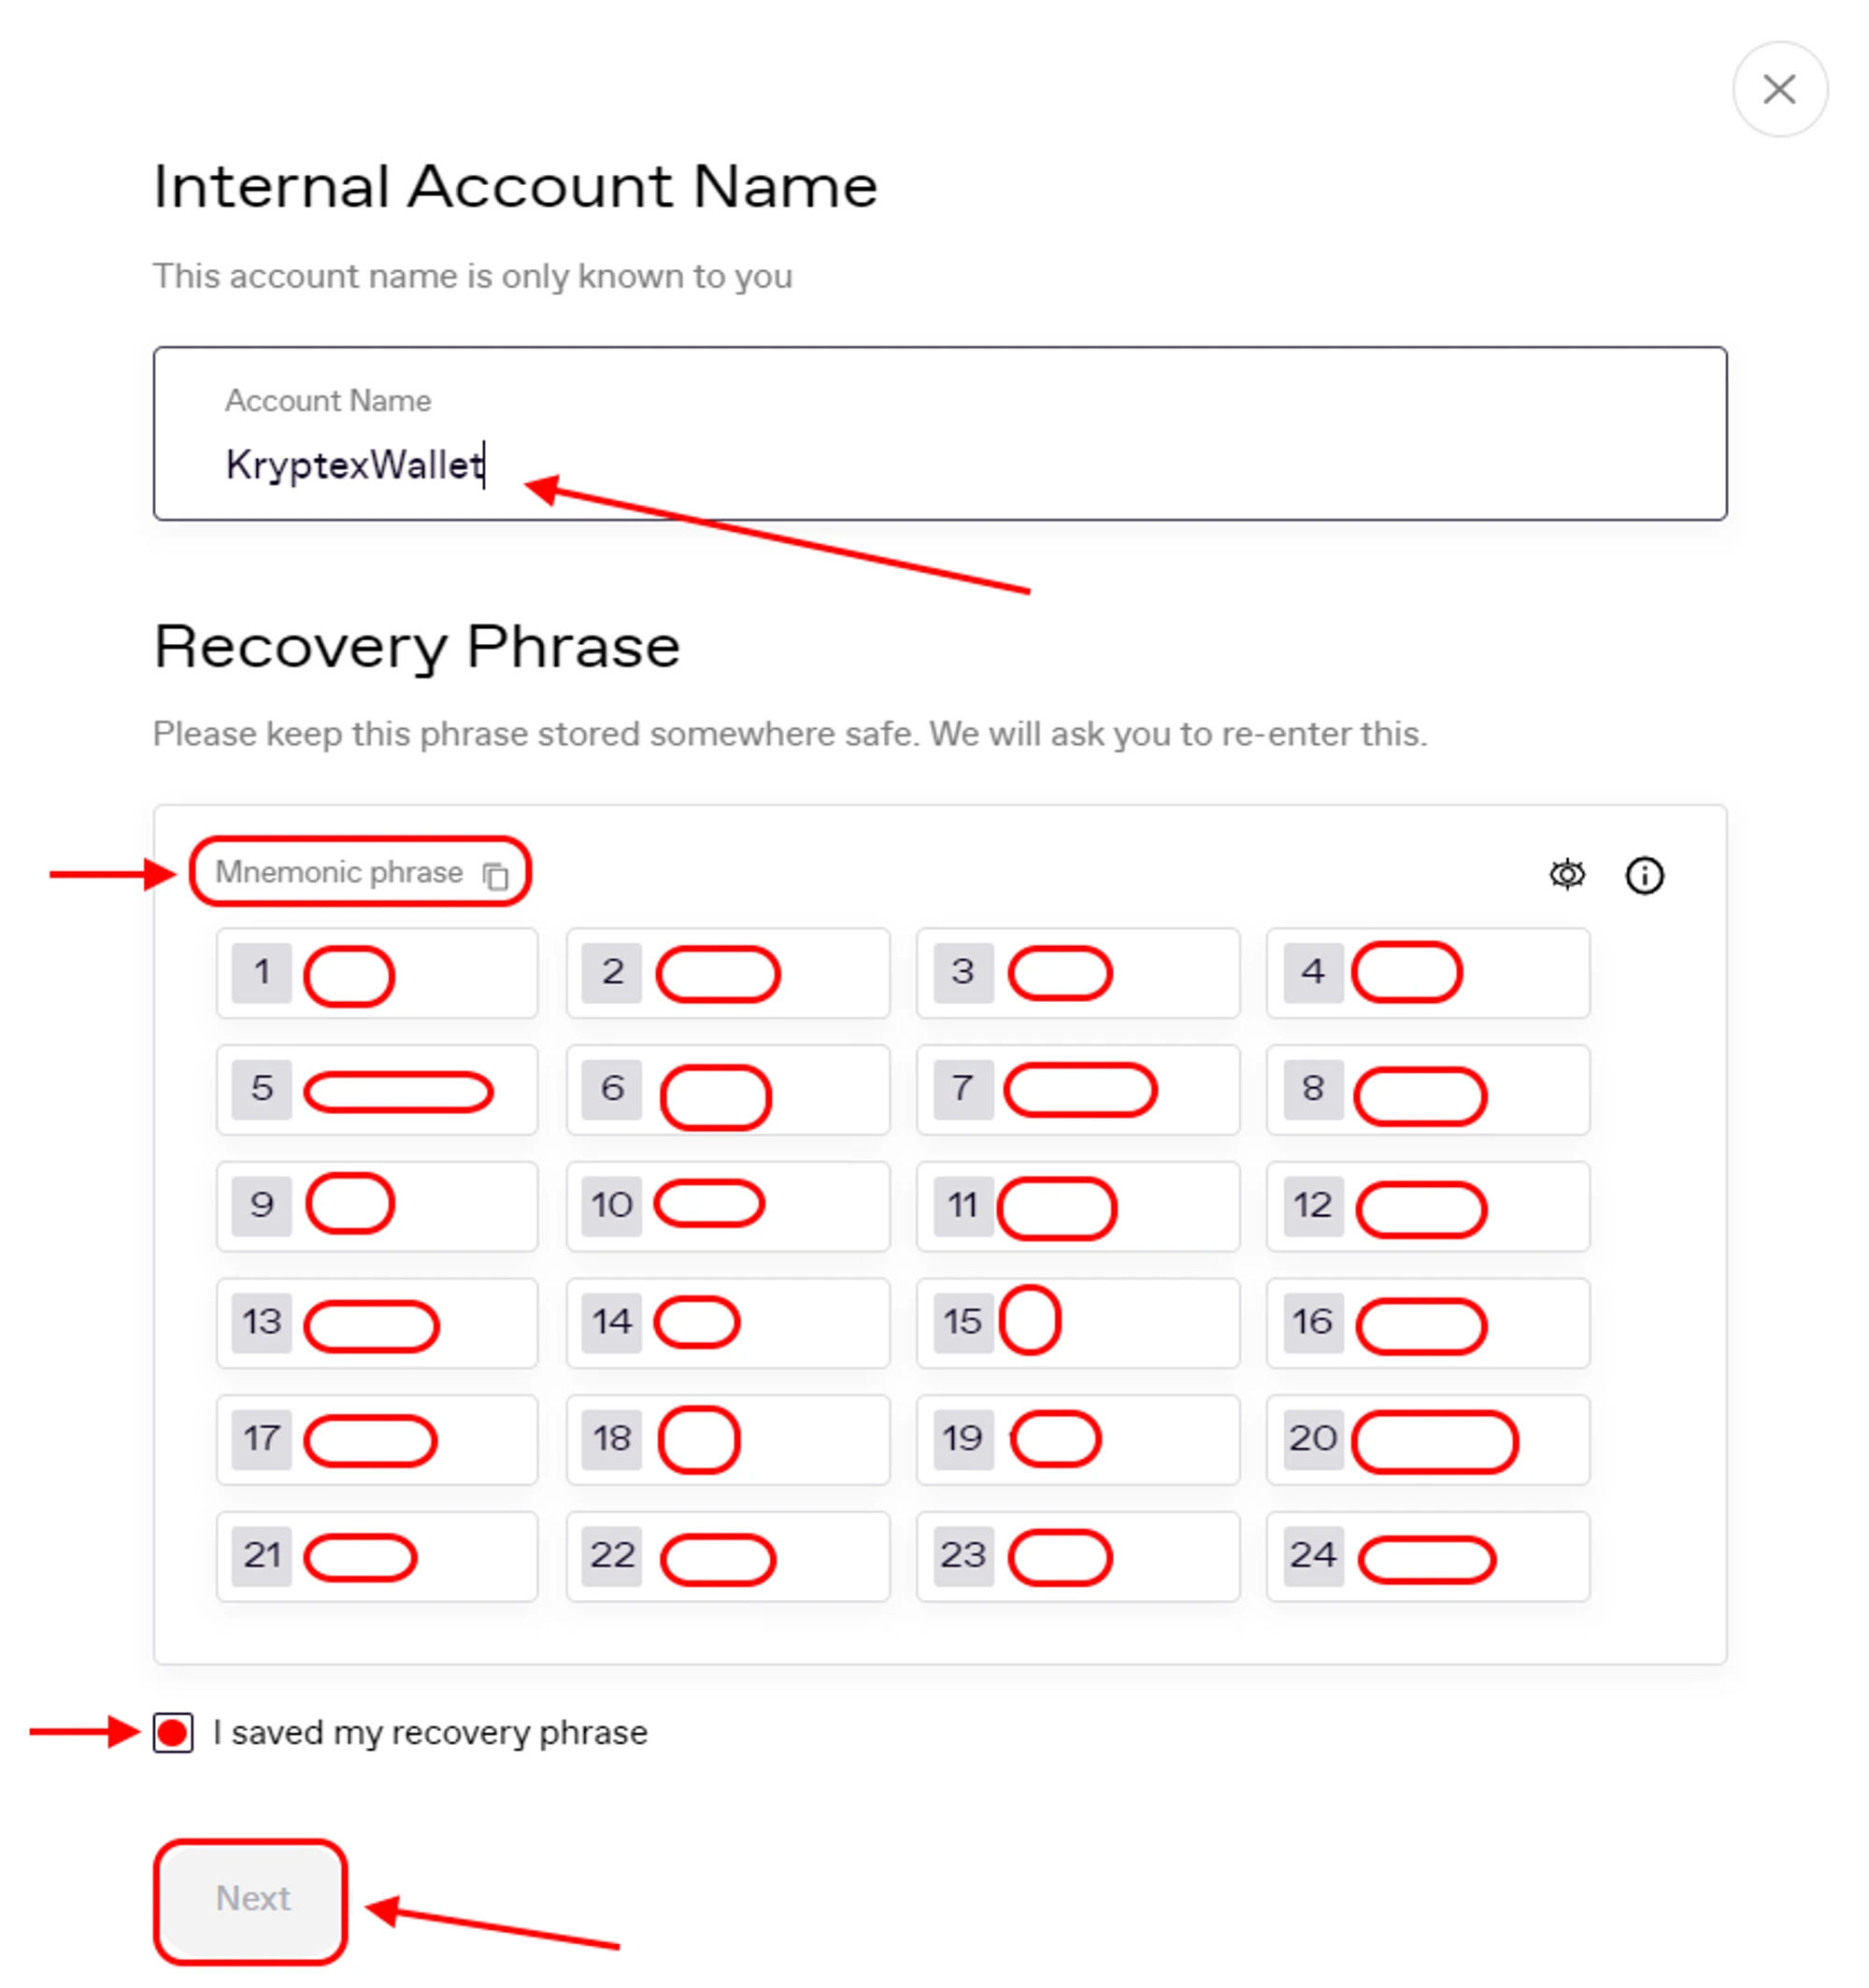
Create a name for your wallet account. You will receive a secret phrase consisting of 24 words. It is crucial to securely store these words in the same order as they appear on your screen since losing them means losing access to your wallet! You can copy this combination by clicking the button near the “Mnemonic Phrase” for your convenience. Once you have securely saved the phrase, click “Next” to proceed.
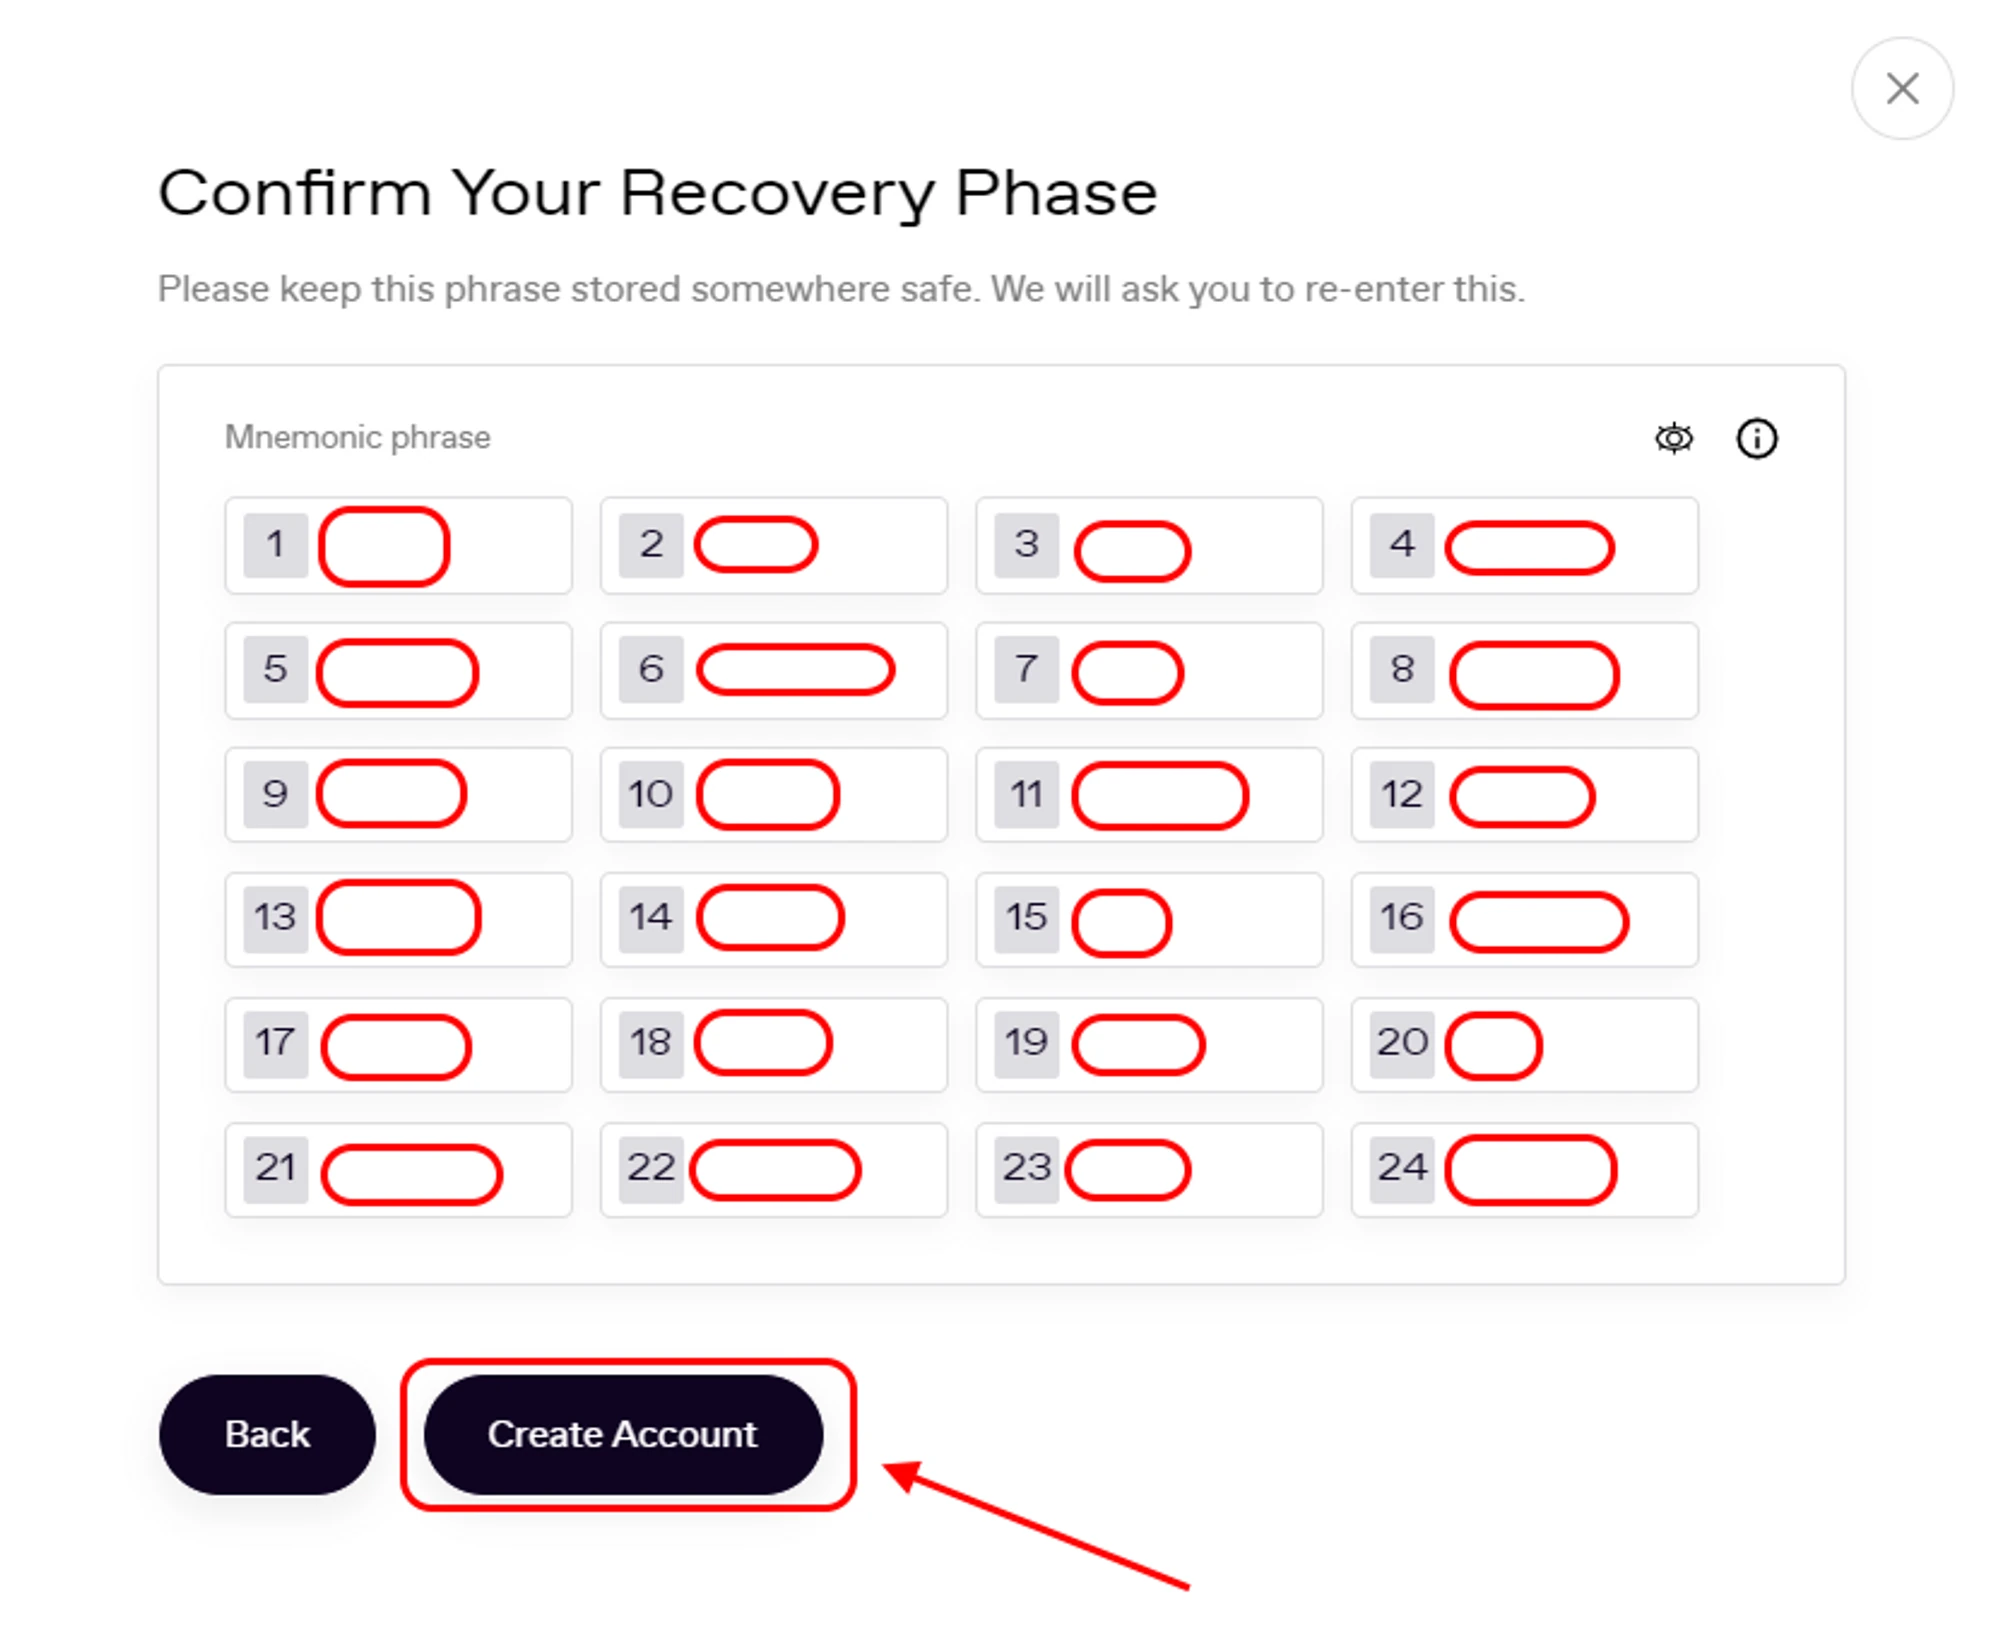
The wallet will prompt you to enter a combination of 24 words to ensure that you can remember it. Enter the combination in the correct order, and click "Create Account". Remember, the person who has the 24-word seed phrase owns the wallet!
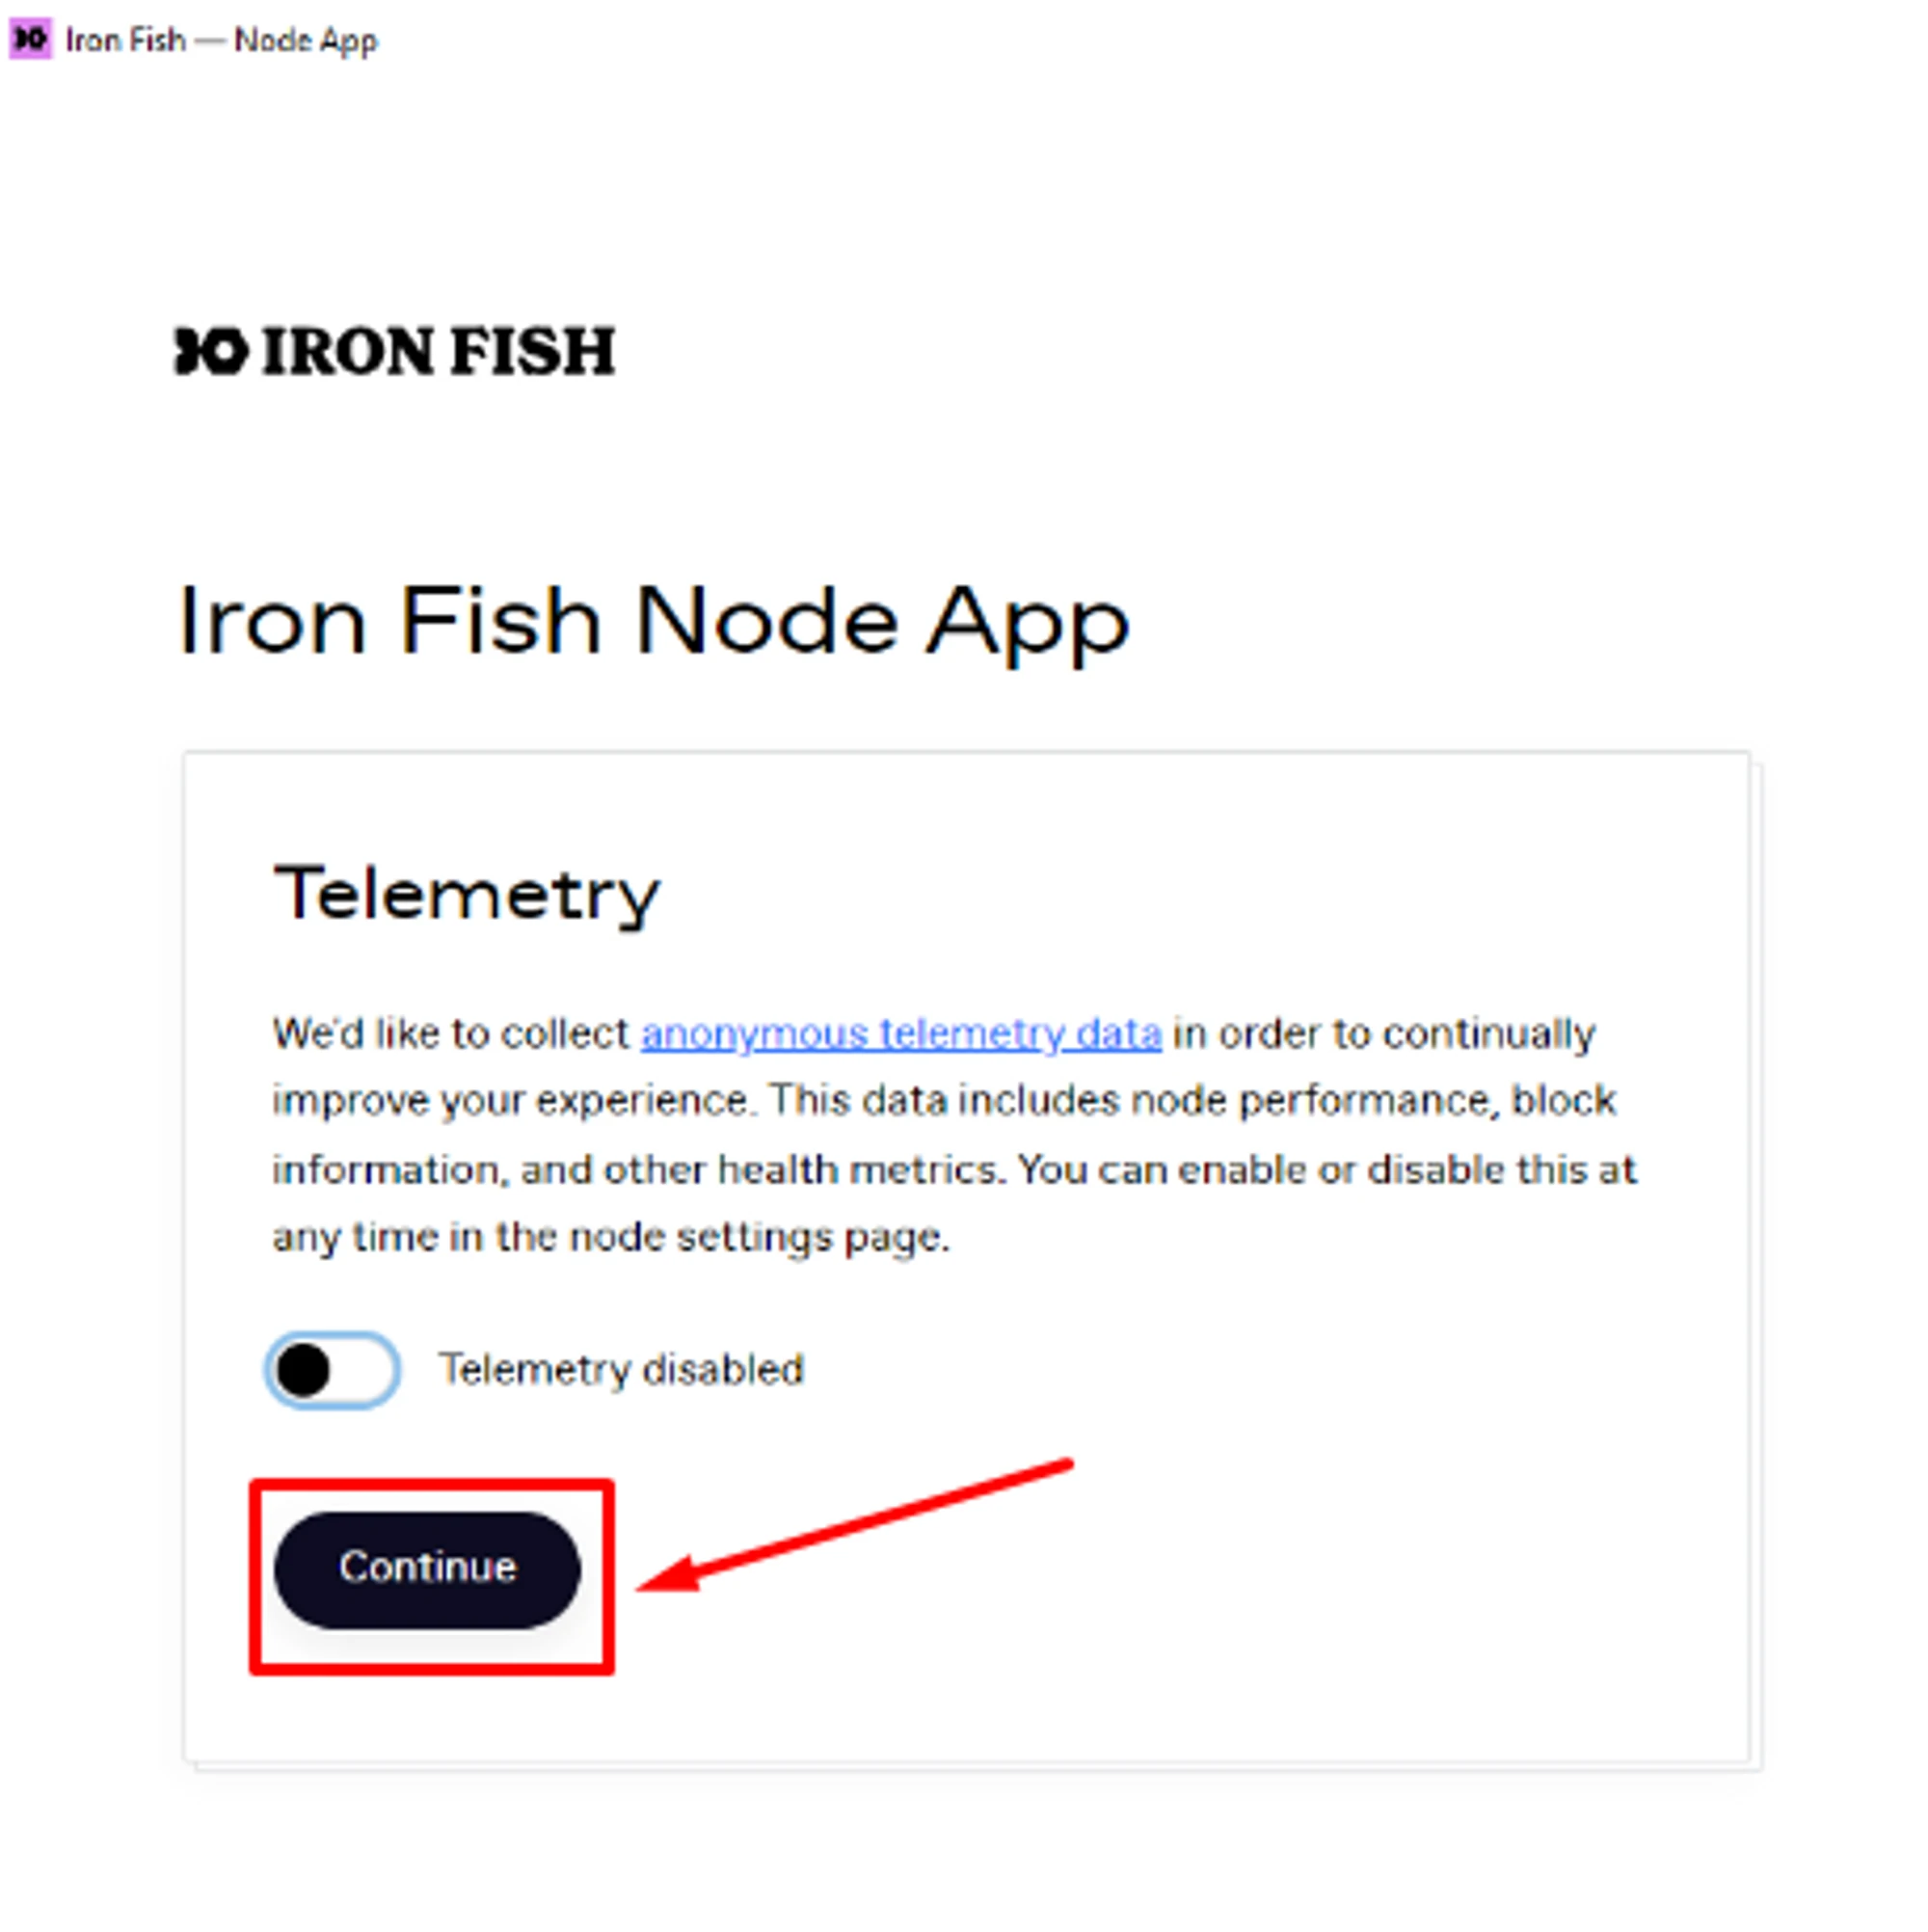
The wallet will ask you to activate or deactivate Telemetry, you can skip this option — click "Continue";
You need to synchronize, select "Download Snapshot" — this is the fastest way to synchronize your wallet;
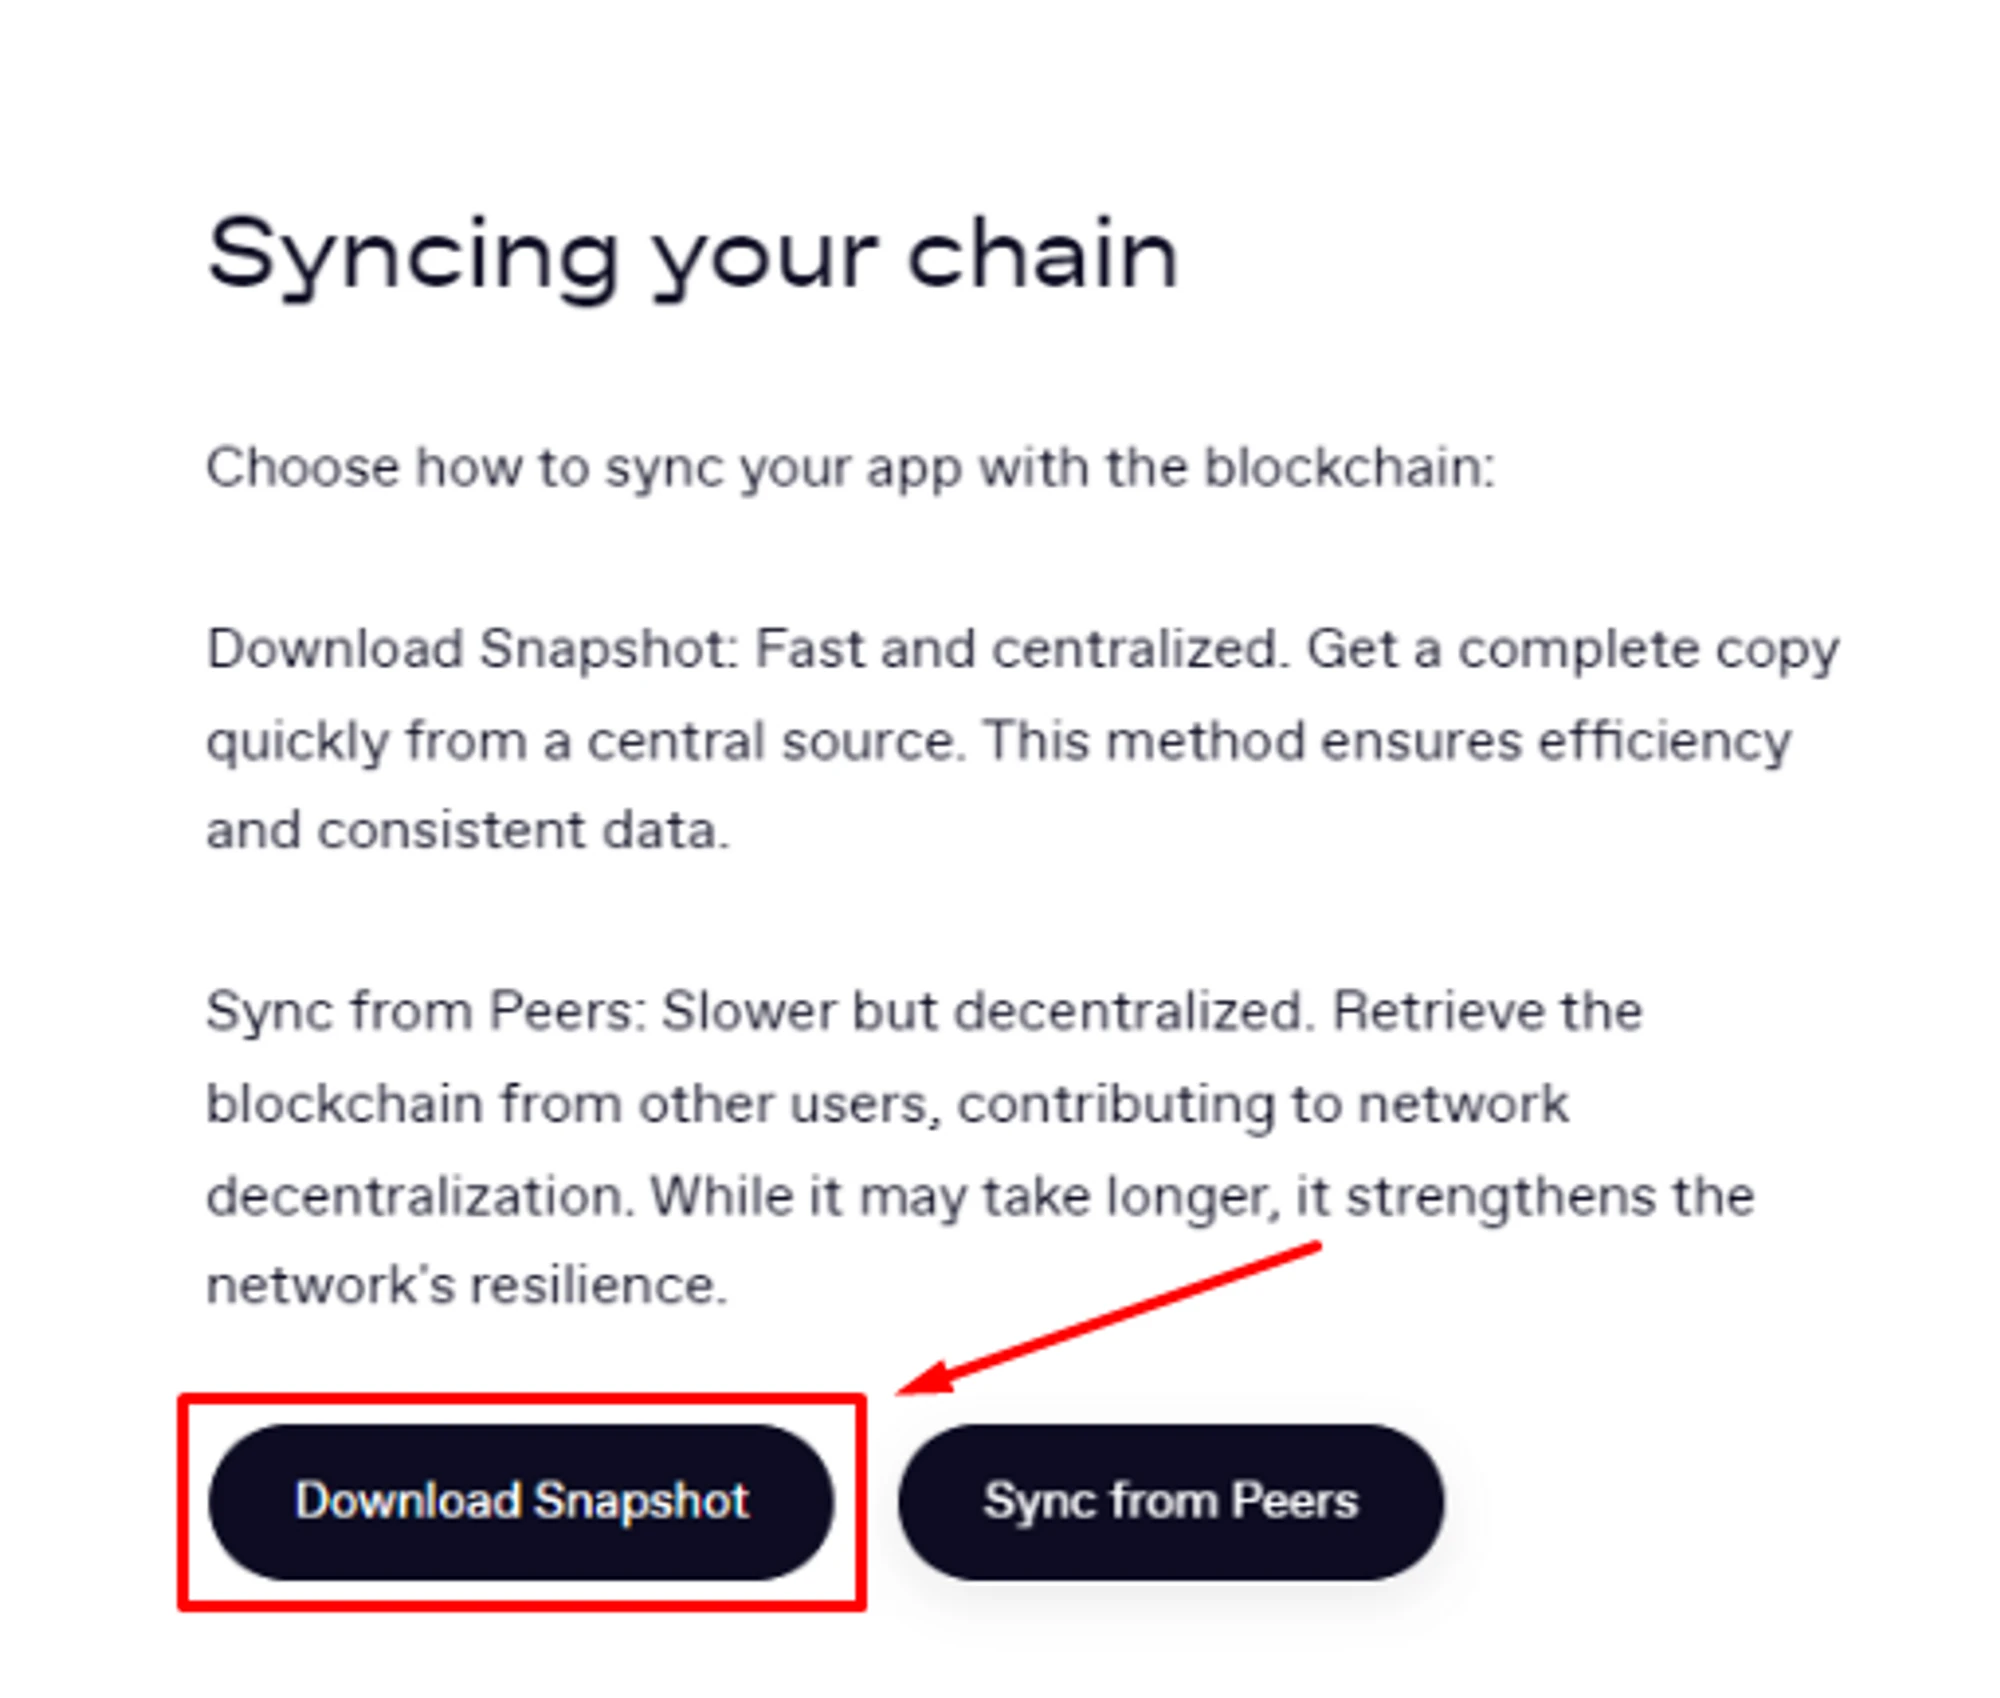
Wait for synchronization to complete — this is a long process and can take several hours;

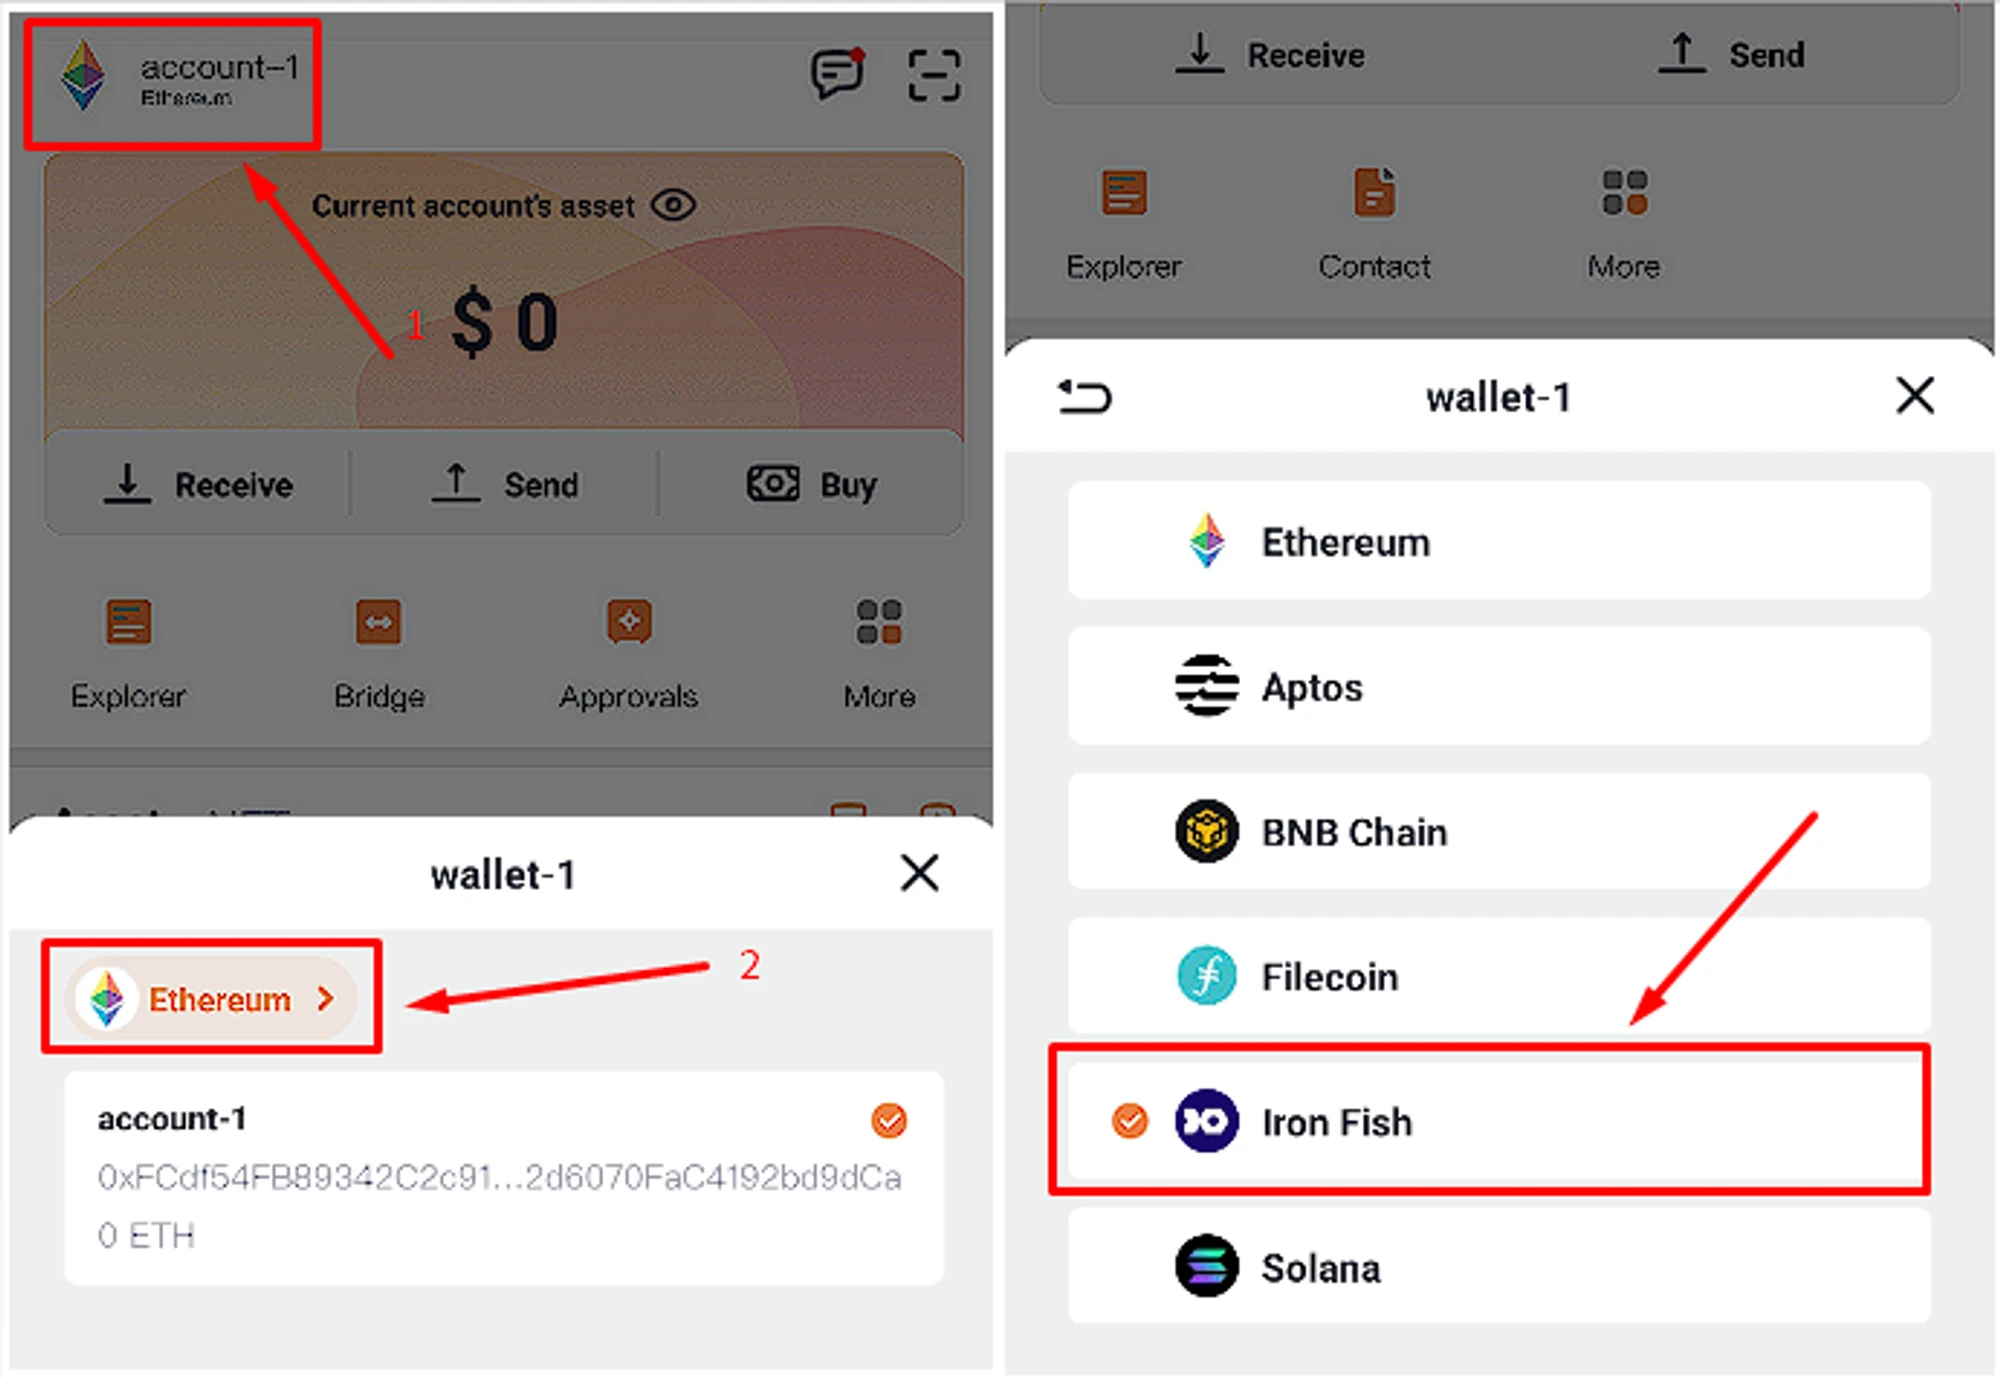
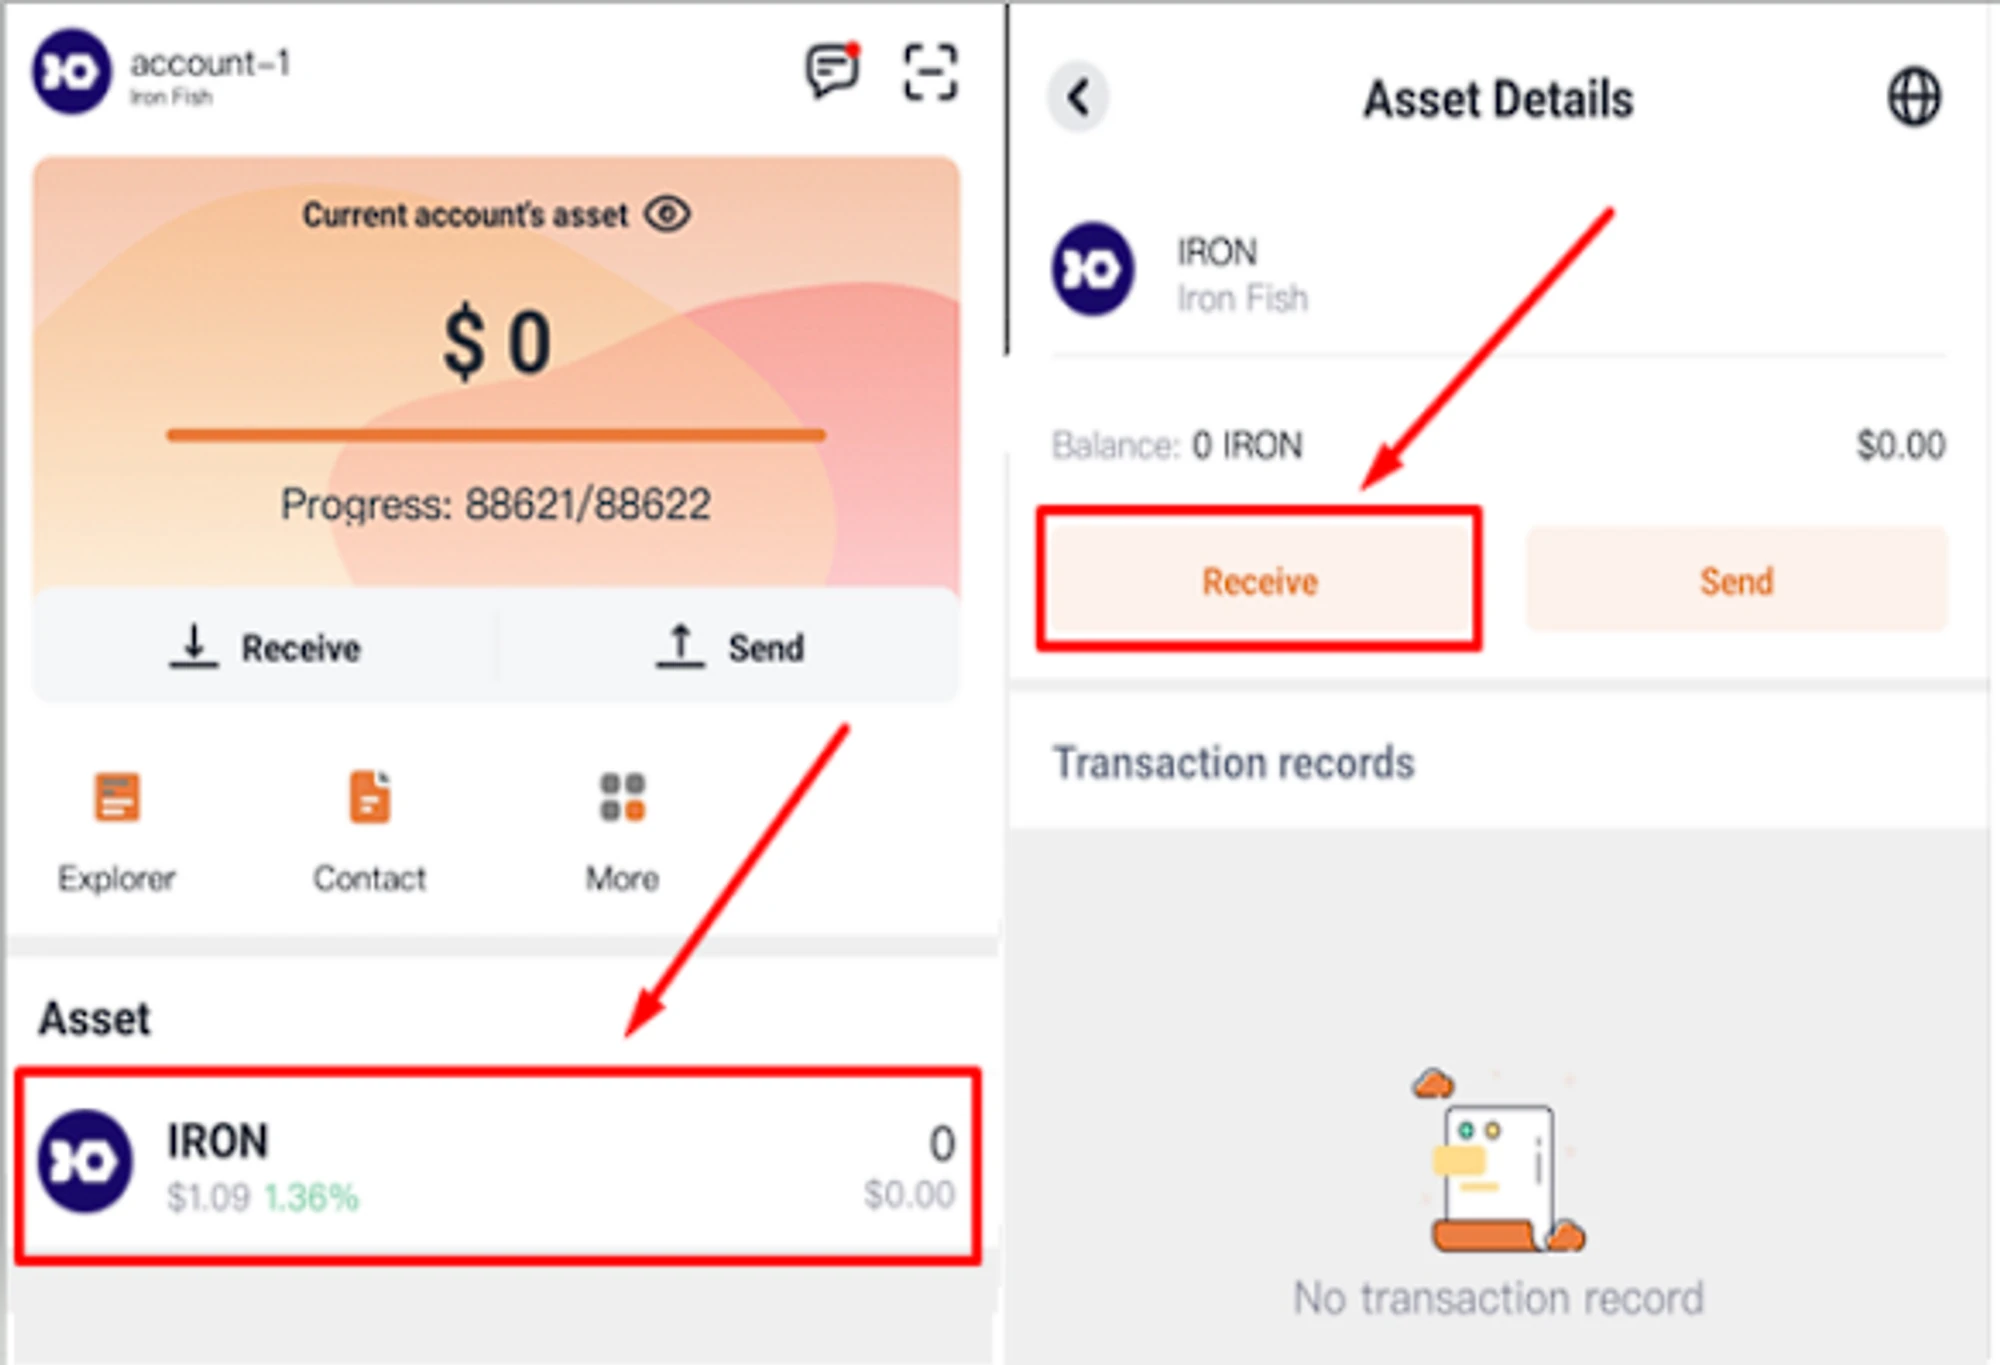
Your wallet is ready to use. You may have several accounts connected with different addresses, so carefully choose the address you want to use. Select the account you need from the list, and click on the icon next to the wallet address to copy it. Use the copied address for mining or to receive coins in your account.
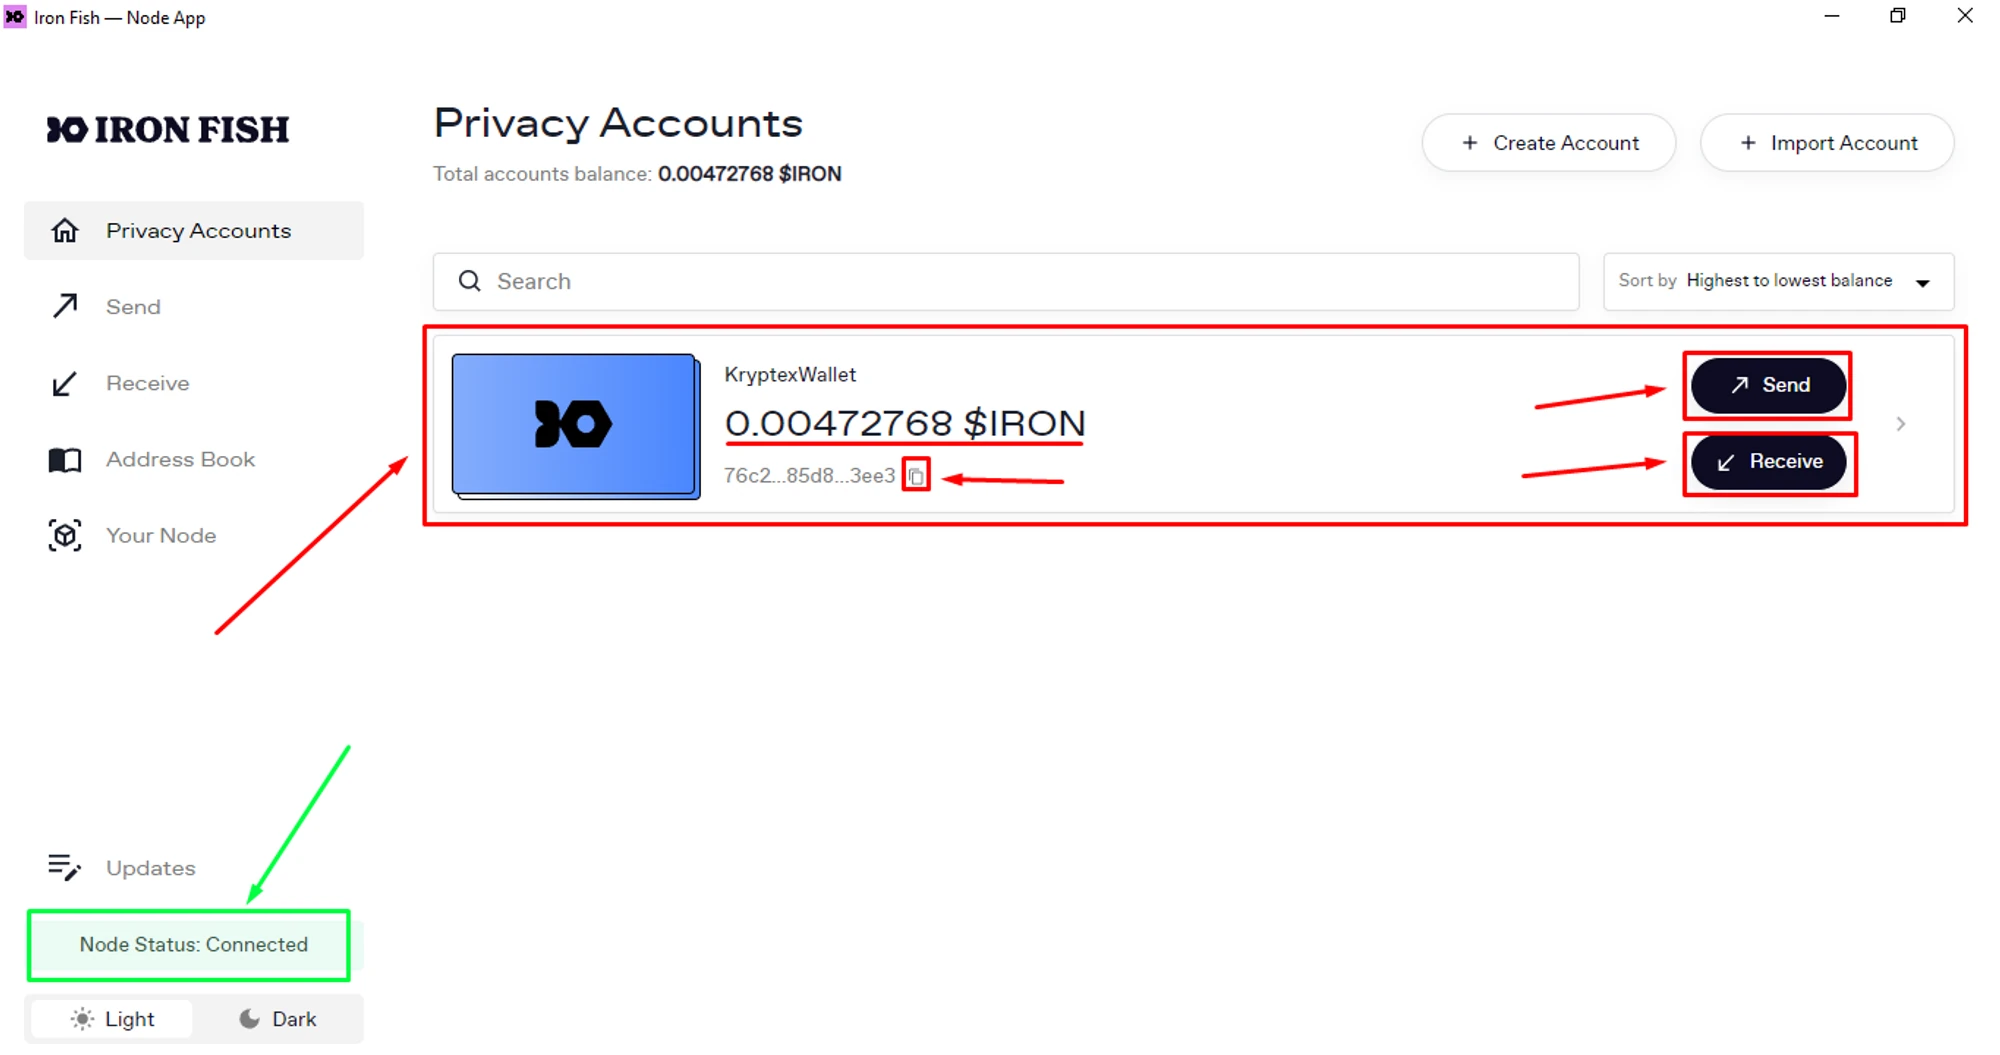
- $IRON — your current balance.
- Beneath the balance, you will find the abbreviated format of your wallet address. Click on the icon next to it to copy the full address.
- Send — send NEXA to other address (exchanger or wallet).
- Receive — receive coins to your wallet.
How to register a IRON FISH wallet in FoxWallet
FoxWallet is an easy and fast way to create a wallet for IRON, recommended by coin developers as an alternative to Node Wallet.
This wallet is mobile and only supported on iOS and Android smartphones.
Open the FoxWallet website from your mobile device* - https://foxwallet.com/
Choose a convenient installation method;
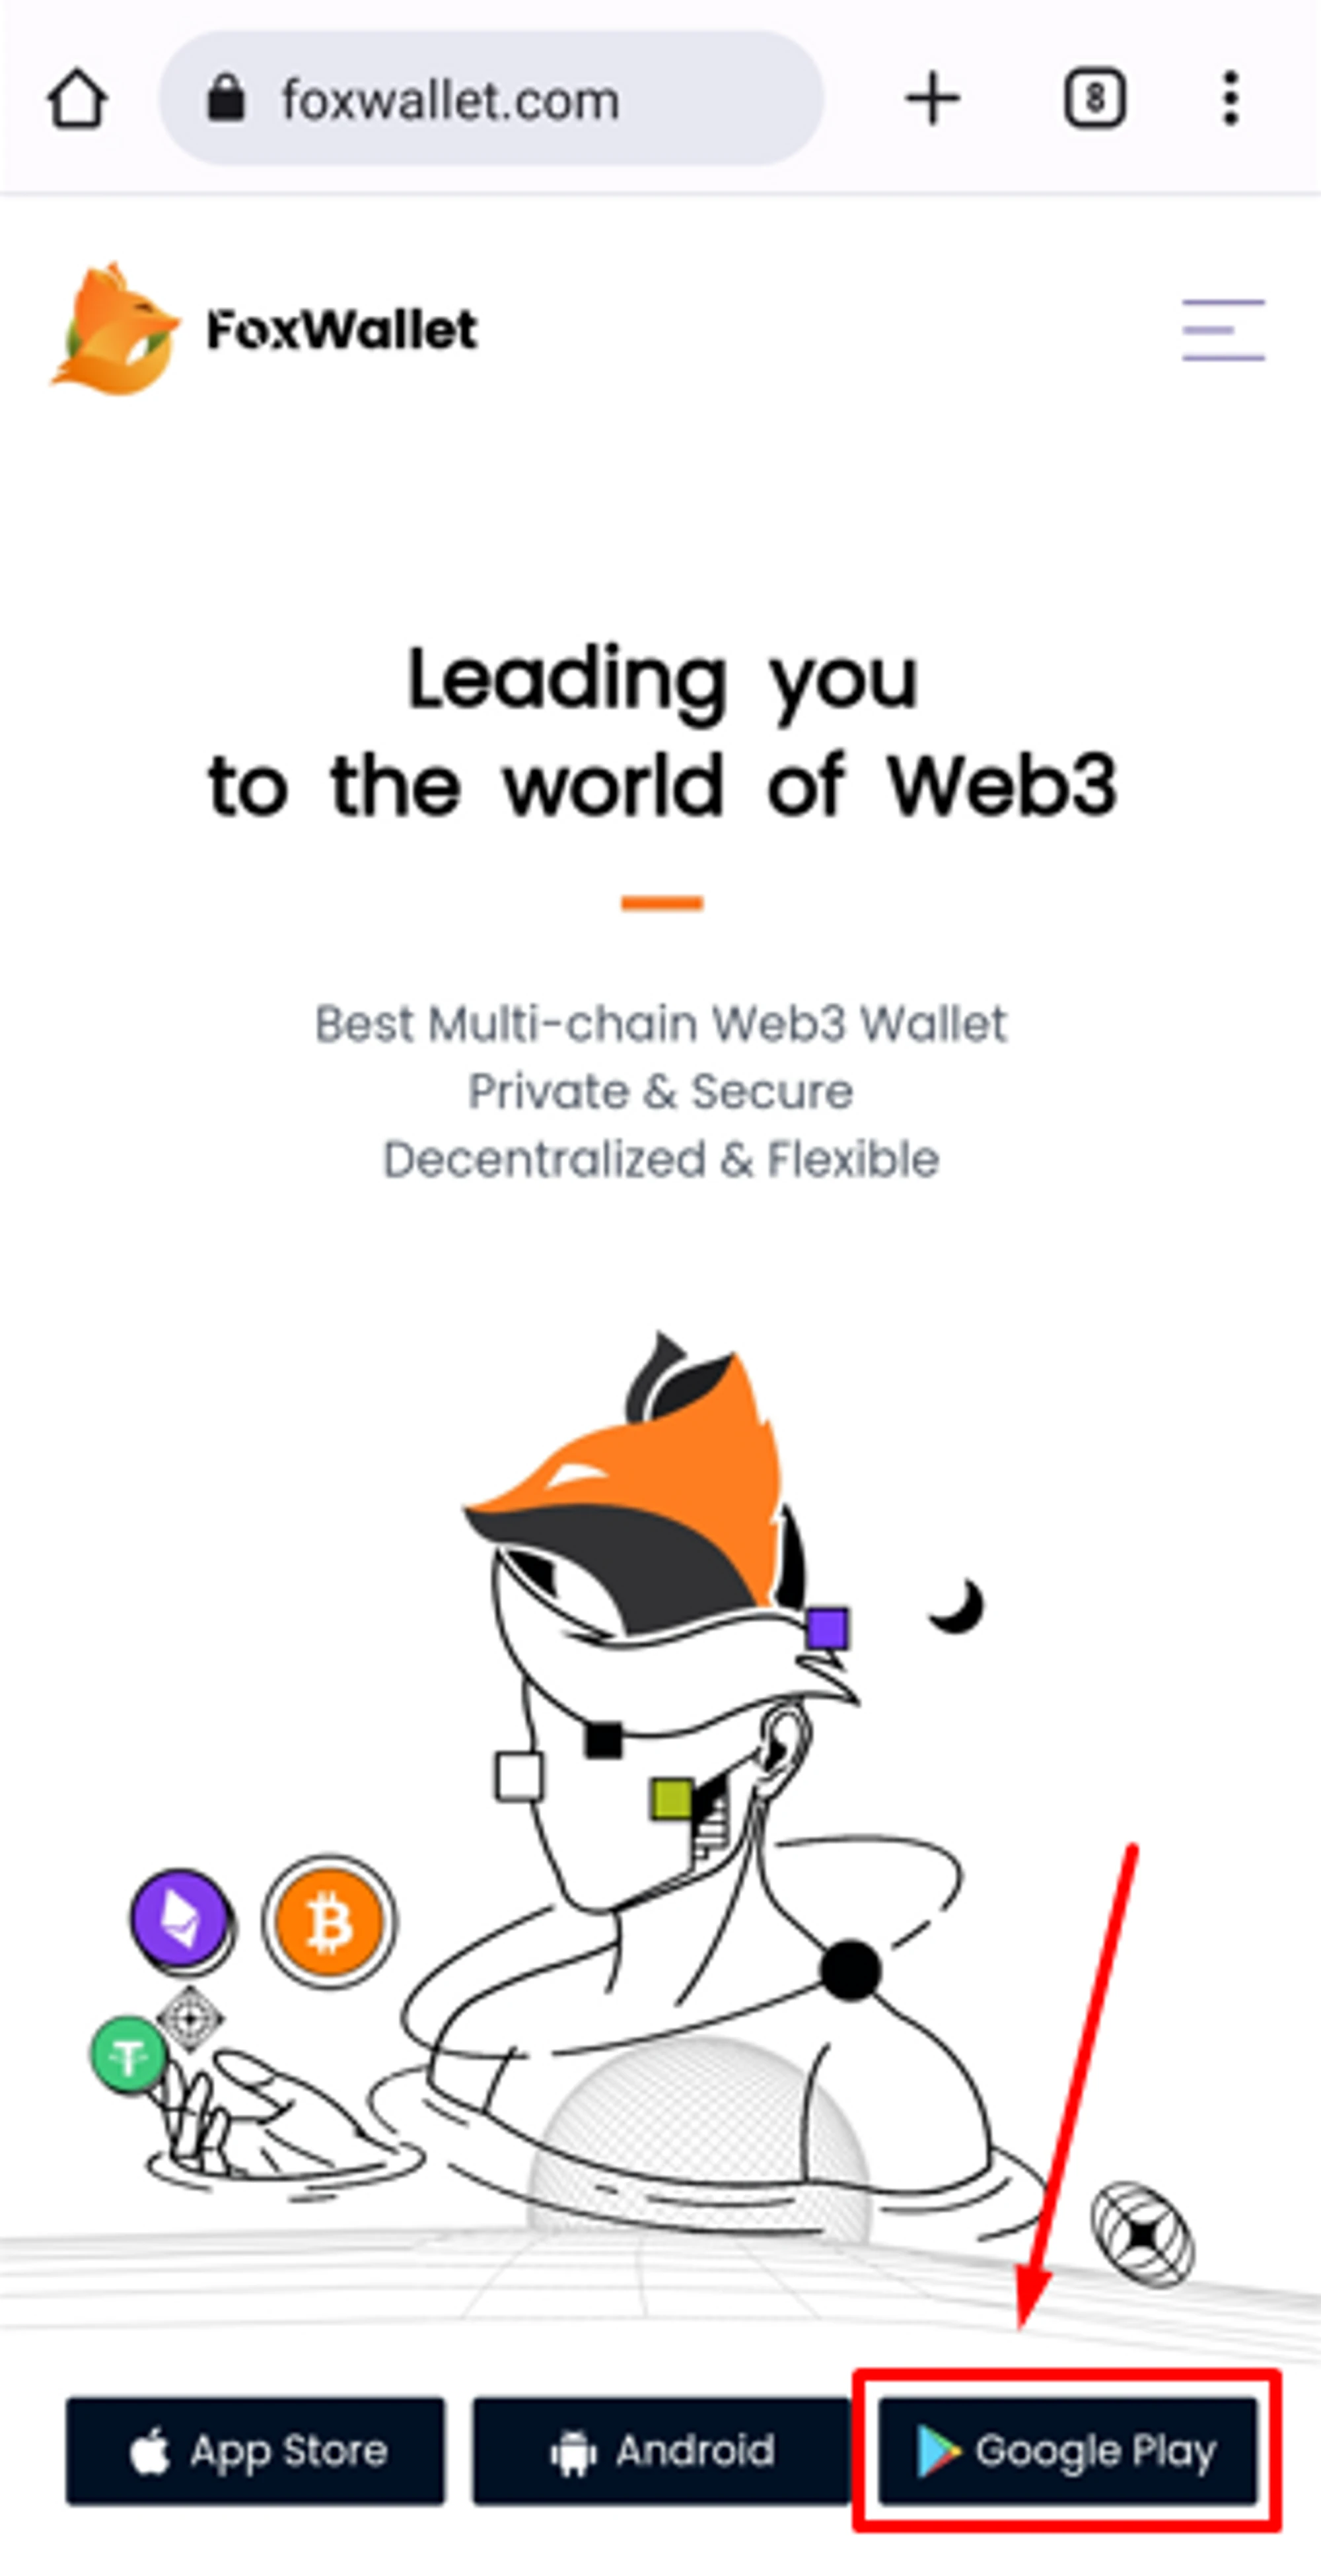
Install the FoxWallet app on your smartphone using the Google Play or App Store;
After installation - launch the wallet app;
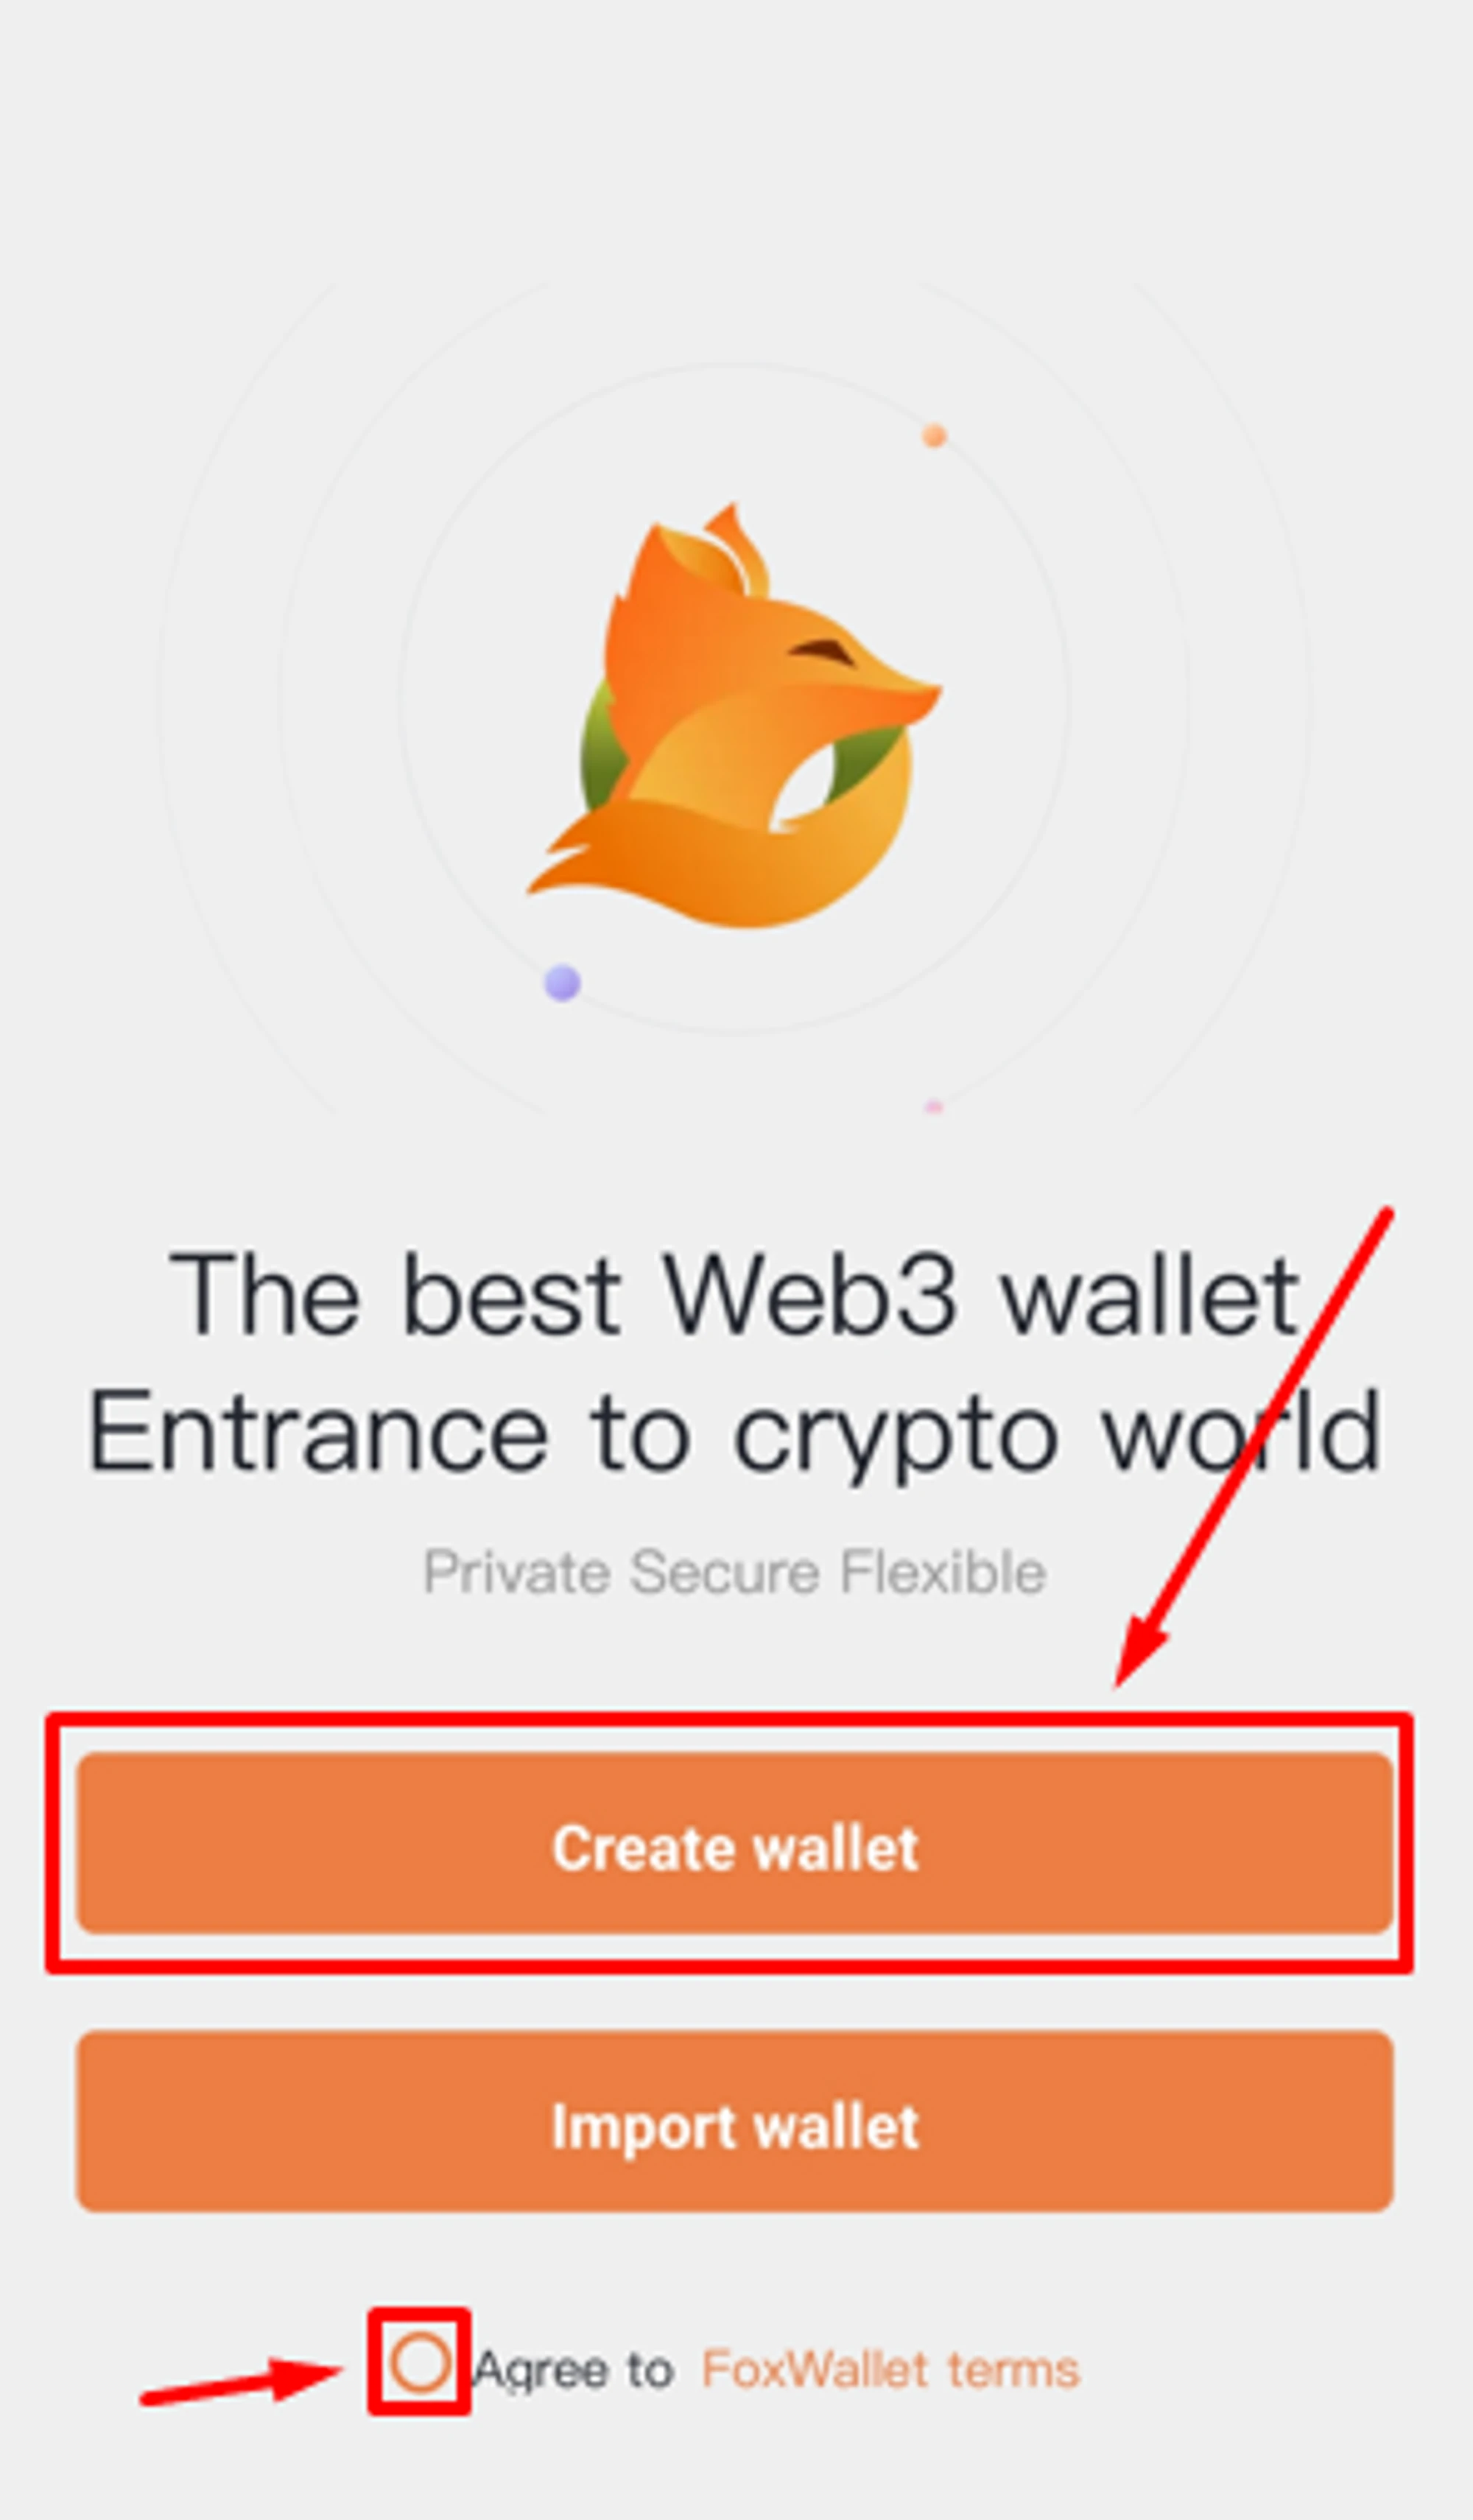
In the wallet app that opens, click "Create wallet" → Accept the user agreement;
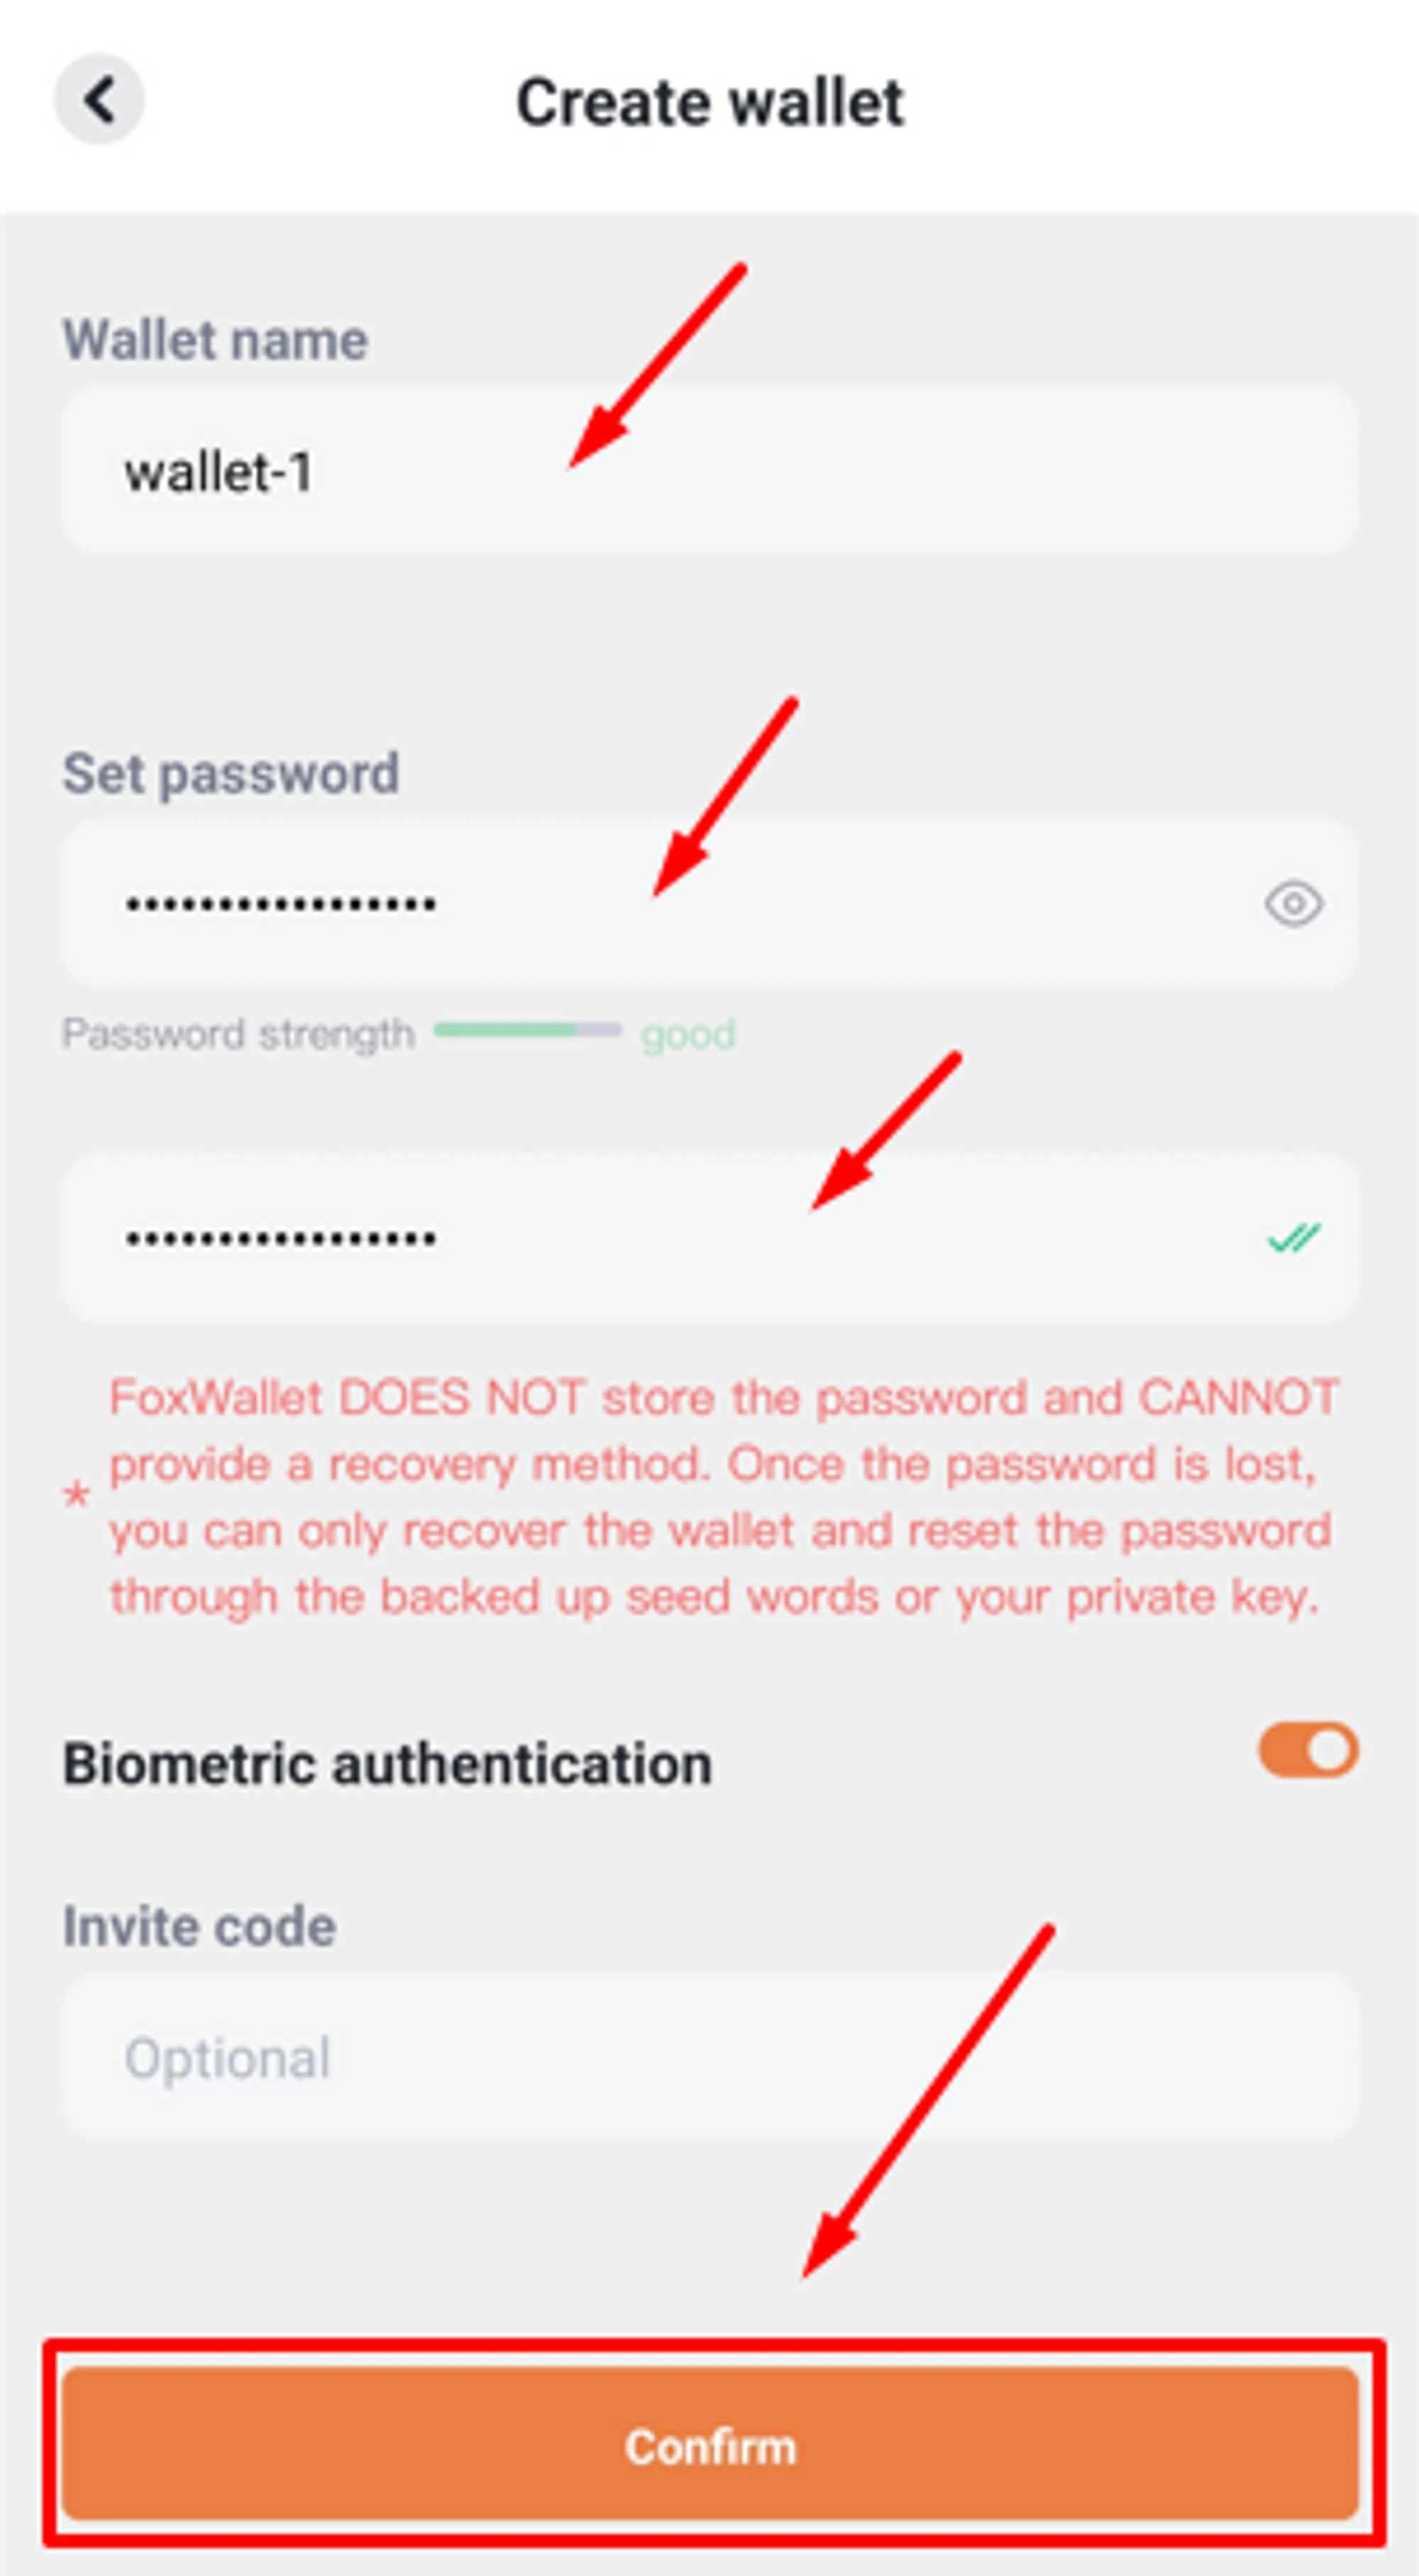
Specify the "name wallet" and set a strong password. Enter name and password, confirm it → click "Confirm";
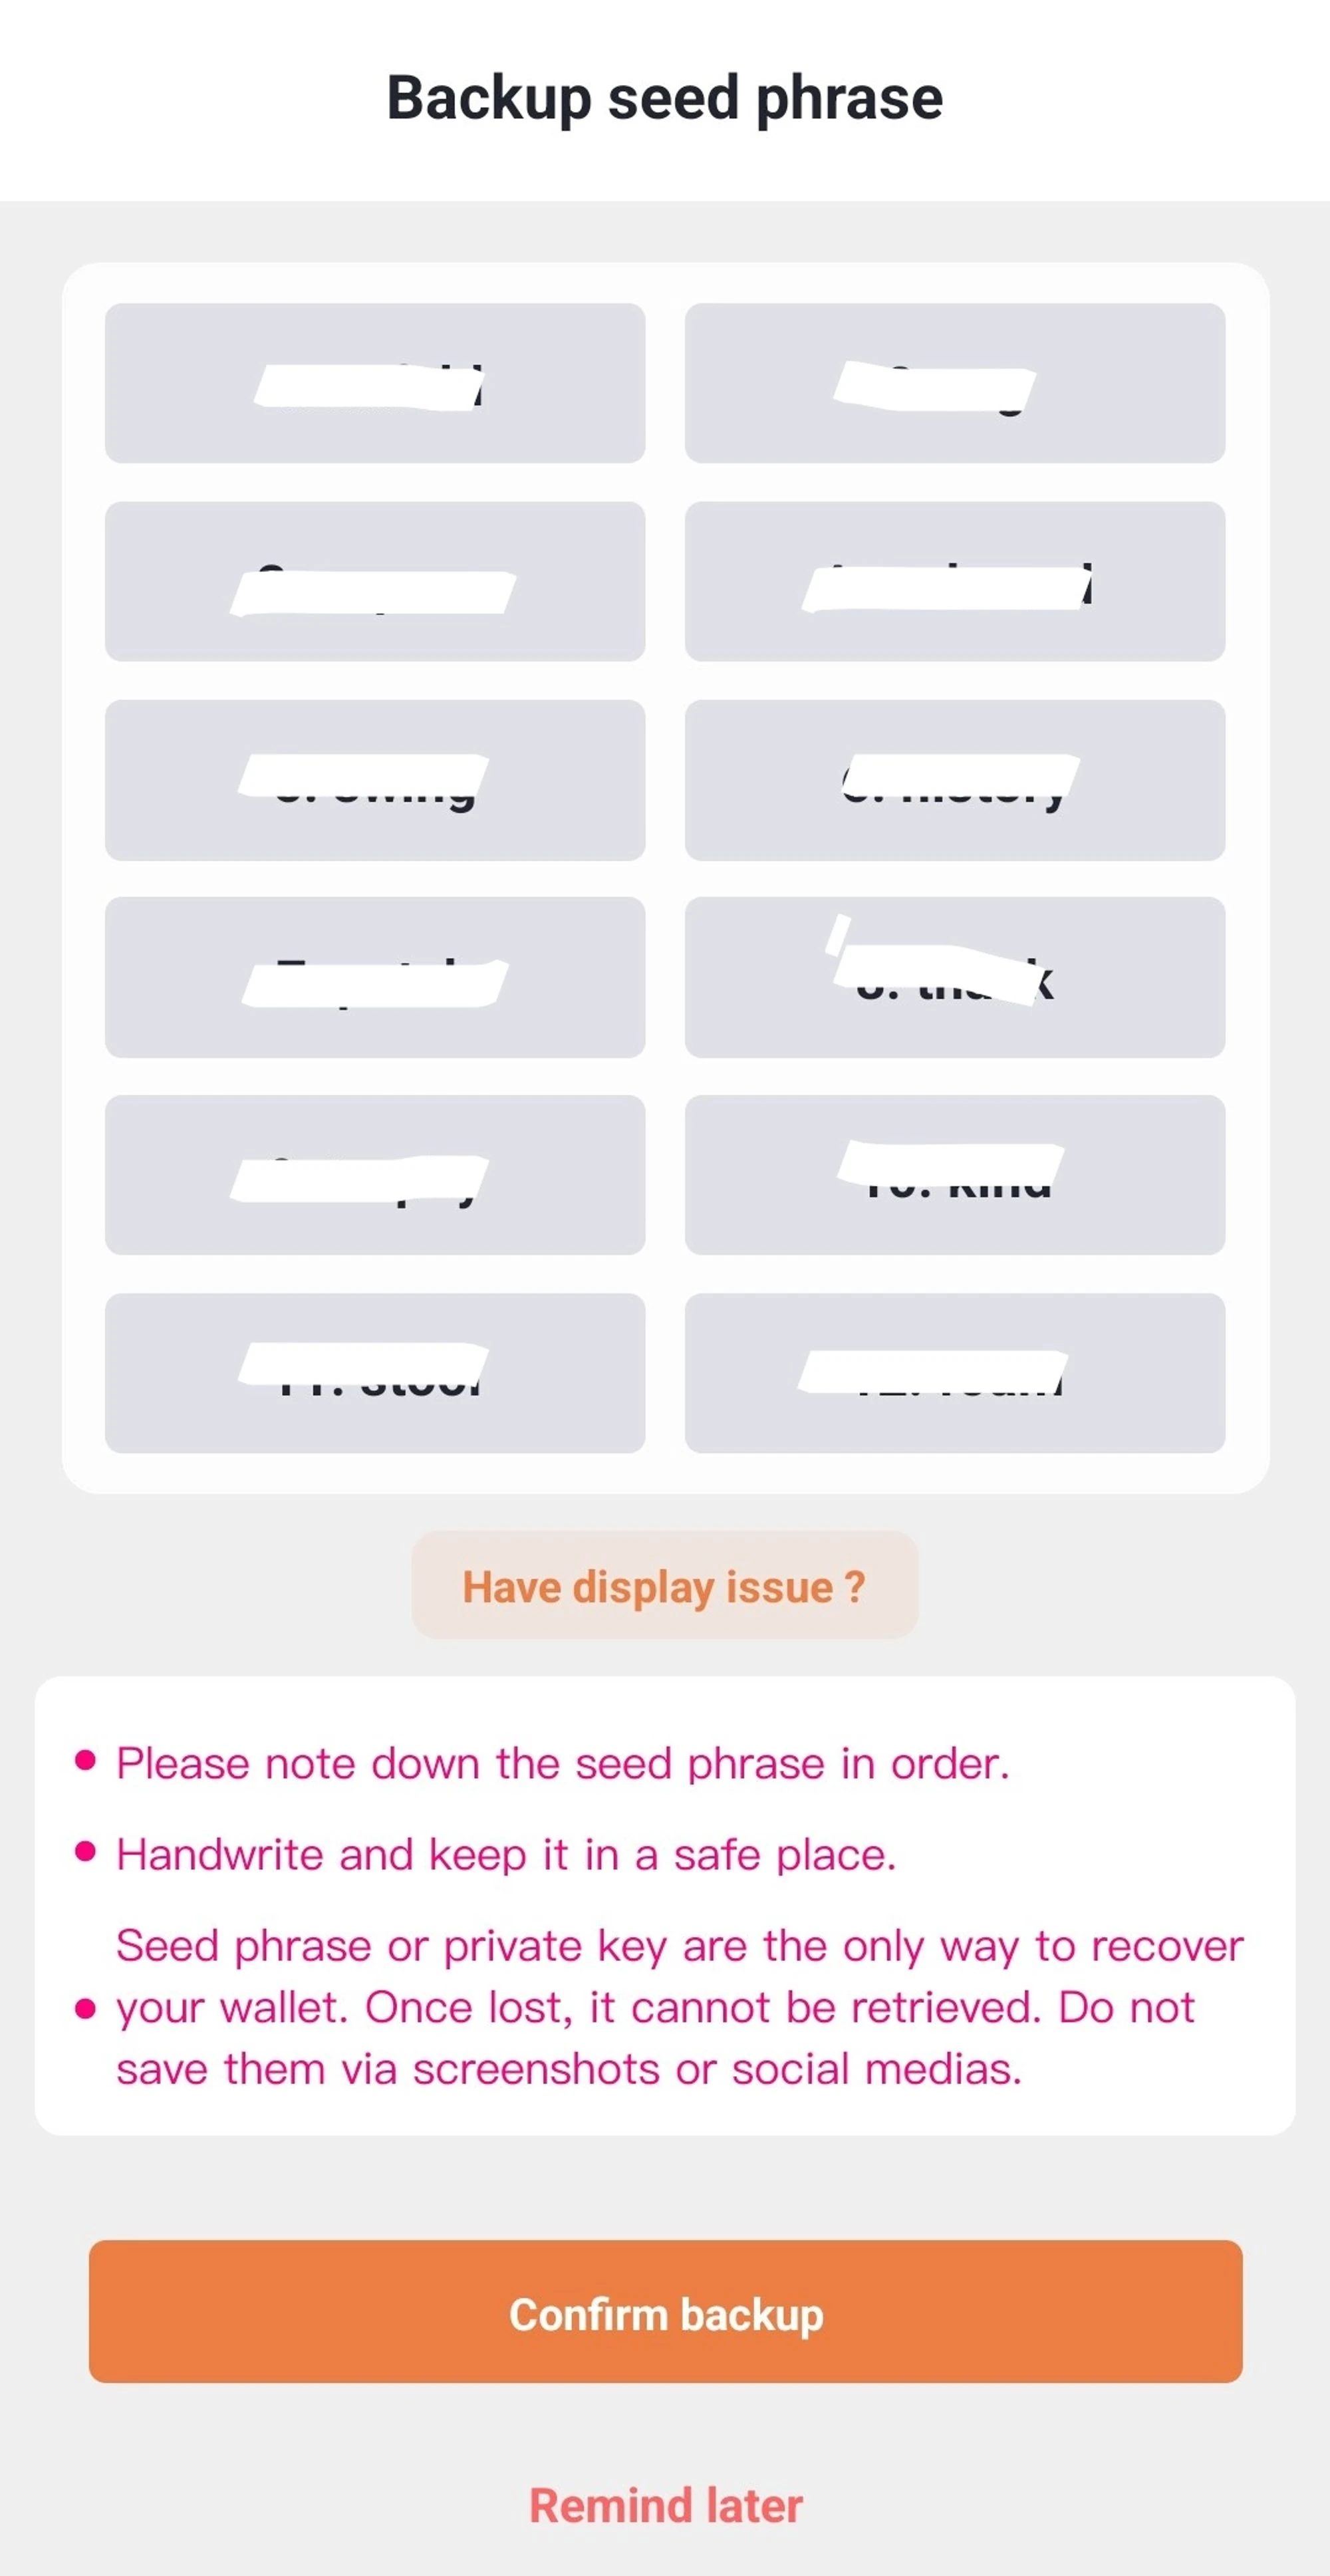
You will receive a secret phrase — a combination of 12 words. Safely keep them in the same order as they appear on your screen. Losing them means losing access to your wallet! Then click “Confirm backup”;
The wallet will check how well you remember your seed phrase and word order. Enter the words in the correct order for confirmation;
After successful verification, select the network to work "Iron Fish" → confirm installation of the new network in the wallet;
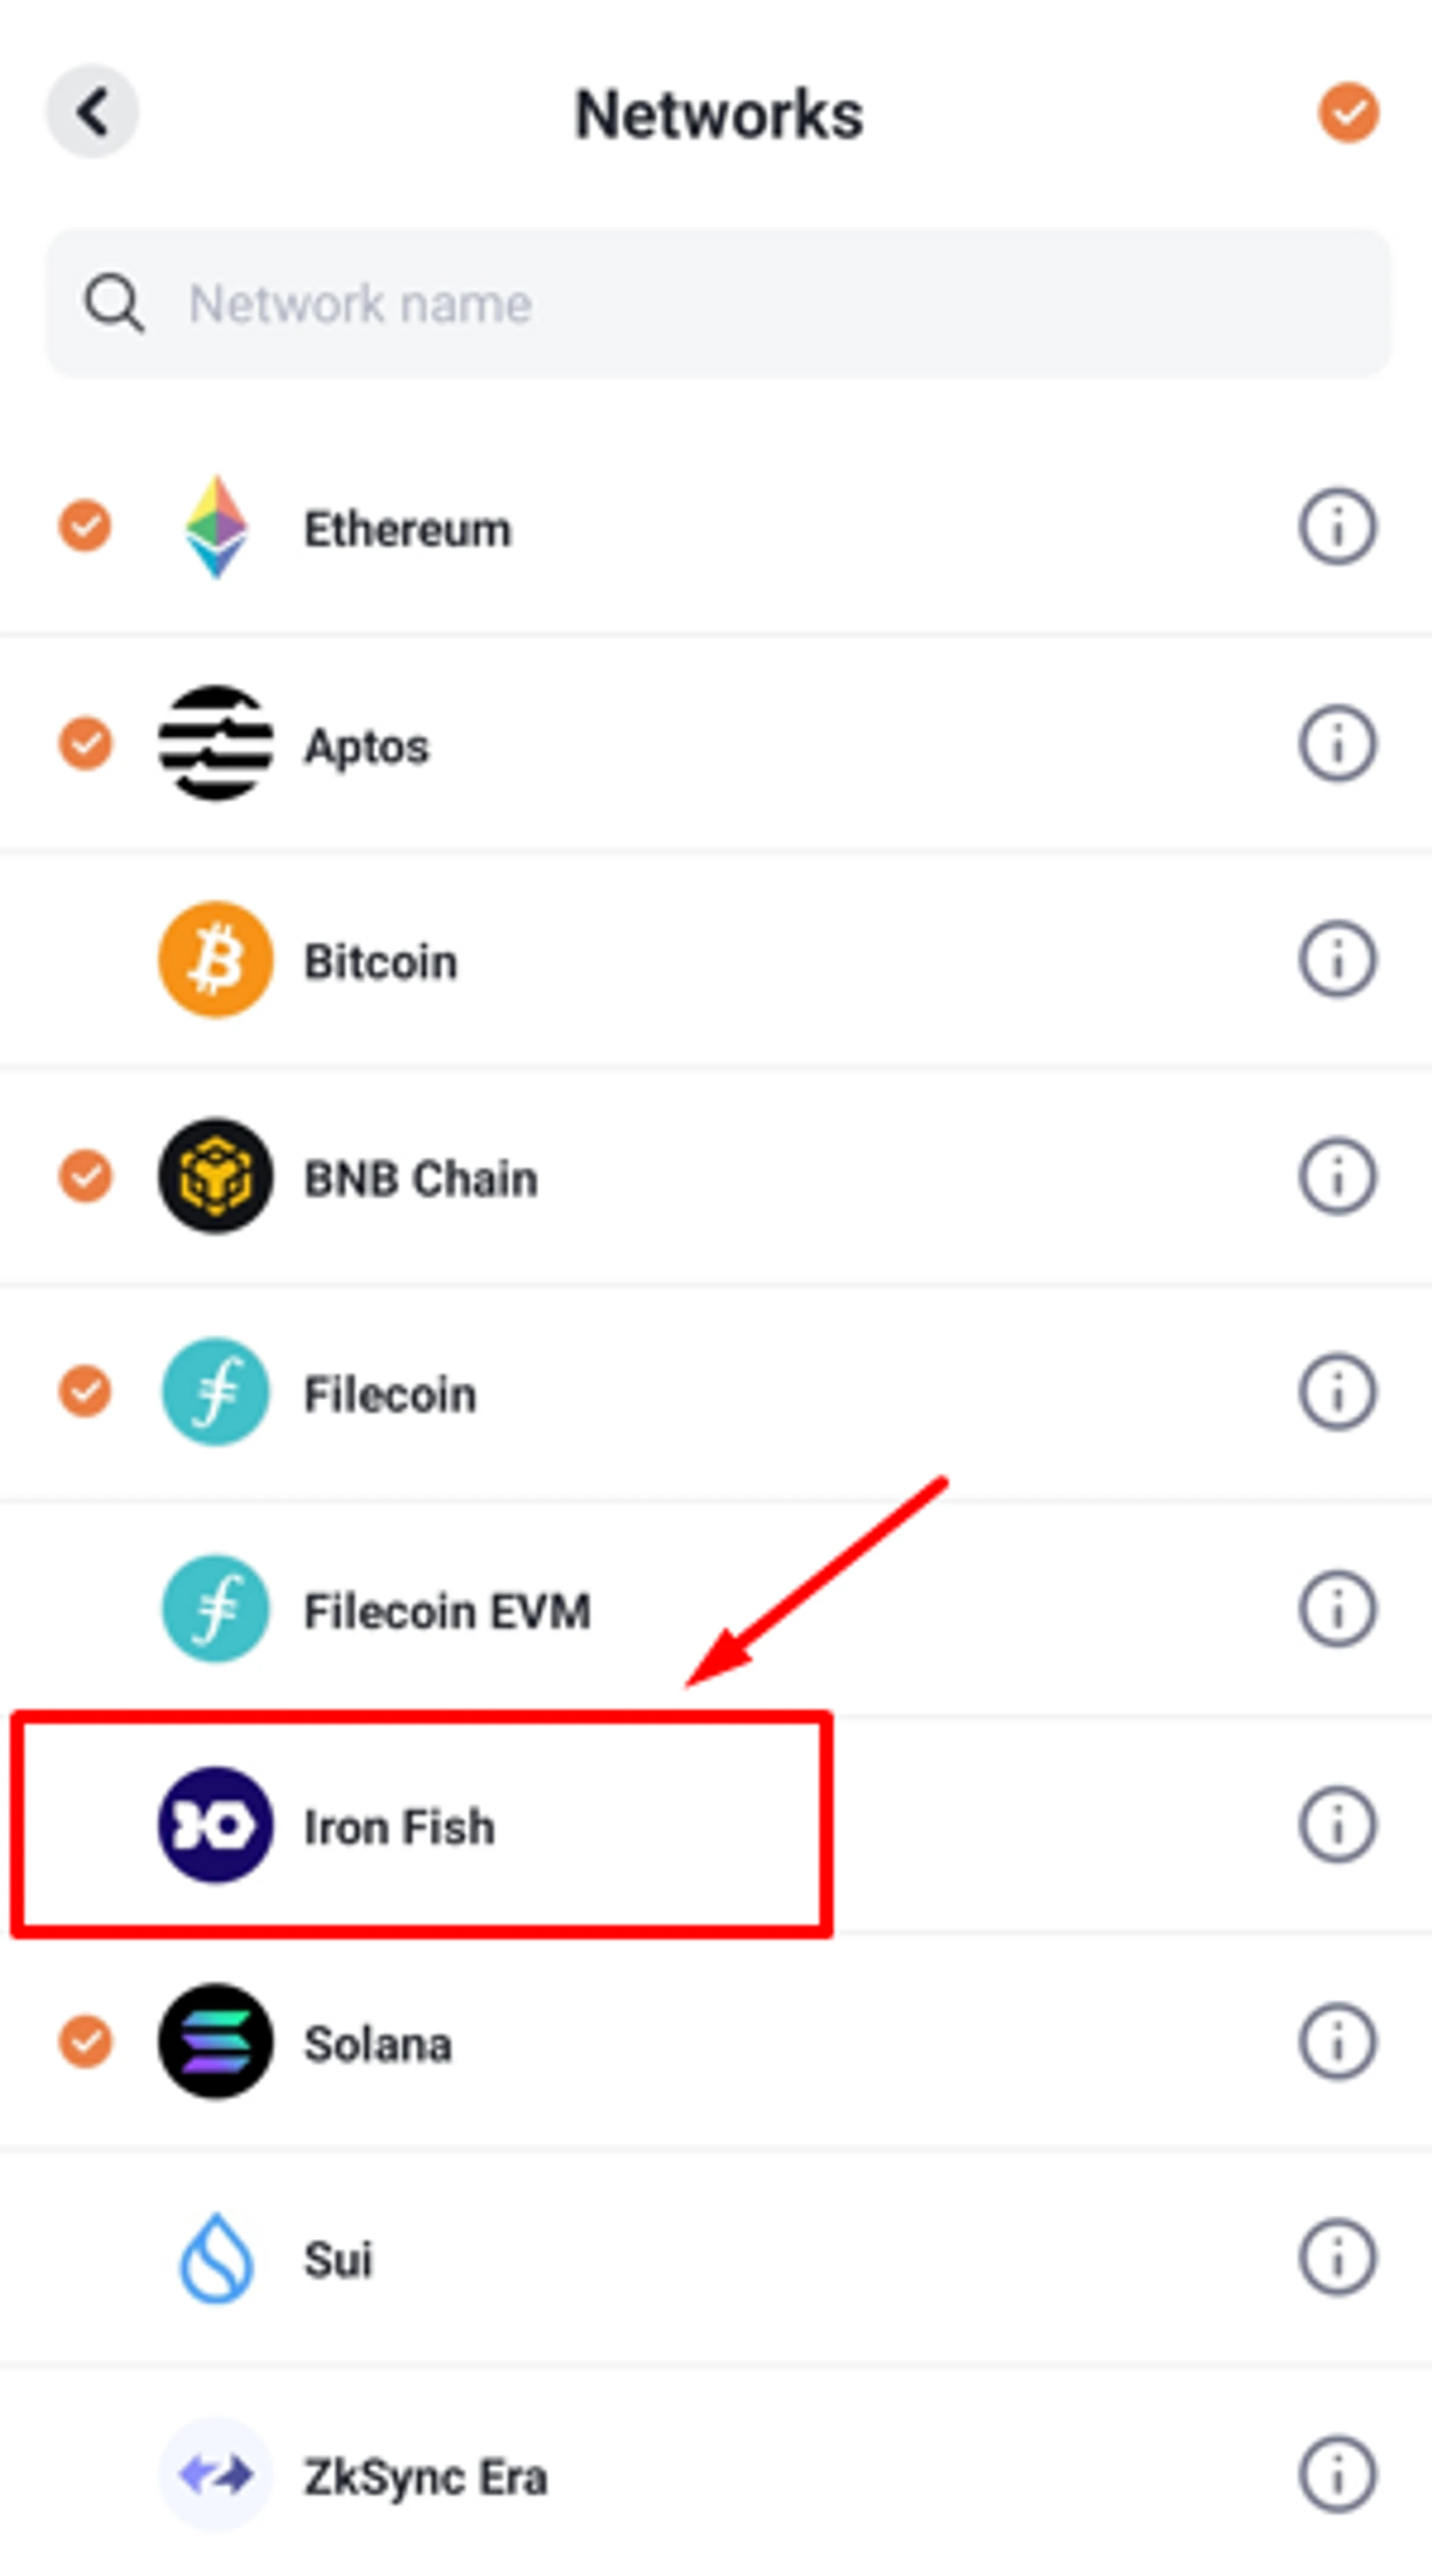
Select the network to work with the IRON FISH coin. Click on the coin icon in the top left corner, Select "Iron Fish" from the drop-down list;
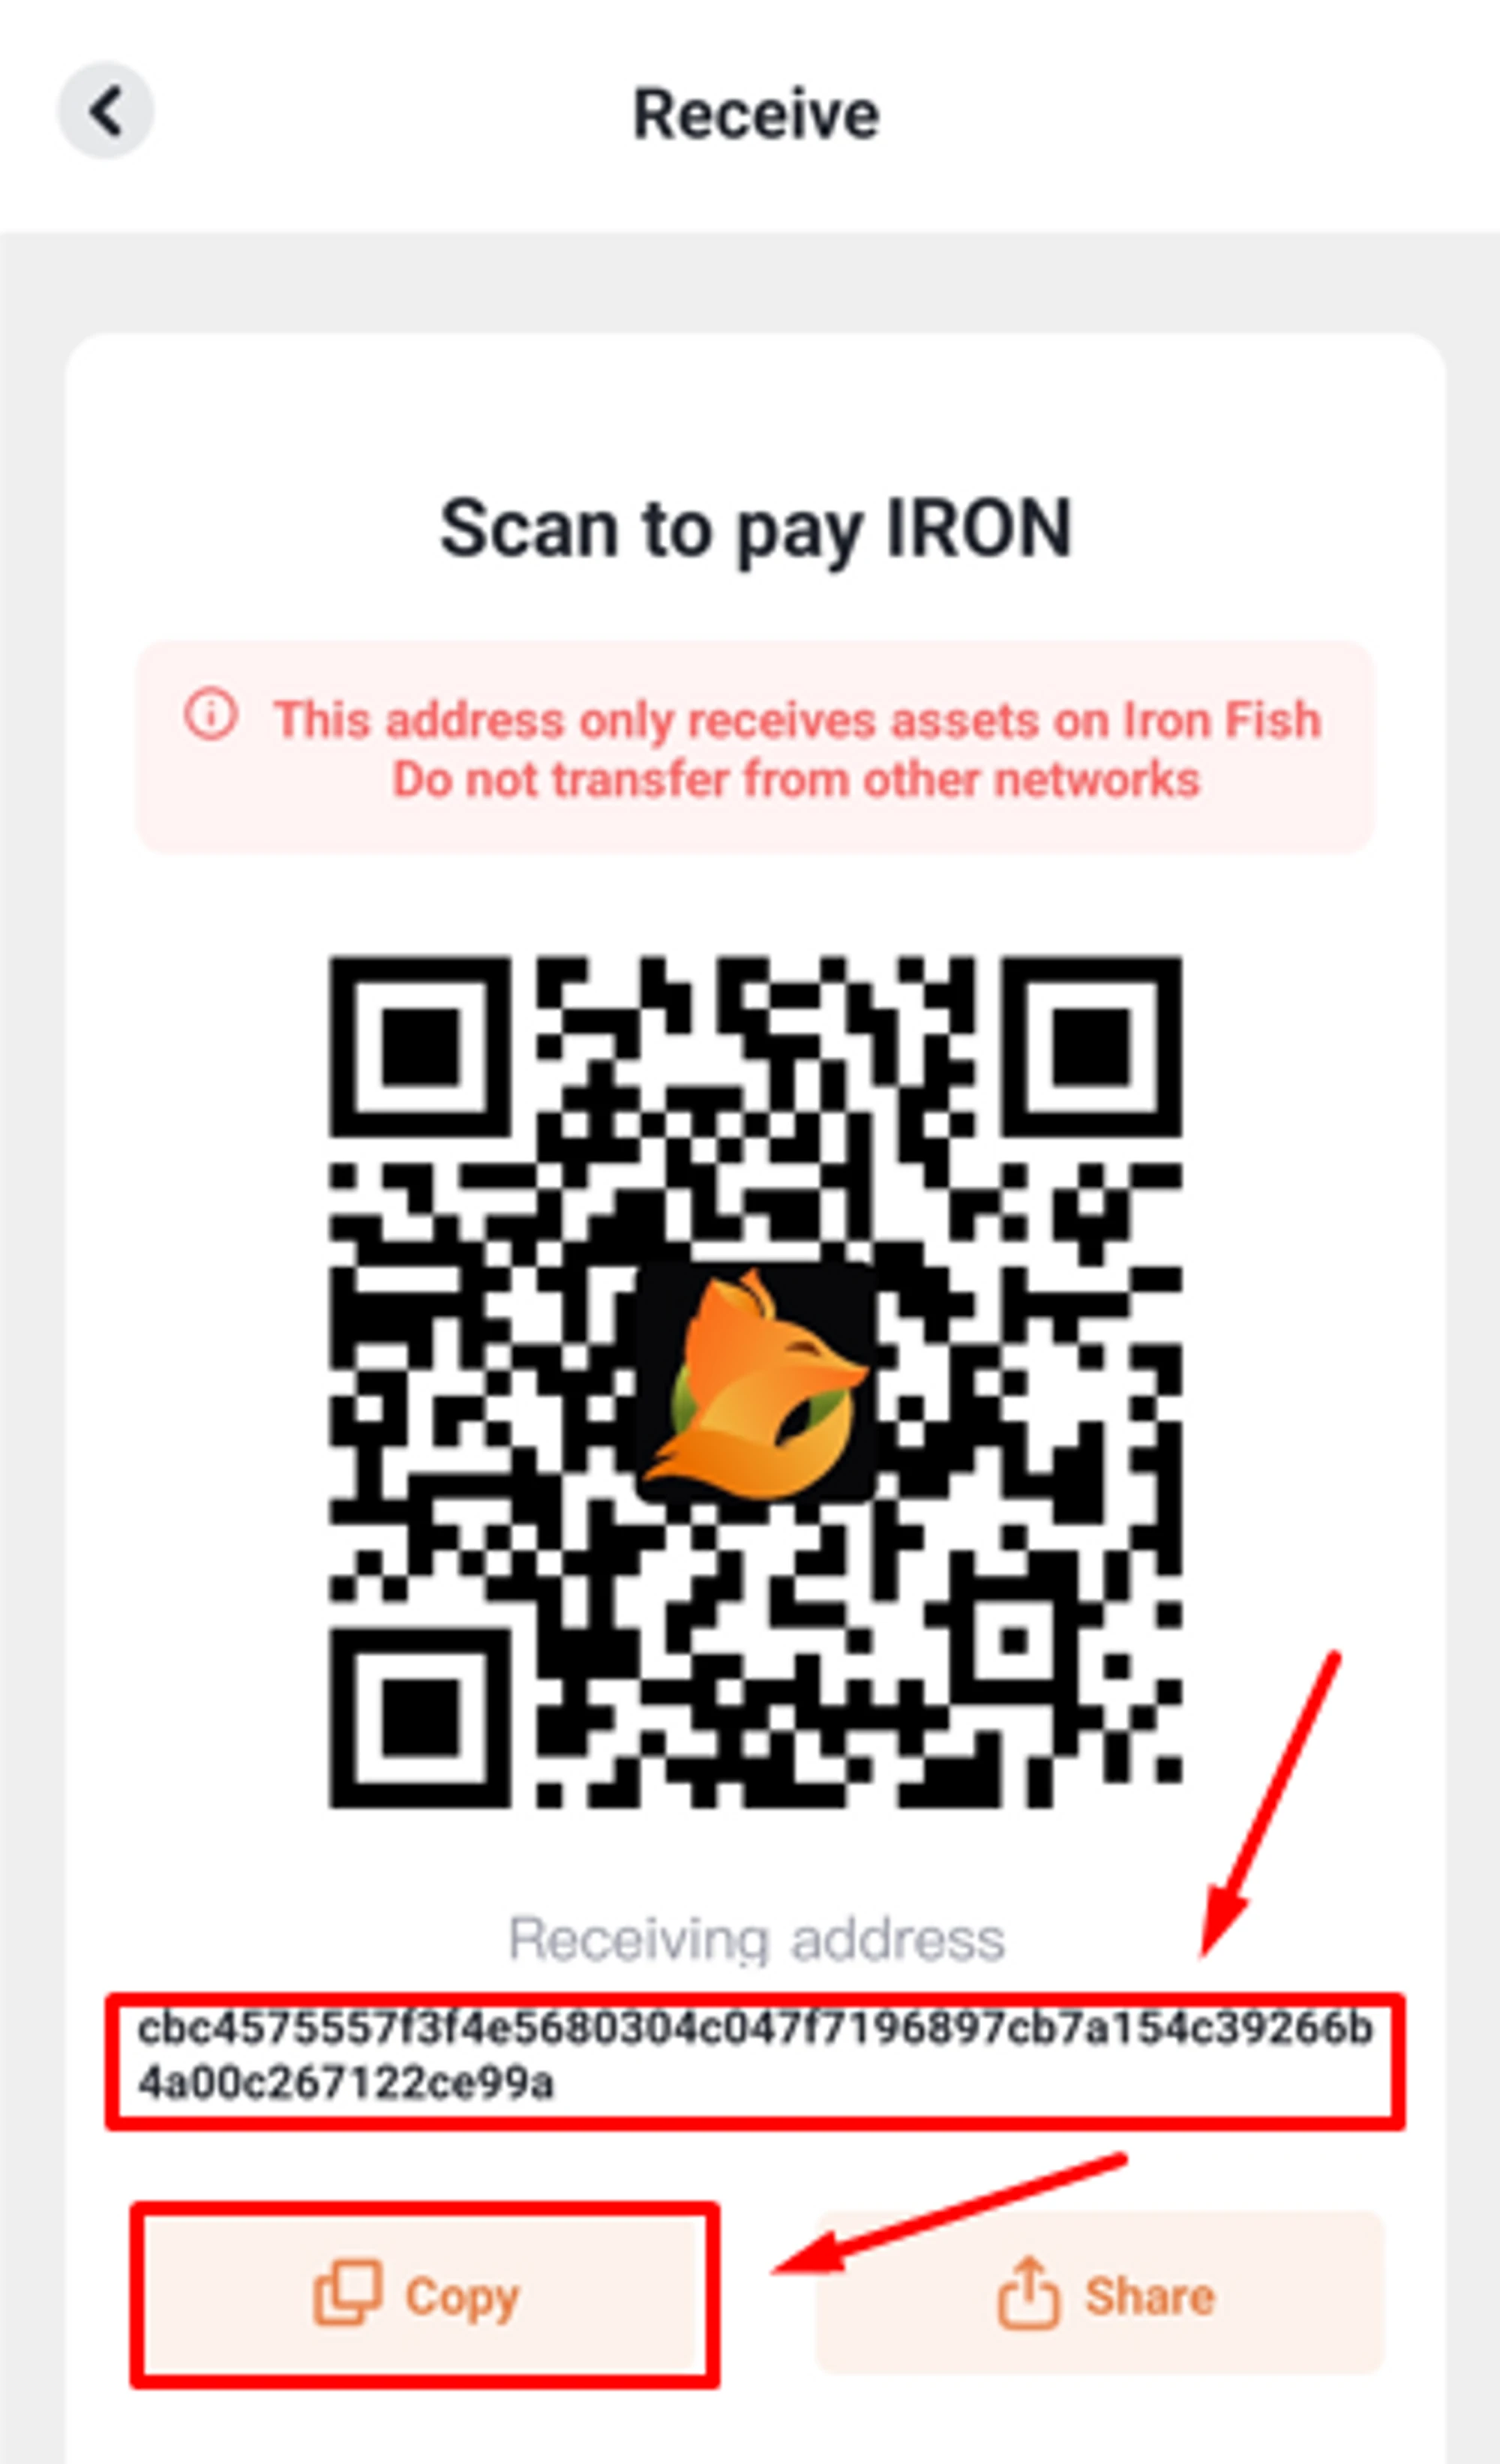
To get the wallet address: Click on the asset icon in the wallet → select "Receive";
Done! You will receive your IRON FISH wallet address. Click on the icon next to the wallet address to copy it. Use it for mining or receiving coins to your account.
How to Register a IRON FISH wallet on the Exchange
This method is convenient because you don’t need to register multiple wallets. Everything is stored on one exchange, and all coins and wallets are easily accessible. You can immediately exchange or trade your cryptocurrency without any hassle.
Some cons: The security of all your exchange wallets depends on the security of your exchange account. To ensure the utmost security, make sure to secure your email, exchange account, and enable two-factor authentication (2FA).
ATTENTION: This mining method can be dangerous if the exchange changes the wallet address or memo and you’re still mining. Funds can be irrecoverable. We also will not be able to change the address before payment. Use this method at your own risk. We recommend mining to your wallet: not your keys — not your crypto!
Register with any exchange that provides the option to trade Iron Fish (Gate.io is used in the example);
After signing up, select "Wallet" → "Deposit" → "Onchain";
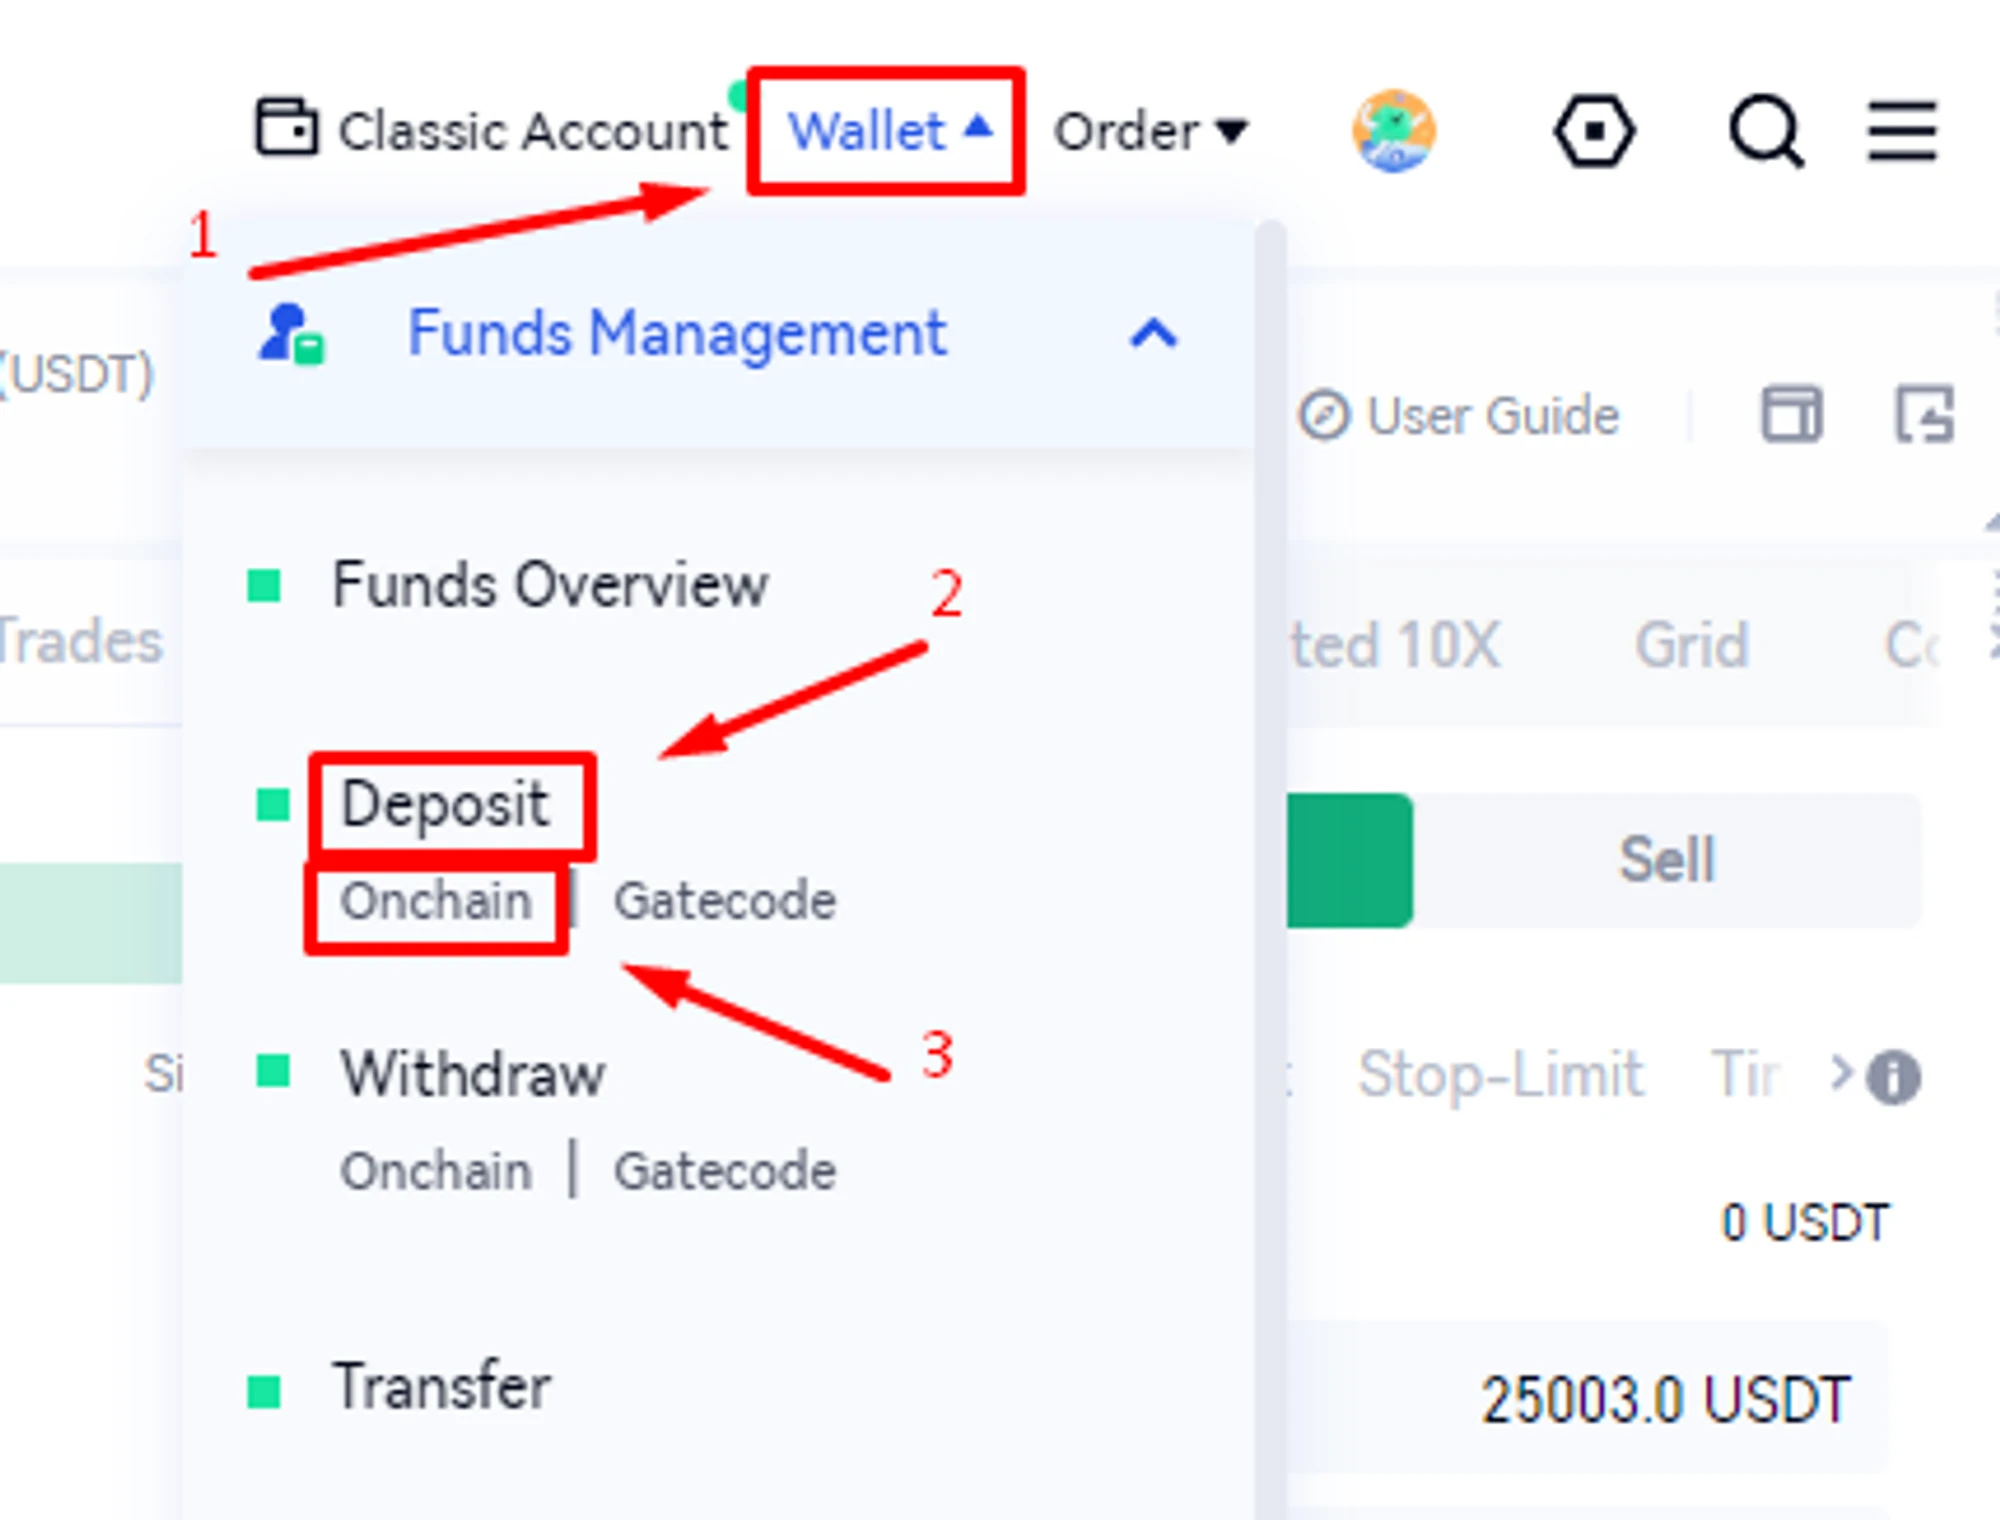
Select "Coin → IRON", "Network → IRON-IRON", get "Deposit Address" and “TAG” (Memo);
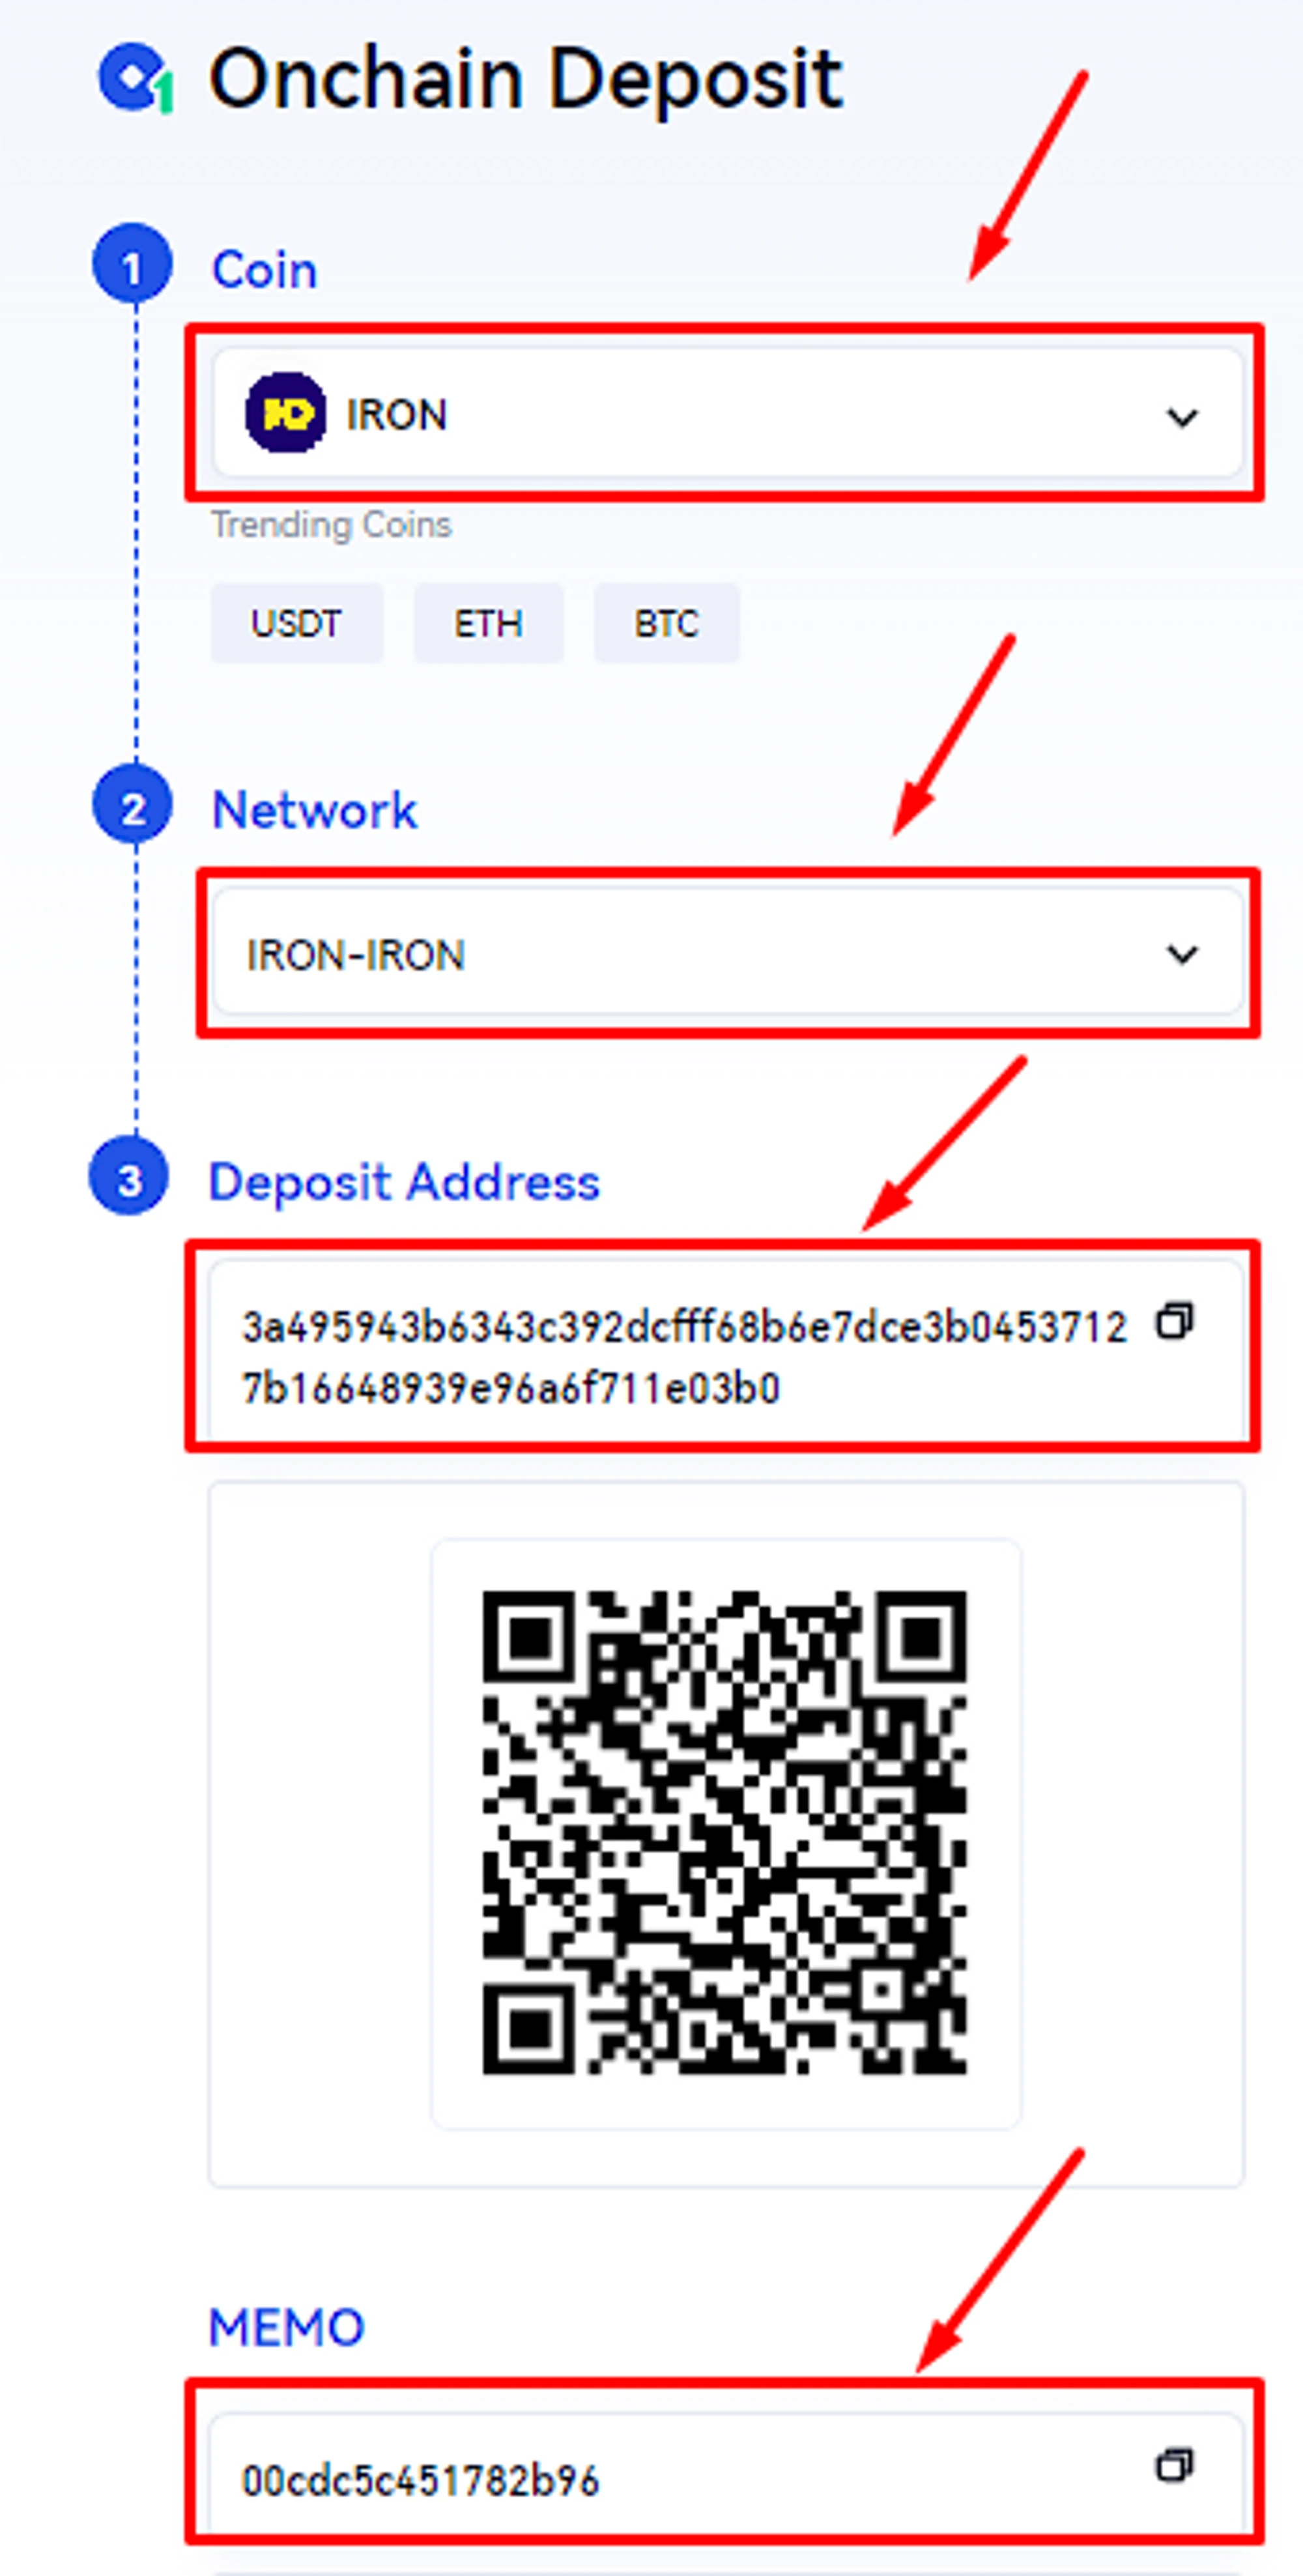
Done! You have got your wallet address and memo (tag) for deposits to the exchange.
When depositing an exchange wallet,
memo (tag)must always be specified, otherwise the deposit will not be received.
If you are planning to use an exchange wallet for mining, be sure to read our guide for mining on IRON FISH exchange wallets.