Overclocking GPU on Ubuntu Linux
30/3/2026
Ubuntu Linux might not be the most user-friendly operating system for mining and overclocking graphics cards. If you're in the process of selecting an operating system for mining and still need to familiarize yourself with the complexities of working on Linux, we suggest exploring other options.
For instance, Windows, HiveOS, or RaveOS could be better choices. The latter two are essentially Linux-based but are specifically optimized for mining and overclocking graphics cards. They come with user-friendly interfaces designed for regular users, incorporate various enhancements, and are straightforward to navigate.
However, if you're determined to pursue mining on Ubuntu Linux and have consciously decided, we're here to assist you! It won't be a walk in the park, but it will undoubtedly be an intriguing journey ✨.
Overclocking with Miner Arguments
Let's begin by exploring a straightforward method for overclocking: using miner arguments.
This method applies exclusively to miners that support overclocking commands on Linux. It's crucial to carefully read the miner's description to ensure compatibility with your specific graphics card, chosen algorithm, and Linux overclocking capabilities.
- Each miner comes with its unique set of commands for overclocking. It's vital to be attentive to the specific command required for each miner.
- The miner.download website offers top-notch miners, comprehensive miner commands, and usage scenarios.
- Detailed instructions on downloading, configuring, and running a miner can be found in the article "Mining on Ubuntu Linux."
This discussion will focus on overclocking your graphics card using the lolminer.
lolminer is compatible with various algorithms and supports various graphics card manufacturers, including Nvidia, AMD, and Intel ARC.
Overclocking Your Graphics Card on Linux with a Shell Script
Regarding overclocking, the fundamental commands involve adjusting your graphics card's core frequency, memory frequency, and power limit. Remember that these settings will differ based on your specific graphics card and the algorithm you're using. For personalized overclocking profiles tailored to your graphics card, refer to our Overclocking Database.
This guide will demonstrate how to overclock the Nvidia RTX 3060 Ti graphics card for the NEXA algorithm.
Navigate to the folder containing the downloaded miner.
Open the shell script (
shfile) corresponding to the cryptocurrency you intend to mine.Insert the overclocking commands after the wallet address and worker name, separated by spaces. *In this example, we'll overclock the core by 100 MHz, set the memory frequency to 5000 MHz, and limit power consumption to 160 Watts.
--cclk 100— increases the core frequency by 100 MHz.--mclk 5000— sets the memory frequency to 5000 MHz.--pl 160— limits the power consumption of the graphics card to 160 Watts.For a comprehensive list of commands tailored to miners, algorithms, and graphics cards, visit miner.download, the “Instructions” page. It provides detailed information on essential commands for various miners and scenarios.

Save the file with your changes. Open the terminal from your miner folder, use the command
suorsudo suto gain administrator privileges, and enter your account password.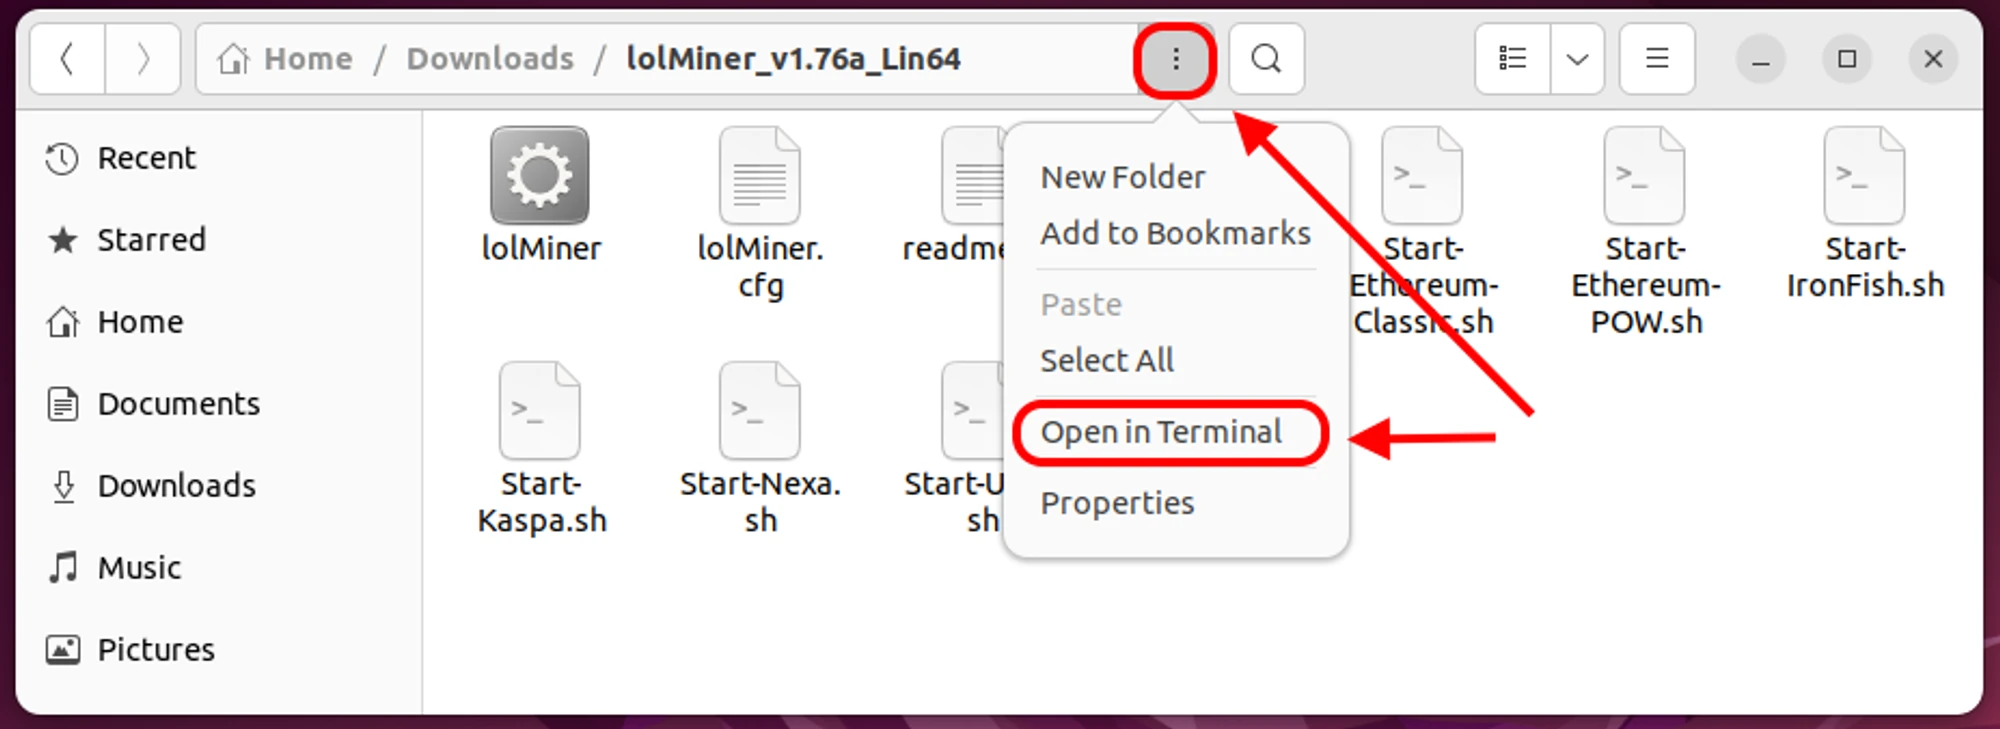
Launch the miner by executing the command
./Start-Nexa.sh. The miner will initiate using the settings from yourStart-Nexa.shscript. In the miner window, you'll notice that the specified overclocking settings have been applied.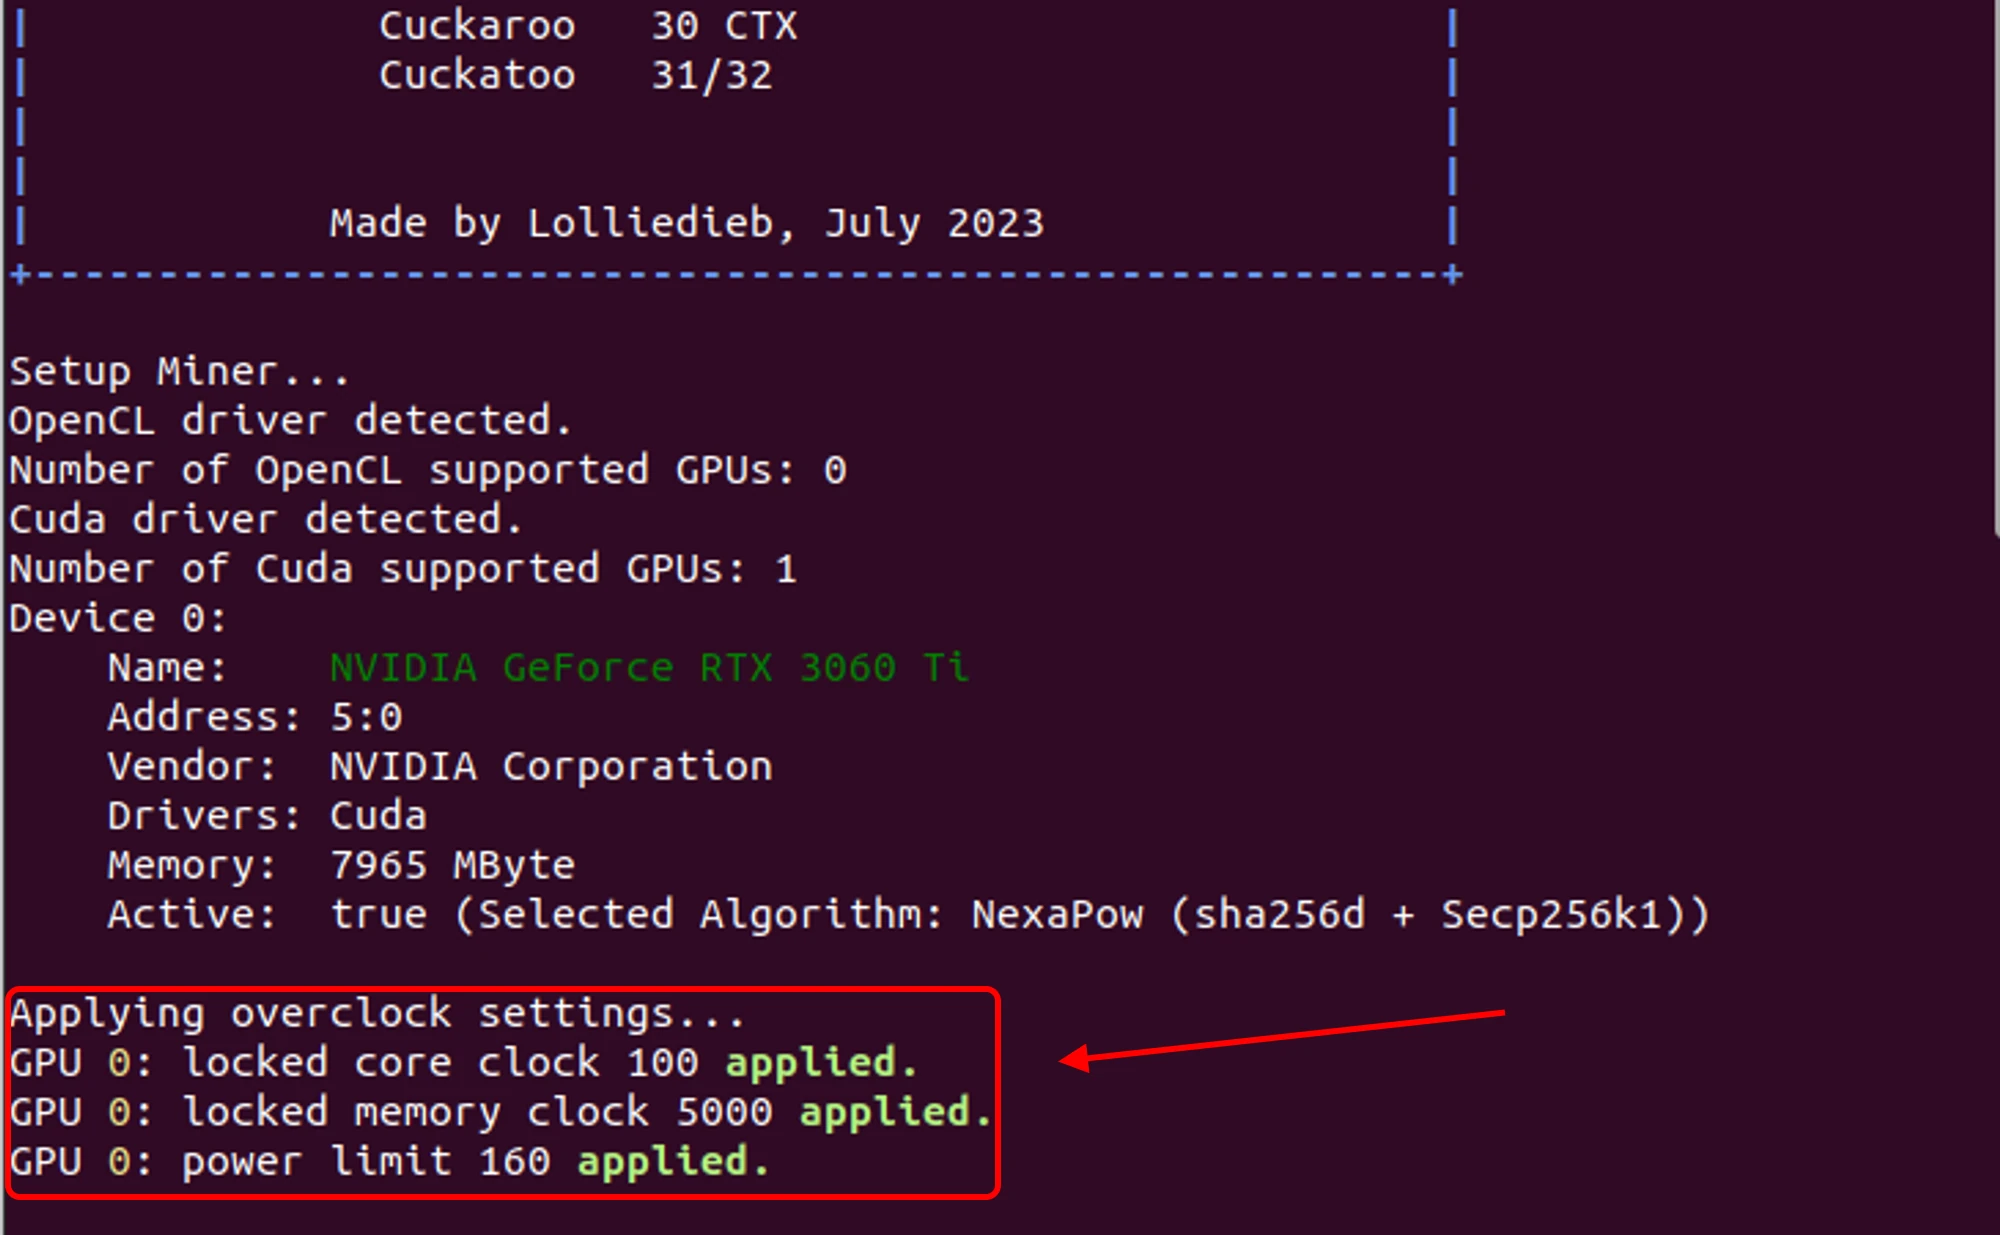
Overclocking Your Graphics Card on Linux via Terminal
Open the terminal from your miner directory.
Use the command
suorsudo suto gain administrator privileges and enter your account password.Enter the miner start command in the terminal, adding the overclocking commands after the wallet address and worker name, separated by spaces. *For example, let's increase the core clock by 100 MHz, set the memory frequency at 5000 MHz, and cap the power consumption at 160 Watts.
--*cclk 100— increases the core clock by100MHz.--mclk 5000— sets the memory frequency at5000MHz.--pl 160— limits the graphics card power consumption to160Watts.
Example:./lolMiner --algo NEXA --pool nexa.kryptex.network:7026 --user nexa:nqtsq5g5ufvngn8yc2va8nf0ru4mq2d8kh0vr4zzvchqhsy6/MyFirstRig --cclk 100 --mclk 5000 --pl 160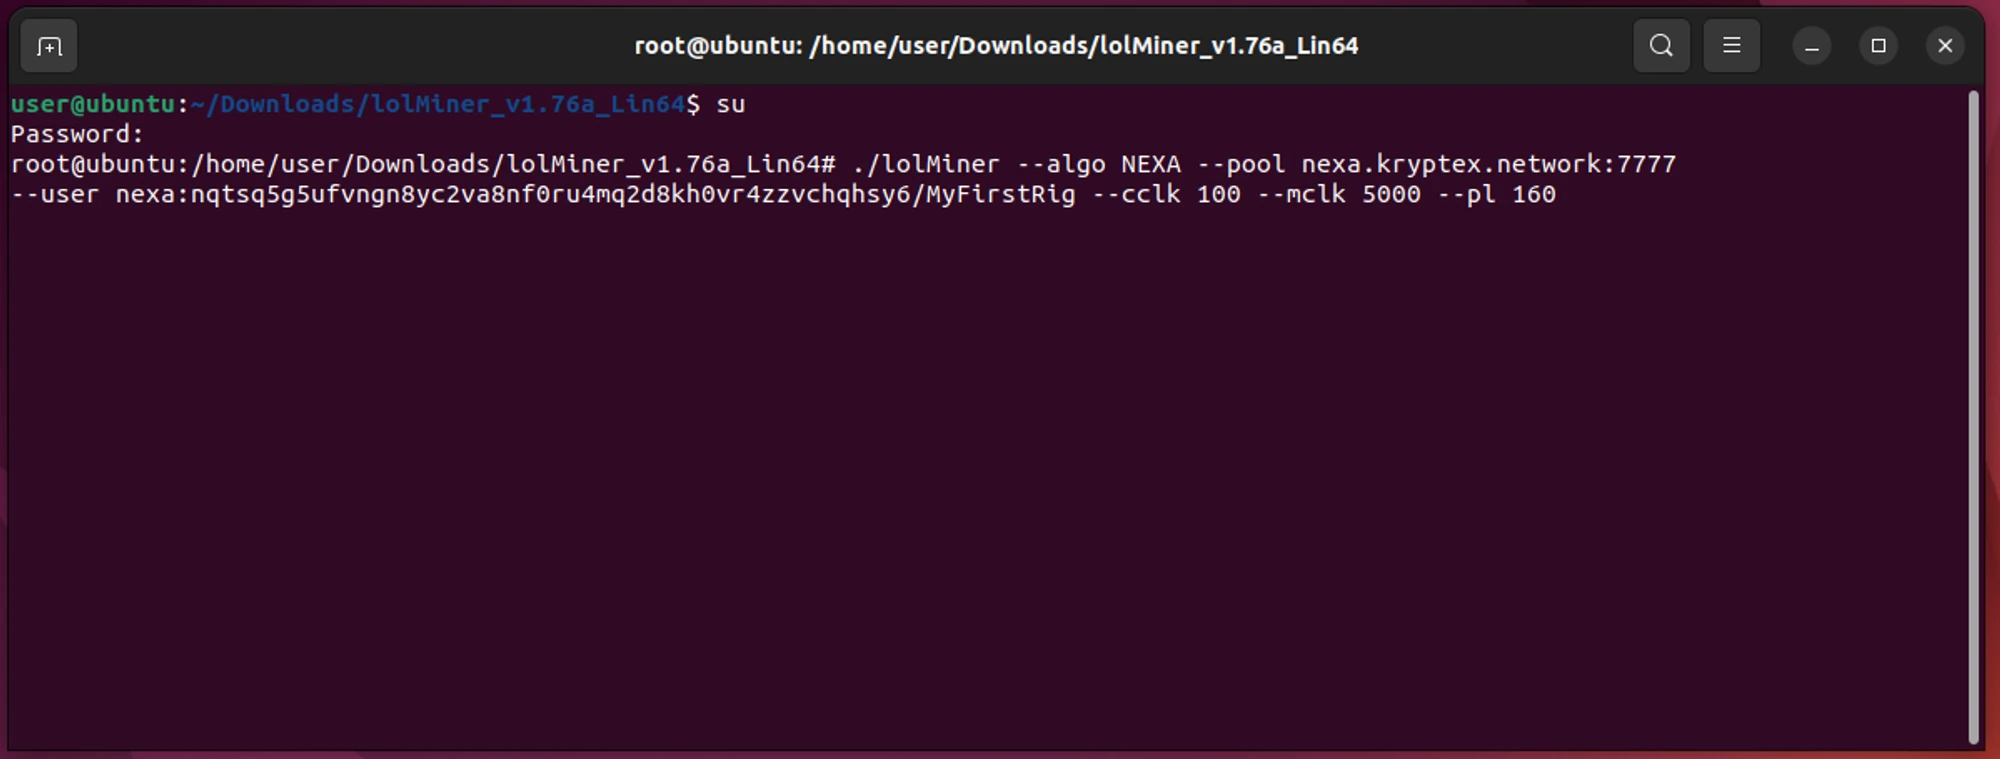
Press Enter, and the miner will initiate with the specified settings, applying your overclocking configurations.
Overclocking NVIDIA Graphics Cards Using nvidia-settings
This method requires expertise in working with Linux. The effectiveness of this method hinges on your system's driver type and version. We recommend using the argument method for the miner.
Open the terminal by pressing
Ctrl+Alt+T.Execute the command
suorsudo suto gain administrator privileges and enter your account password.Open the
xorg.conffile usingsudo nano /etc/X11/xorg.conf.Locate the sections
Section "Device"andSection "Screen"within the file.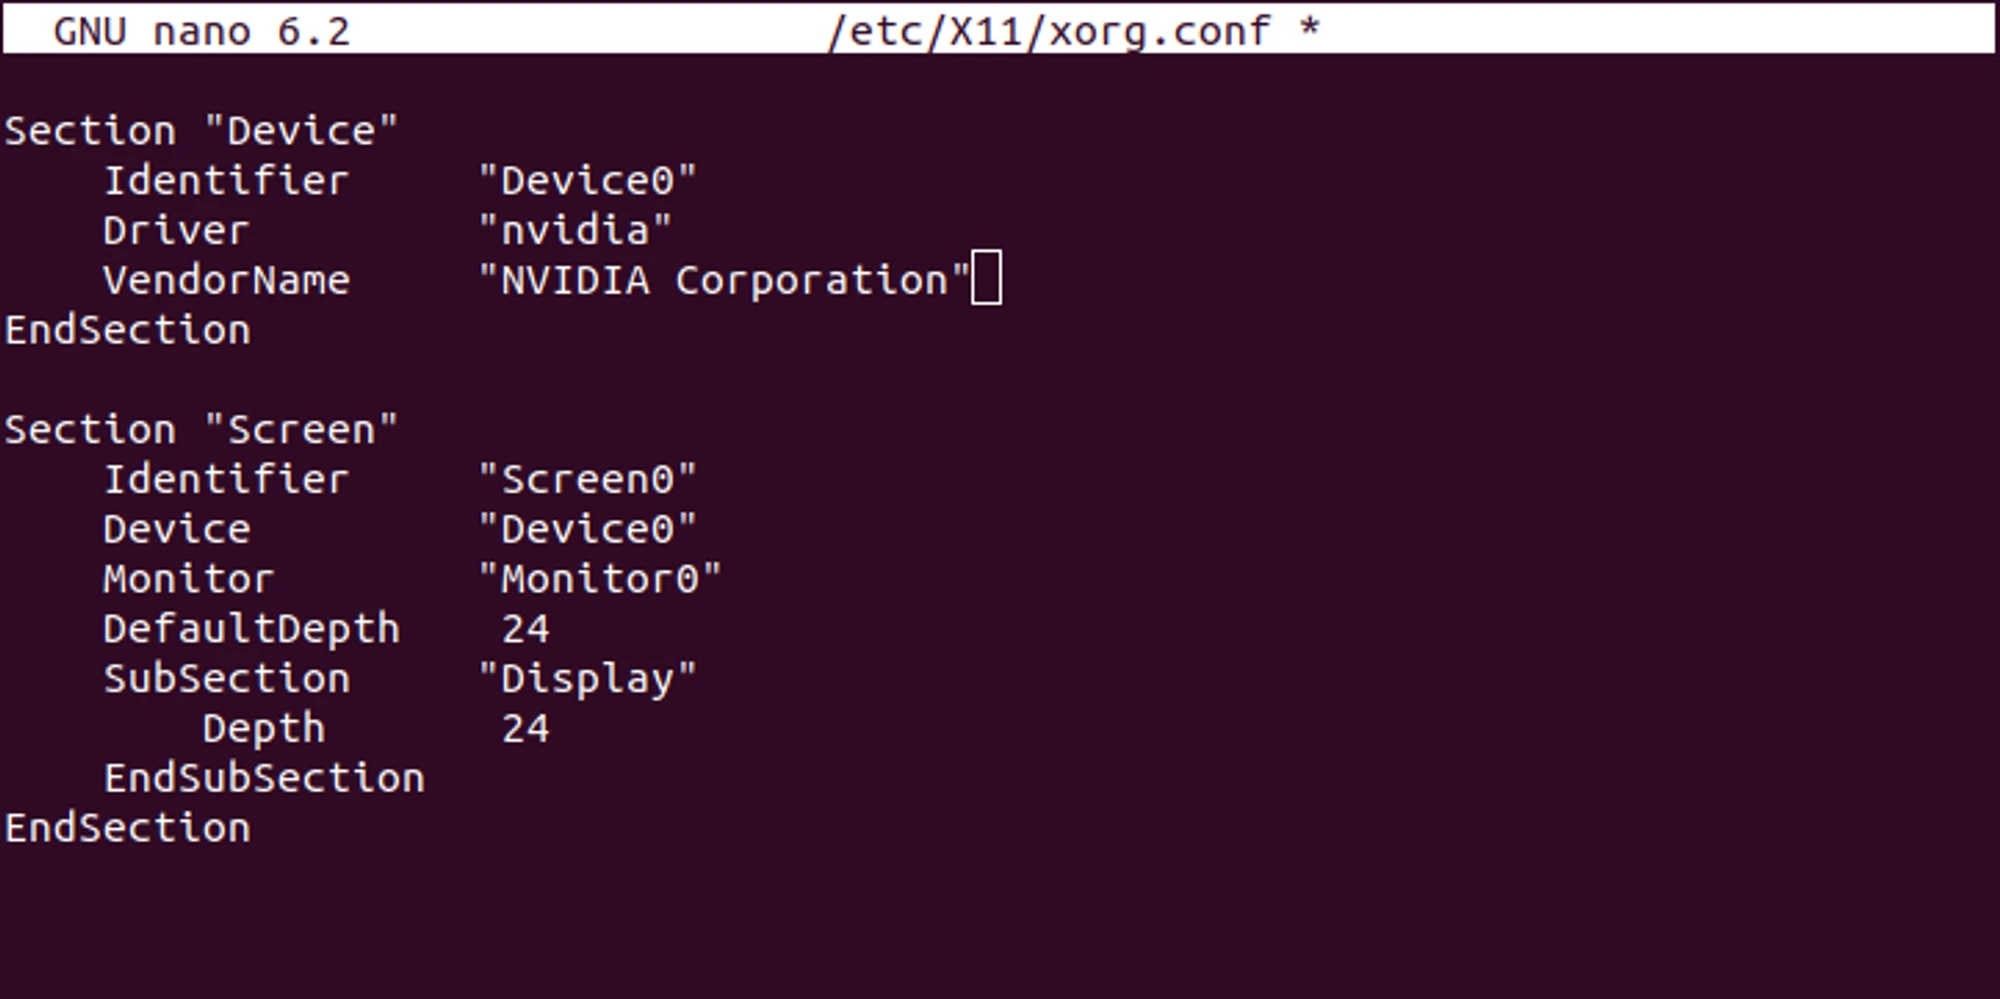
Add the following setting to both sections, as shown in the screenshot:
Option "Coolbits" "12"
Save the changes to the file by pressing
Ctrl+Sand close the file withCtrl+X.Restart your computer.
Reopen the terminal using
Ctrl+Alt+T.Execute the command
suorsudo suto gain administrator privileges and enter your account password.Run the command
nvidia-settings.The
nvidia-settingswindow will open. Navigate to thePowerMizertab.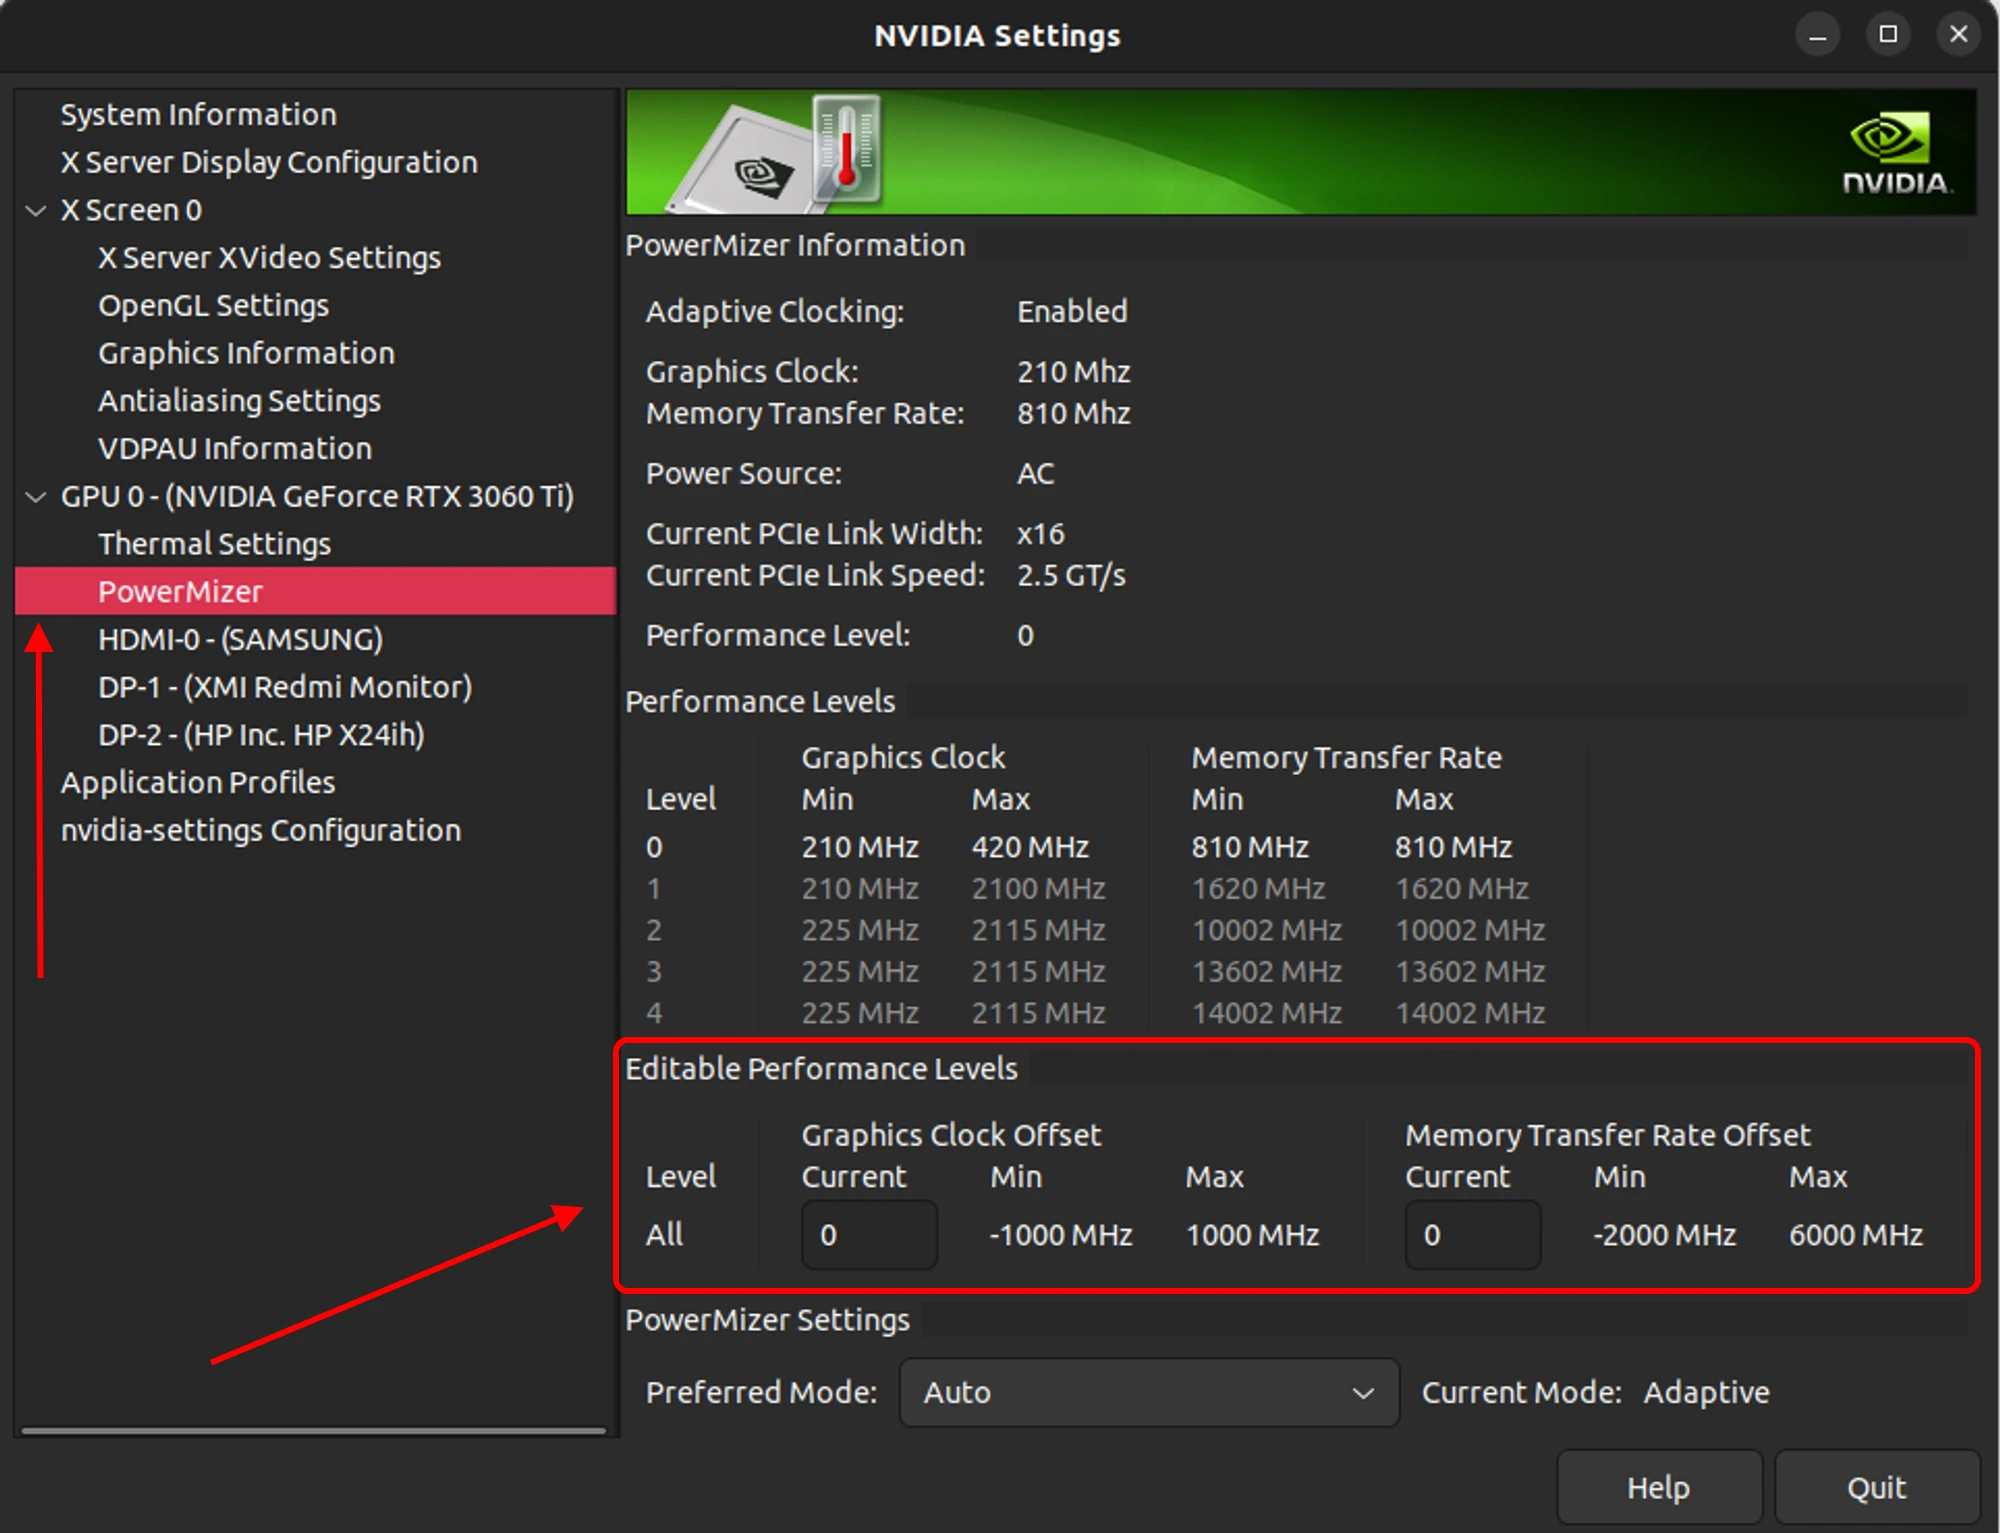
Input your desired settings in the
Editable performance levels.
Close the program after making the adjustments.
Launch the terminal and execute the command
nvidia-smi -i 0 -pl 140if you wish to change the Power limit.-i 0— refers to the graphics card number (counting starts from zero).-pl 140— sets the power consumption limit in watts. For example,140means 140 Watts.Done! Your configured settings will be applied to your video card until you modify them again in the
nvidia-settingsprogram.
Overclocking AMD using radeon-profile
This method requires experience working with Linux. The success of this method will depend on the type and version of the driver you have installed. We recommend using the method with arguments for the miner.
Open the terminal using
Ctrl+Alt+T.Execute the command
suorsudo suto grant administrator privileges and enter the account password.Paste the following commands into the terminal and then press Enter:
apt-get install mesa-utils
add-apt-repository ppa:radeon-profile/stable
apt-get update
apt-get install radeon-profile
Once the installation is complete, you will see
Radeon Profilein the list of applications. You can open it from there or execute the commandradeon-profile.After the
Radeon Profileis opened, go to theOverclocktab by clicking on it in the bottom part of the program.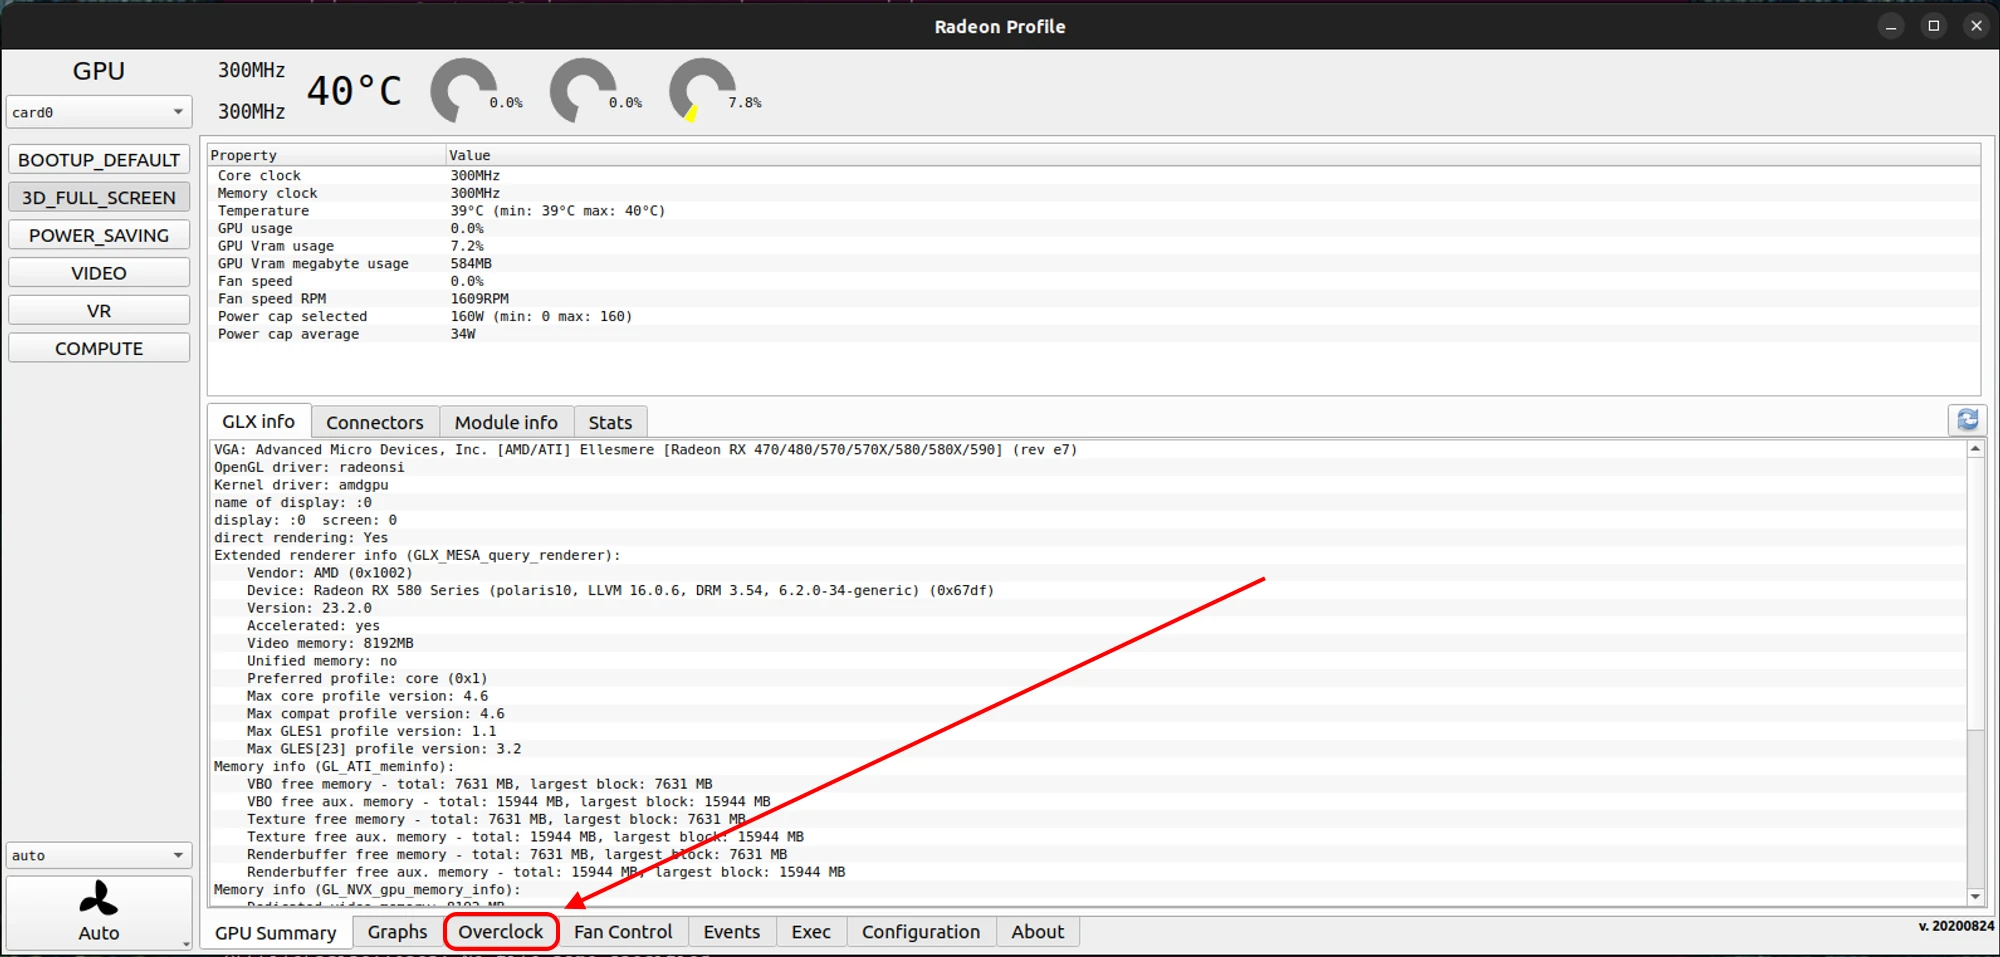
Enable
Percent overclockand overclock your graphics card.Please note that overclocking is done in percentages. For example, to overclock an RX 580 by 100 MHz, you need to divide 100 MHz by its maximum frequency of 1340 MHz, resulting in 7.5%. You can find the maximum core frequency of your graphics card in the
Overclocktab under theManual Frequency controlsection, number7, or for video memory, number2.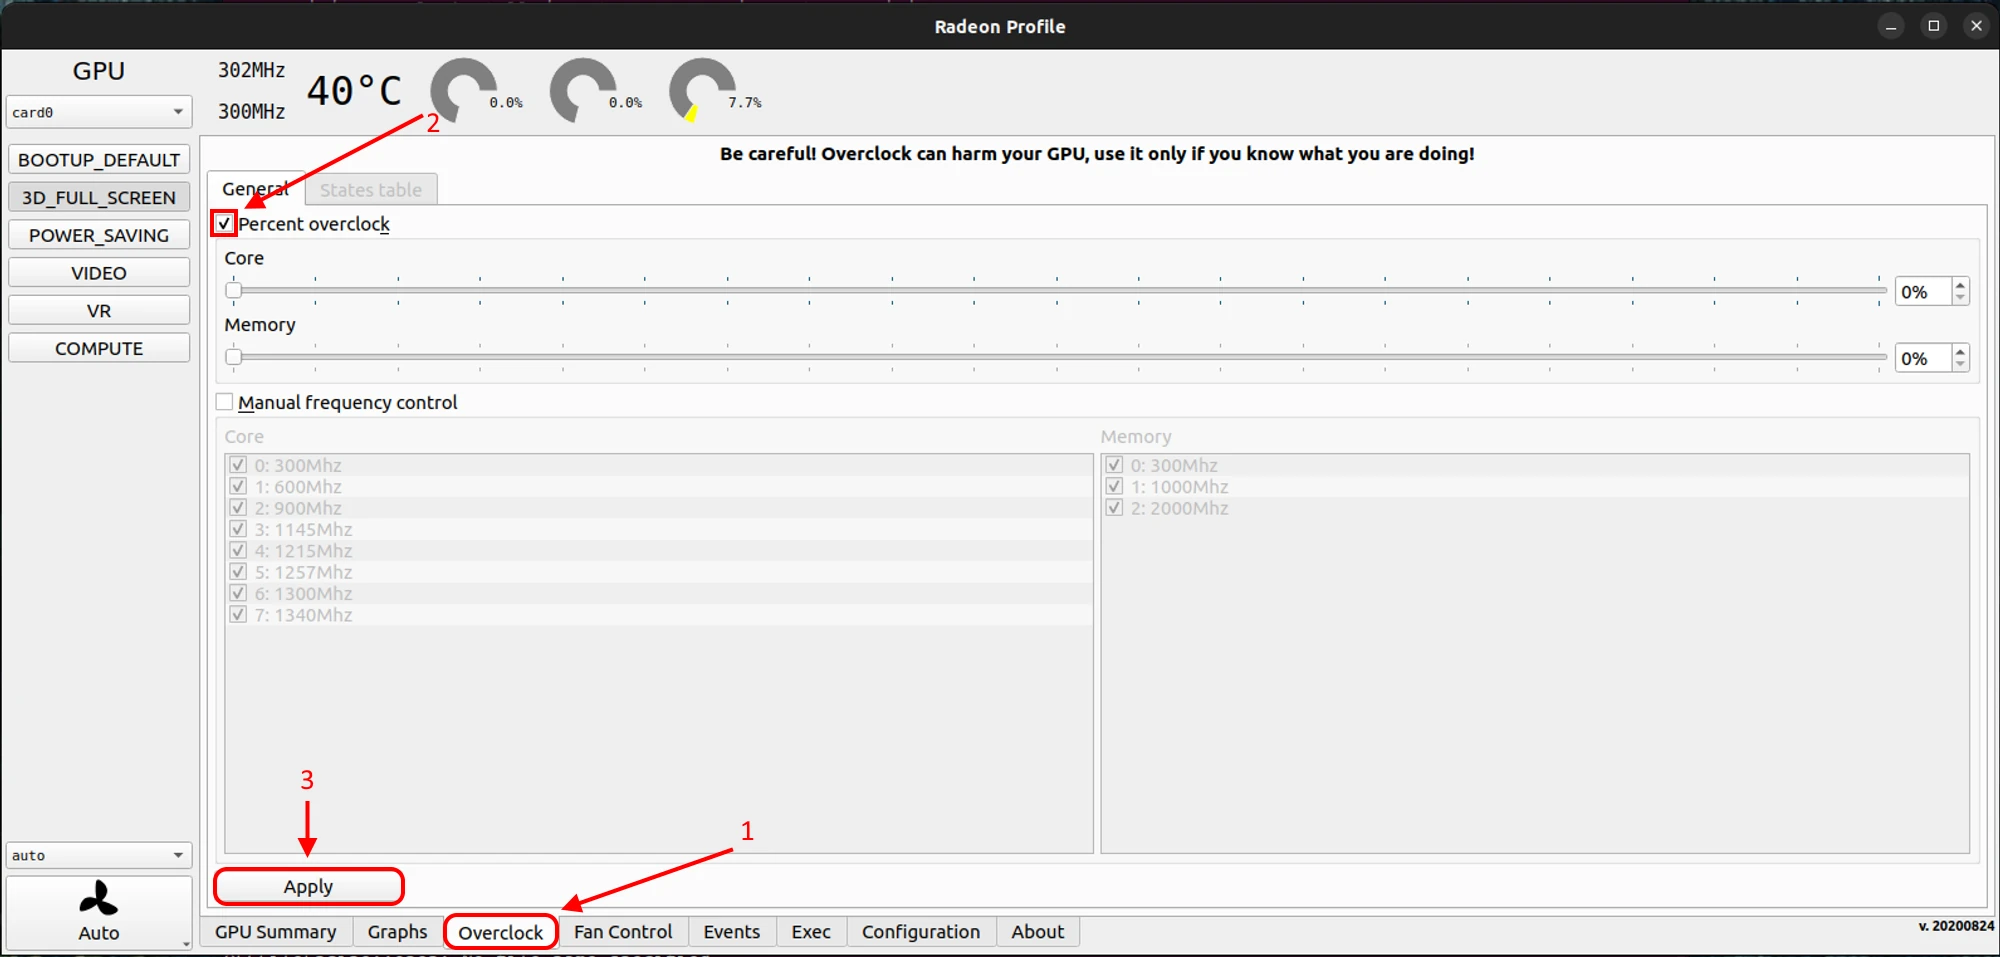
After all is done, press
Applyto apply the changes you made. Ready! Your settings will be used for your video card until you change them in theRadeon Profileprogram.
Overclocking AMD Graphics Cards with CoreCtrl
Please note that this method requires Linux expertise. Its success depends on your installed driver's type and version. We recommend utilizing the argument method for the miner.
Open the terminal using
Ctrl+Alt+T.Run the command
suorsudo suto grant administrator privileges and enter your account password.Add the repository with the command
add-apt-repository ppa:ernstp/mesarc.Update the package versions with the command
apt update.Install
CoreCtrlby executingapt install corectrl.Add the program to autostart with the command
cp /usr/share/applications/org.corectrl.corectrl.desktop ~/.config/autostart/org.corectrl.corectrl.desktop.Run the command
pkaction --versionand note the version.Create a file using
sudo nano /etc/polkit-1/localauthority/50-local.d/90-corectrl.pkla.If the version displayed by the command
pkaction --versionis older than0.106, insert the following settings into the file. Replaceyour-user-groupwith your user group name (usually the same as your username), which you can find usingid username:[User permissions] Identity=unix-group:your-user-group Action=org.corectrl.* ResultActive=yesIf the version is newer than
0.106, insert these settings into the file, replacingyour-user-groupwith your group:polkit.addRule(function(action, subject) { if ((action.id == "org.corectrl.helper.init" || action.id == "org.corectrl.helperkiller.init") && subject.local == true && subject.active == true && subject.isInGroup("your-user-group")) { return polkit.Result.YES; } });Save the file using
Ctrl+Sand exit by pressingCtrl+X.Open the file
sudo nano /etc/default/grub.Find the line
GRUB_CMDLINE_LINUX_DEFAULT=and addamdgpu.ppfeaturemask=0xffffffff"at the end as shown in the screenshot.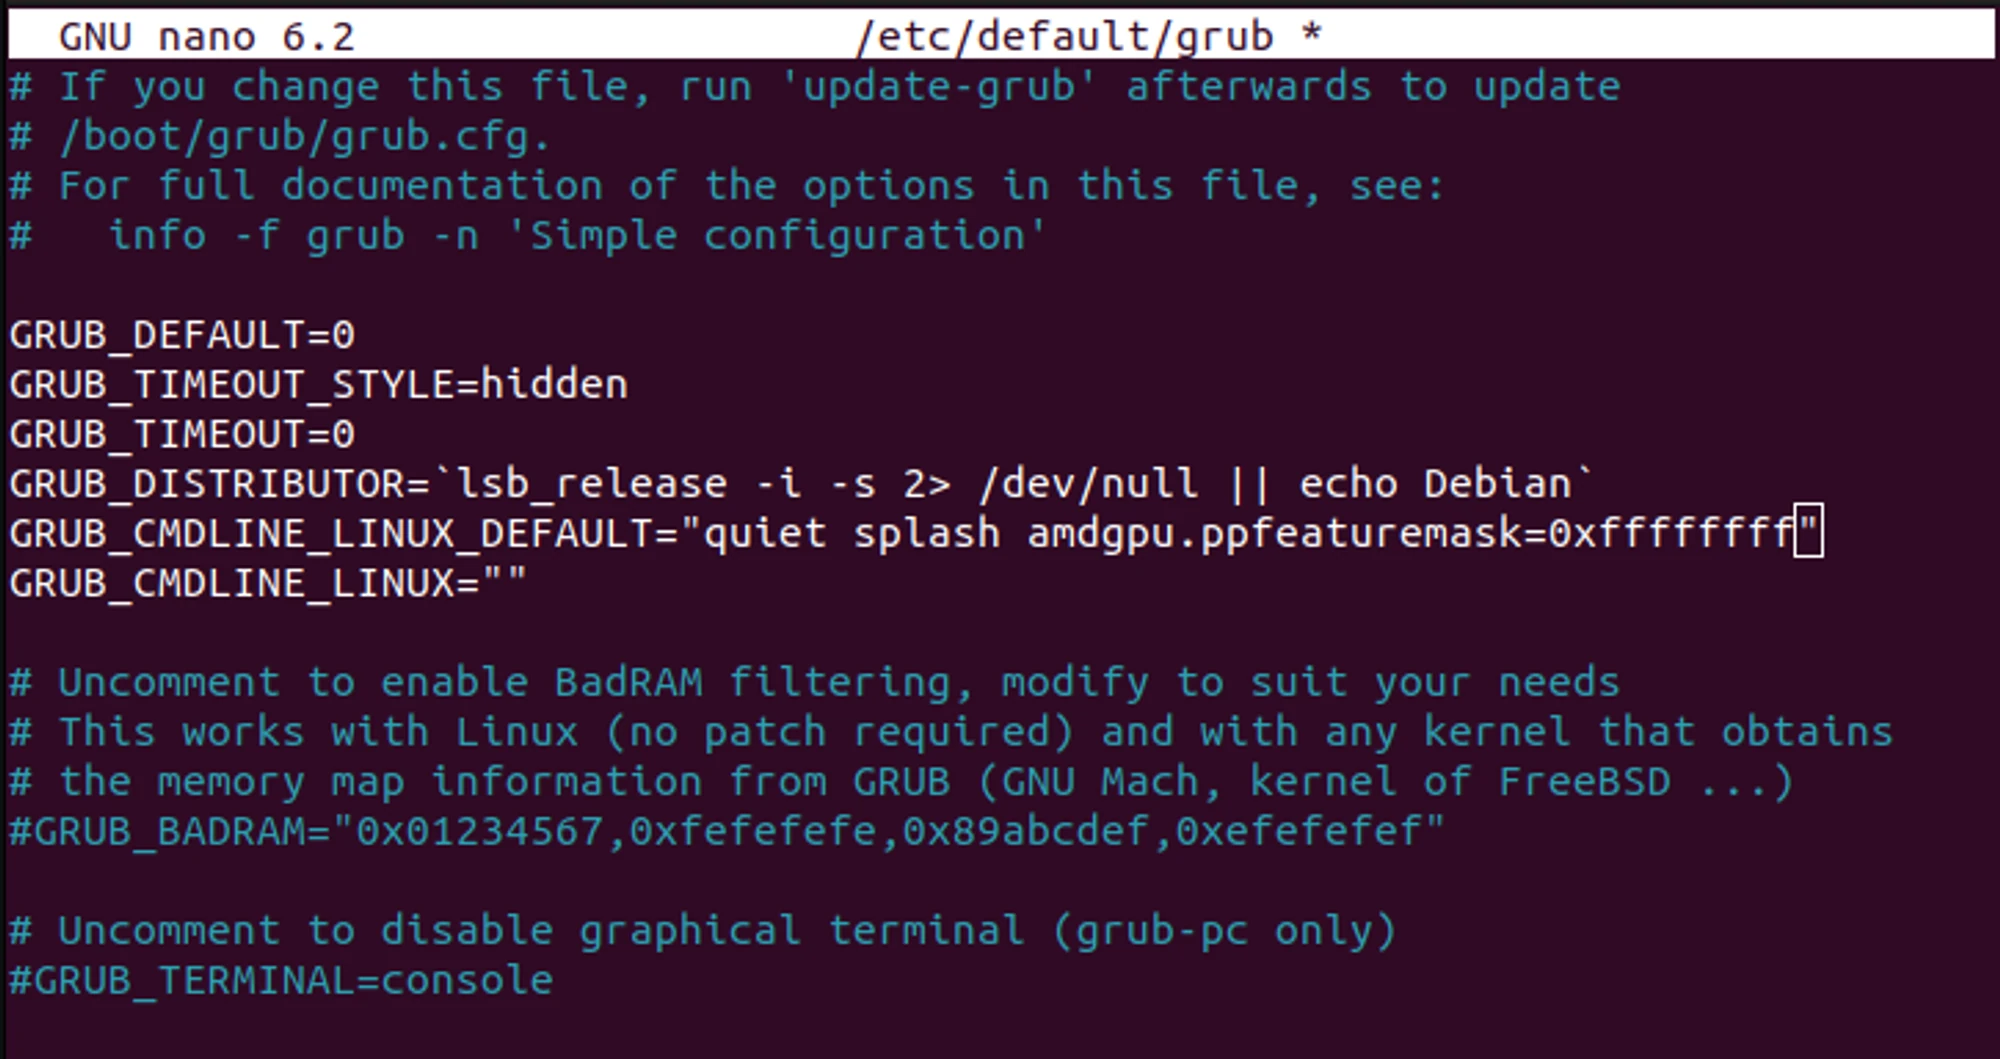
Save the file using
Ctrl+Sand exit by pressingCtrl+X.Run the command
grub-mkconfig -o /boot/grub/grub.cfg.Restart your computer.
Open the
CoreCtrlprogram.In the
Profilestab, create a new profile and overclock your graphics card.Done! Your configured settings will be applied to your video card until you modify them in the created profile.
🚑Need help?
Something does not work?
Our friendly community and experienced support will be happy to help you!
Contact us throw the website support, in Telegram, or ask for help on our Discord.